The post 6 DIY Titles to Get Your Creative Juices Flowing appeared first on Creative Sides.
]]>In the world of Pinterest and Instagram, Etsy and YouTube, you would think that there are enough online sources for inspiration to satisfy any creative dry spell. Maybe I’m old-fashioned, but there is just something about the tactile experience of glossy pages filled with beautiful photography beneath my fingertips to get my DIY mojo back on track. You don’t even have to leave home to enjoy these page-turners, you can order them online! I love books of all genres, but today I’m sharing titles to jumpstart your left brain activity.
Top DIY Books (and the online bookstore where you can find them)

1. THE DIY HOME PLANNER: PRACTICAL TIPS AND INSPIRING IDEAS TO DECORATE IT YOURSELF
This book is not just filled with beautiful inspiration. It also has handy pockets for paint chips and fabric swatches, style guides, decision trees, and reference guidelines to help with every decision, PLUS frameable prints to get your wall decor game on point.

2. SEW SUBVERSIVE: DOWN AND DIRTY DIY FOR THE FABULOUS FASHIONISTA
Calling all style icons, this is the book for you! Whether you’re creating an outfit from scratch, or ‘refashioning’ and old look to give it new life, grab your scissors and your sewing machine and get ready to be inspired!
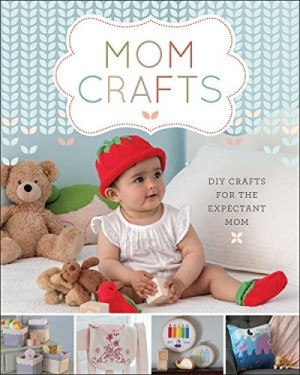
3. MOM CRAFTS: DIY CRAFTS FOR THE EXPECTANT MOM
You don’t have to be an expectant Mom, or Grandma to get creative with these DIY crafts. Aunties and Uncles, BFFs, cousins or friendly neighbours can all enjoy these adorable crafts for a new baby in your life!

4. PLYDESIGN: 73 DISTINCTIVE DIY PROJECTS IN PLYWOOD ( AND OTHER SHEET GOODS)
Plywood gets a bad rap, but can be great for DIY’s, especially if you’re new to working with wood. Let your fingers do the walking through these practical and styling plywood projects. Bet you can’t pick just one!

5. DIY MAGIC
This book isn’t quite like the others. It doesn’t provide step by step instructions to sew an amazing dress, or decorate the most beautiful cake. Instead, it offers guidance to help creative types of all kinds find new sources of inspiration.

6. A HOT GLUE GUN MESS: FUNNY STORIES, PRETTY DIY PROJECTS
Let’s face it, we’ve all seen enough #PinterestFails to know that not every DIY project will go perfectly smoothly. This light and humorous book isn’t short on DIY inspiration, but also encourages you and offers a much-needed laugh when things don’t go exactly as planned.
Whether you’re a Pinterest rookie or DIY pro, we all have creative dry spells. Try one (or all) of these handy titles to get you back up and modge-podgeing in no time.
Our friends at Book Outlet sponsored this post, but we would never share anything with our readers that we wouldn’t use ourselves. See full disclosure statement here.
The post 6 DIY Titles to Get Your Creative Juices Flowing appeared first on Creative Sides.
]]>The post Small Spaces and How to Maximize Them appeared first on Creative Sides.
]]>
How to maximize space in a small apartment
If you happen to live in a booming urban environment, you may notice that the cost of living space is at somewhat of a premium. The solution to this is often to live in smaller spaces. Many of us have lived in small spaces at some time in our lives, and many of us still do – especially when you’ve found that perfect apartment close to work and right next to the grocery store. But how can you escape that feeling of living in a tiny box? There are a few small space solutions that can help you to really open up your space and make the most of it.
Think Vertically
It’s important to remember that every room has eight corners! One way to maximize your space is by thinking vertically rather than horizontally. Floor to ceiling bookshelves are a great way to make use of wall space. Cabinets too! You can also think about exploiting the spaces between the tops of furniture and the ceiling. Think of hanging or high-mounted elements, which will draw the eye upwards.
Storage Solutions
In the same way, consider storage nooks, bespoke built-ins and tailored furniture to make use of every available portion of space. For example, try retractable pantry drawers for small appliances. To reduce clutter, make sure that items can easily be shut away or grouped by category. Open storage can also draw the eye upward; balance this against the amount of clutter you have on your shelves.
Opening Up
Doors and walls are so last century! Consider using room dividers in place of walls to let your space breathe. If you want to go further, consider glass walls, which can separate spaces without visually dividing a room. Curtains are also useful where privacy is required, and can make one wide open room into two very easily. And try increasing your window to wall ratio; larger windows let in more light, which can really make your space seem more open and free.

Less is More
It’s a lot easier to minimize clutter if you don’t have any clutter. Embracing a minimalist lifestyle can not only make your space go further but also cuts down on the need for consistent consumption of consumer goods, saving money as well. A win-win. In terms of furnishings, maximize your square footage by using small, easily moveable pieces of furniture. As an alternative, use fewer, larger pieces of quality furniture – this may seem counter-intuitive, but this can make a room feel grander. But choose which technique you want to use – don’t mix and match!
Mirror, Mirror
The cunning placement of mirrors can do wonders for opening up a space. Using them can easily double the size of a room, for example by mimicking doorways and windows. An alternative is to use reflective metallic subway tiles; reflecting more light will also help the space feel larger. Other visual tricks include see-through furniture made of glass, Lucite or Plexiglas – either that or mounting the mirrors or tiles on the furniture themselves.
Zone Warfare
Think about all the things you do in your house or apartment –work, sleep, eat, relax – and consider separate zones for each activity. You can place different types of furniture and demarcate the zones by using multiple seating areas, a table and chair, or a tented bed. If you don’t want to go this route, go the other way: find elements that have multiple functions, like a table that can function as both dining table and desk, or deep sofa beds. Try ensuring that each furniture piece is dual-use at least. That way you will waste as little space as possible.
Conclusion
Maximizing your space doesn’t have to be a chore – it can be a fun interior design project. Reduce clutter by thinking like a minimalist, and making use of storage space in an optimal fashion. Use visual tricks like mirrors, windows and glass walls to open up the interior, and make use of as much of your vertical space as possible. And consider the type and size of furniture you are using, where it’s placed and what it’s used for. Taken together, these tips should help you to feel like you’re living in a much larger space!
The post Small Spaces and How to Maximize Them appeared first on Creative Sides.
]]>The post Focus And Clarity In A Mug appeared first on Creative Sides.
]]>As someone who deals with chronic pain, cares for two small kids, and is growing a business where I work from home, my brain is taxed to the limit. It takes laser focus to get through all that stuff with a smile on my face and the kids by my side. So many days I have just wished that things would come easy, just this once. I am thankful to be so busy, but I need a little kick in the morning to get through everything on my to-do list. Or even to make a teeny-tiny dent.
Bulletproof Coffee in my cup gives many, many kicks to get me moving. I’m moving on my business goals, I’m moving on my mommy goals and I’m even moving on my blogging goals. I even got my husband to switch over from the “dark side” (coffee with a gallon of milk and sugar.)

At the best of times I need an extra boost. This past few weeks have been even more full than usual, between planning my daughter’s winter birthday party and the Christmas tree needing a makeover. Beyond that, there’s the shopping and all of the events that come along with being a blogger at Christmas time. Events are like tinsel, bright and shiny but so tightly scheduled they get stuck together. This is prime time, baby.
How ever was I going to get it all done? I’m tired, I’m sore, I’m cranky and to be honest it all felt a bit much. Enter Bulletproof Coffee to save the day. Santa’s sleigh is pulled by 8 tiny reindeer, and my holiday season is pulled by the contents of my coffee mug. What the heck is this stuff, you ask?

Bulletproof Coffee is Upgraded Coffee blended with grass-fed unsalted butter & Brain Octane Oil. It’s also low toxin, high performance & full of healthy fats to fuel me. It’s a way better energy source than sugar because you don’t crash. But what about the low-toxin part? Well, low-quality beans can actually contain mould. Gross. Upgraded Coffee beans are certified clean so you don’t have to worry about that. Thank goodness. I’ve got enough to worry about!
All that energy did me well. I decorated the Christmas tree with my family and I blogged all the blogs and wrote all the plans and wrangled all the kids and planned the most exciting birthday party ever. I had my best week yet! I was proud of everything I had accomplished and I didn’t feel like I was treading water at a polar bear swim anymore. I really needed this confidence boost Bulletproof Coffee delivers.

I thought I was a bit old to still believe in magic, but this season Bulletproof Coffee helped me believe in the magic of the season and in myself. That gift, my friend, is priceless. It turns out I really needed to give myself a break – a coffee break.
I’m so glad the rain (and brain fog) is gone and I can see clearly now. I’ve got Bulletproof Coffee in my mug and I can take on the world (even tinsel.)
The post Focus And Clarity In A Mug appeared first on Creative Sides.
]]>The post What Everyone Needs To Know Before Remodelling appeared first on Creative Sides.
]]> 
Until the day when I can have the older home of my dreams and embark on that adventure, I will happily settle on being about halfway there with our current home that is approaching the 50 year mark. This place has garnered us with plenty of experience in fixing and repairing, but without the charm of a front porch. Any part of our place that looks nice to date is because we have made it that way. We bought this place because we could see the potential and liked the space it afforded us (not because we were won over by things like pink sinks and yellow bathtubs or a lack of doors on most of the rooms…including the bathrooms…). Of course it has meant replacing some plumbing and electrical along the way, as well as many ascetics (orange melamine countertops anyone?), and due to the age of the building, there is asbestos. We didn’t know it initially, but we learned that it was present in the drywall tape. This is hardly unusual. In fact, older homes are not the only ones with the problem (unless you are young enough to think that 1990 is old – in which case get out your smartphone and look up asbestos and shoulder pads – both are bad…. but in different ways…). Asbestos was used in construction up until 1990, believe it or not. Often times it seems to slip people’s minds, but asbestos is something that should be at front of mind when considering renos.
By living in a place that has been on this planet longer than I have, I have been afforded unique insights along the way, thanks to my DIY-happy husband. I’ve learned to say things aloud like, “When I come home today, please let there still be stairs.” After all, in his defense, he can’t read my mind. I learned this when I returned home from work one day, shortly after purchasing our current home, and was shocked to hear myself say, “Where are the stairs that were here this morning?!”
It has also taught me phrases like, “What is your asbestos abatement plan?”. No seriously, my husband’s career is related to safety and the words ‘abatement plan’ are in fact part of our regular vocabulary and riveting dinner conversation.
Asbestos is not uncommon, as most houses built between 1950 and 1990 in BC contain some form of asbestos. In our case, it’s in the drywall tape on the walls. Drywall, insulation and vinyl flooring are very common places to find asbestos. You can find a list of other common places asbestos is located here.
Turns out that buying a place built in the 70’s didn’t just leave us the building legacy of no overhead lighting, sunken living rooms and strangely hued decorative glass panels! The use of asbestos in residential finishes (between 1950-1990) became commonplace because of its incredibly hardy nature and resistance to heat. Now the presence of asbestos in itself is not harmful, but the act of removing it is. If you have ever lived through any type of renovation or demolition, you will know about the dust. The never ending, insidious, possibly make you lose your mind trying to clean it up, dust. There is no way around it. Unfortunately, this is where asbestos becomes incredibly dangerous. As soon as something containing asbestos is disturbed, it can become air born and harmful. You do not want breathe in asbestos particles and there is no renovation without dust (though how I wish there was) and so asbestos protection/removal plans need to be in place.

Before fixing up our homes, we all need to make sure our renovation plans include looking for and safely removing asbestos before any workers come into do the work.
WorkSafeBC is educating homeowners in BC about the danger of asbestos exposure and how we can work together to keep everyone healthy and safe on our projects. Because asbestos was so widely used in BC construction, it’s important that any asbestos is identified and properly removed to ensure the health and safety of everyone contributing to the project or living in the home. Take asbestos seriously. It can only be removed (or remediated) by qualified professionals.
Consider these sobering facts. Breathing in asbestos fibres can cause serious health problems, lung diseases and cancer. Asbestos-related disease is the leading cause of work place death in BC. In fact 584 workers died from asbestos-related diseases between 2006 and 2015, 30% of which were in the construction industry alone.
Clearly, we need a greater awareness of asbestos and how prevalent it can be in structures built before 1990. Educate yourself before taking on a home renovation. Click here to learn more about asbestos.
It’s important to take the necessary steps to ensure your home is asbestos-free before starting any demolition or renovation project.
Disclaimer: this post has been generously sponsored by WorkSafeBC, the opinions and language are my own.
The post What Everyone Needs To Know Before Remodelling appeared first on Creative Sides.
]]>The post A Vacuum for Christmas…Wow! appeared first on Creative Sides.
]]>
I’m not going to lie… it’s a bold choice to give your special someone a vacuum as a gift. My husband did it and he lives to tell the tale. I have the Dyson V8 Stick vacuum. Trust me, anything Dyson, she’ll love it.
Growing up with two typical guy shoppers – get in, find the item, and get out as fast as possible – I’m not one for battling crowds or going to the store only to find out the item I want isn’t in stock. I want a one stop shop where I can get most of my shopping done under one roof. With two kids in tow, the years of being mentored with the get-in-get-out rule of shopping has done me well. Thanks guys!
Enter the Wow Guide from Canadian Tire. You’ve been tasked with picking up a new pan, dish or appliance for the gathering you didn’t know you were hosting? Check. Toys? Check. Christmas Lights? Check. The thing-a-ma-jig your mom keeps hinting about? Check.
Best of all…with the click of a button you can check stock and aisle numbers before even leaving the house. Or if you need your spouse to pick up an item you can give them the exact location in the store.
From our house to yours, wishing you the gift of laughter and good times…Caveat: If you buy any vacuum other than a Dyson, you are on your own!
Disclaimer: Although this post has been sponsored, the opinions and language are my own. If I would not do it for my family, I would never suggest you do it for yours.
The post A Vacuum for Christmas…Wow! appeared first on Creative Sides.
]]>The post West Coast Tuna Sliders and Salmon Cucumber Rolls appeared first on Creative Sides.
]]>Tuna Sliders

- 1 tbsp extra virgin olive oil
- 1 clove garlic, minced
- 1 red chili, minced
- 1 rib celery, finely diced
- ¼ tsp celery seeds
- ¼ tsp sea salt
- ¼ tsp pepper
- 1 egg, beaten
- 3 green onions, thinly sliced
- ¼ cup fresh parsley, minced
- 1 tbsp heavy cream
- 1 tbsp Dijon mustard
- 2 cans Raincoast Wild Solid White Albacore Tuna
- ⅓ cup dry breadcrumbs
- 2 tbsp all-purpose flour
- Canola oil
- 8 buns/dinner rolls
- Niko's Sweet Chili Dipping Sauce (found at St. Jean's Cannery and Smokehouse)
- Broccoli Kale Coleslaw
- Heat olive oil in a pan over medium heat and sauté the olive oil, garlic, red chili, celery, celery seeds and salt and pepper. Remove from heat and set aside.
- In another bowl, mix together egg, green onions, parsley, cream, dijon mustard, two cans of tuna, and breadcrumbs. Add in the chili, garlic, celery mixture and combine well.
- Shape mixture into small patties and dredge in flour.
- Place the patties in the freezer for 10-12 minutes.
- Heat the canola oil in a large frying pan. Fry the patties for 5-7 minutes, until crispy and heated through.
- Toast the buns and brush with Niko's Sweet Chili BBQ & Dipping Sauce
- Top the buns with the tuna patty and coleslaw and serve with a side of dipping sauce.
- You may also substitute Raincoast Trading Wild Solid White Albacore Tuna - No Salt for a lower sodium option.
St. Jean’s has been an important part of my family’s table for many years. They still process all the fish my dad catches and each time we travel to see my husband’s family in France, we stock up on cans of salmon and frozen filets and bring them as gifts. Canned Salmon as gifts, you say? Not Nanaimo Bars? Yes, it is a huge hit every year. Next year we’ll be bringing the dips and marinades.
After finding out St. Jean’s Cannery acquired Raincoast Trading in 2013 I was happy that the standards of sustainable catching (hook and line caught – no nets, yay dolphins!) and processing (these guys know their stuff) will continue to be top notch. All of their fish is sustainably sourced in the Pacific Northwest off the coast of BC. All wild – not farmed.
Raincoast Trading Tuna and Salmon is only cooked once during the canning process and there are no preservatives. It is not packed in water – just the fish and all of its natural oils and nutrients. This means the tuna provides as much as 8 times the Omega 3 Fatty Acids compared to other commercial brands. As for quality, open a can of salmon or tuna from a competitor brand and a can from Raincoast Trading and do a side by side comparison to see the difference – it’s striking.
Raincoast Trading products are available at most major grocery retailers in Canada as well as online at Amazon.ca
Salmon Cucumber Rolls


- 1 can Raincoast Trading Wild Sockeye Salmon - No Salt
- 1/2 cup cream cheese
- 1/4 cup firm goat cheese
- 1 tbsp lemon juice
- 1 tbsp fresh dill, minced
- 1/2 tsp sea salt
- 1/2 tsp fresh ground pepper
- 1 english cucumber, very thinly sliced lengthwise using a mandolin
- 2 tbsp capers
- Sprigs of fresh dill for garnish
- In a mixing bowl, combine salmon, cream cheese, goat cheese, lemon juice, dill, salt and pepper. Mix until well combined.
- Place 1 tbsp of mixture at the end of each cucumber slice and add a few capers on top. Roll up the cucumber tightly using a toothpick to secure if needed.
- Garnish with remaining fresh dill

This project is supported by the BC Government’s Buy Local Program; delivered by the Investment Agriculture Foundation of BC with funding from the BC Ministry of Agriculture. #BCBuyLocal
Disclaimer: Although this post has been generously sponsored and compensated by Raincoast Trading, the opinions and language are my own. If I would not serve it to my family, I would never suggest you serve it to yours.
The post West Coast Tuna Sliders and Salmon Cucumber Rolls appeared first on Creative Sides.
]]>The post Bat Minion Halloween Door appeared first on Creative Sides.
]]>
It all started with a vampire cape from the dollar store. No one wanted to wear it, it didn’t even get much love sitting in the dress up box. I removed the collar of the cape and spread out the vinyl and started thinking about what I could use it for.
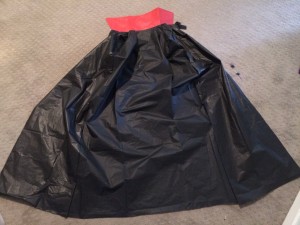
Ah ha! I had a yellow plastic table cloth left over from a recent birthday party. Given my kid’s love for all things superheroes and Minions, this lonely cape would get a new a new life and decorate our front door for Halloween. Behold: Bat Minion!
You will need:
White card stock or cardboard
Black plastic/vinyl cloth (I used a vampire cape)
Stencil or print out of Batman logo
Yellow plastic table cloth
Googly eye (optional)
Paint – gray, white, red, black, brown
Paint brushes
Tape
Scissors
Pencil

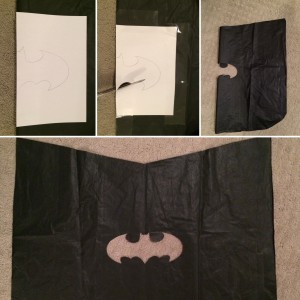
Step 1: If using the vampire cape, remove the collar. With your material folded in half, cut out the shape of the mask, body and feet. Take the folded body portion and tape the batman logo on the fold and cut out. Tape the feet to the body.
Step 2: For the eye, trace a large circle on card stock or cardboard with a bowl or other circular object. With a slightly smaller bowl, draw another circle. Use gray paint around the edges and brown and black paint for the iris. You can also use a googly eye from the dollar store for the iris.
Step 3: For the mouth, paint and cut out a mouth on cardstock. Make it as spooky or happy as you wish.

Step 4: Now you have all of your pieces, its time to set up! If your front door is painted, test in an inconspicuous spot to make sure your tape does not peel off the paint. Tape the yellow tablecloth to your front door. Make a very small cut and carefully push the tablecloth over the door handle. Repeat for the deadbolt. Tape the body and feet to the door. Repeat for the head, mouth and eye.
Happy Halloween!
The post Bat Minion Halloween Door appeared first on Creative Sides.
]]>The post Salmon with Avocado Dill Yogurt Sauce appeared first on Creative Sides.
]]>
Here on the West Coast of Canada, there are a few things we know to be true:
- We live in the tropics of Canada – yes it rains, but not nearly as much as we say it does because then everyone would want to move here.
- We can BBQ all year round without having to shovel snow to reach our BBQ – you don’t have to shovel rain… see #1.
- We are lucky to have an abundance of fresh local ingredients available within 100 miles.
- West Coast Spirit… easily observed in a gathering of great people, relaxed, welcoming, and – more often than not – planned on the spur of the moment.
Some of our best and most memorable gatherings are planned at the last minute. Friends coming over? Put some ice in a bucket with your beverage of choice, throw a salmon on the BBQ and whip up this tasty sauce. This sauce is quicker to prepare than the salmon and is a crowd pleaser. It adds a lot of flavour and interest to a simple meal and it lets you spend more time with your friends than in the kitchen.
What’s the secret to this easy sauce? Olympic Natural Yogurt. I’ve raved about it before in my Coconut Lime Banana Bread recipe. I love it because it’s so versatile and can be used at breakfast, lunch and dinner. Does this make me a Yogurt Aficionado?
Cedar Planked Salmon with Avocado Dill Yogurt Sauce
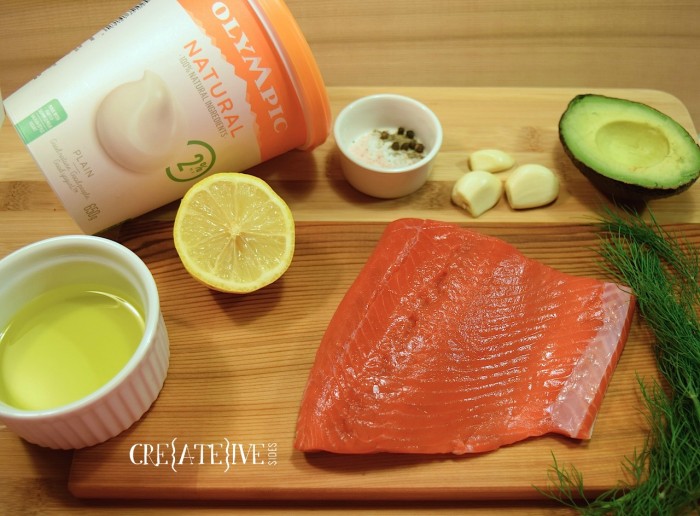
Ingredients
1 avocado
½ cup Olympic Natural Plain yogurt
3 tbsp dill (chopped)
1 clove garlic (pressed)
2 tbsp lemon juice
Salt
Pepper
4 salmon fillets
1 tbsp olive oil
Cedar Plank or parchment lined baking tray
Instructions
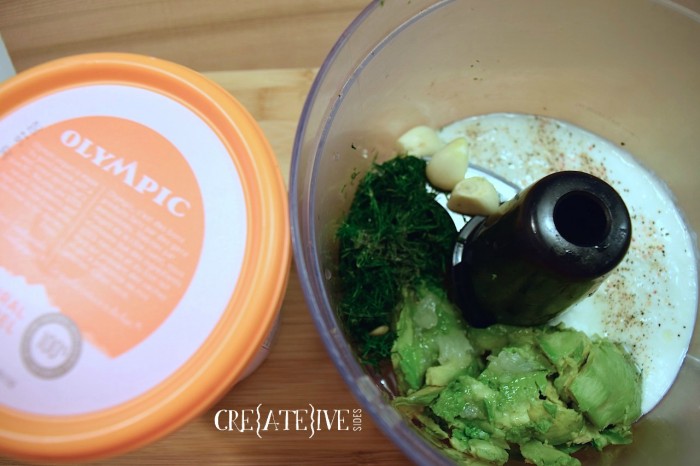
Avocado Dill Yogurt Sauce
- In a food processor, combine avocado, Olympic Natural yogurt, dill, pressed garlic, lemon juice, salt and pepper until smooth and creamy.
- For garlic lovers you can blend the cloves of garlic whole but you may end up with small chunks in the sauce. If you prefer a smoother sauce, press the garlic first.
Cedar Plank Salmon (Baked)
- Submerge your cedar plank in water for 2-6 hours prior to cooking. Weigh down the plank with a heavy object.
- Preheat oven to 400 degrees
- Place salmon skin side down on cedar plank.
- Brush olive oil on salmon then season with salt and pepper.
- Bake for approximately 10-15 minutes depending on thickness of your fillets. A good rule of thumb is 10 minutes of baking time for each 1” of thickness.
- Serve topped with Avocado Dill Yogurt Sauce

Cedar Plank Salmon (BBQ)
- Complete Steps 1-4 as above
- Place the plank on a preheated hot grill. Turn down to low and close the lid.
- Keep the lid closed as much as possible. Plank should smoulder not flame. If the plank starts to flame, spritz the plank with a spray bottle of water.
- Serve topped with Avocado Dill Yogurt Sauce

As mentioned in my previous post, Olympic products are made right here on the west coast in Delta, B.C. with 100% natural ingredients and fresh milk from cows who live close to their dairies. The milk has a shorter commute than my husband does to go to work. It’s that fresh!
Olympic’s packaging has a great new look and easily spotted in the grocery isle (as well as my fridge – my husband and I both went to the store and picked up yogurt last Tuesday without telling the other. I’ll be referencing these recipes over the next few weeks as I have approximately 3kg of yogurt in my fridge. Thank goodness it’s Back to School time!)
Disclaimer: Although this post has been generously sponsored by Olympic, the opinions and language are my own. If I would not serve it to my family, I would never suggest you serve it to yours.
The post Salmon with Avocado Dill Yogurt Sauce appeared first on Creative Sides.
]]>The post Goodbye Perfectionism appeared first on Creative Sides.
]]>
I often struggle with having everything just so. Perfectionism is a slippery slope, especially when children are involved. Children are not perfect; they are glorious and wonderful. Learning how to do things comes with mess – lots and lots of mess. That mess and clutter makes me shy away from all day cleaning binges in order to make my house appear uninhabited for when company comes calling. I don’t want to teach my girls that their selves and their homes must be perfect to be hospitable. That’s just not true.
I decided to make ‘goodbye expectations’ my new motto. Embracing that spirit means it’s time to say:
“Goodbye, see you later, adios, so long expectations!
Here we are in all our imperfect glory!!!
Take us as we come, because we are great!
Welcome to ‘how we do things in our family.
Hello friends – my kids are learning and growing here.”
I want them to know it might be a bit of a circus, but it’s our circus. Life would be awfully dull without it. All this fun and life happens in our home. It happens in our sometimes cluttered, sometimes noisy, sometimes ‘where-is-the-dining-table-under-all-these-crafts-and-blanket-forts’ kind of home and more often than not, with a dirty kitchen floor.
After all, a lot happens in our kitchen. There are chairs dragged up to the counters (sometimes running over my toes), with flour flying everywhere. Sometimes we have more baking than we know what to do with, but the neighbours never complain about that. I hope that spirit of sharing teaches my girls to be generous and giving. The spirit of hospitality is about more than housekeeping.
Who’s idea is it anyway that a home must appear un-lived in and flawless to entertain guests? We have enough people expecting us to be perfect, do we really want that from our near and dear too? And when, oh when, did someone decide there should be no sign of children around the home (and especially not in living rooms)? It’s just plain weird that 50% of our household should leave no evidence of their existence.
Do we really only want friends who know this version of ourselves, the version that – if we succeed in portraying – will only make them feel ‘less than’ about themselves? Shouldn’t our friends and loved ones enjoy our company, comfy sofa and yummy kitchen creations?
Yummy kitchen creations make for messy floors. It’s science. You can’t argue with science. Aren’t the best meals the ones that happen naturally with many hands contributing a little of this and a little of that (in comfy pants, with lots of laughter for good measure)?!
This is why Ikea’s new campaign #letsrelax really spoke to me. Ikea’s new global campaign challenges the expectations and starts conversations about the things that make life unnecessarily demanding. It’s about time we all relax and start enjoying the perfectly imperfect life we have to share with family and friends.
Here are some of the great ways our family has found to do just that:
Location, location, location. For daily family meals we all sit around our kitchen table, it makes for much better conversation – plus you are closer to the food for seconds or, dare I even say, thirds.
Embracing the dining table. Our dining space (referring to it as an actual room might be a stretch) is rather tight. To seat everyone at the table comfortably we need to slide the living room sofa further into the living room. It’s painstaking, but we are not to be denied. We love sitting around the table, and not just because we are statistically more prone to spills!
Make room! When it comes to entertaining, cozy or not, we slide the sofa out, insert the dining table’s extra leaf, and add more chairs. We can (and do) seat up to ten. Once the food starts flying being eaten, no one really seems to notice the close quarters. Our most recent family gathering boasted out of town relatives, with our numbers rising to twelve. The kids pulled up their play table and chairs next to the adults table and away we went!! Make room in your heart and your house for family.
Delegate! Kids can help you embrace imperfection. No one will have to wonder if you did things to a grade or preschool level because the kids will be proud enough to take ownership when your guests cross the threshold. A collaborative approach teaches that entertaining is a family affair. It should not just fall on one person. This lesson is important for me and my kids.
Start Small. Setting the table for guests is a great start. Bonus: a table set with mismatched dishware is adorable because the kids did it. No one suspects you don’t have twelve matching place settings (which my cupboards don’t currently boast).
For Everything There is A Season. My beautiful place settings for twelve are carefully packed away in the basement with very fragile and non dishwasher friendly china. They patiently await another season in our lives. This is not the time for that; it is the time for occasionally broken dishes and everything dishwasher friendly.
Leave Room For Creativity. Once our eight year old set such a beautiful table, it would rival that of any adult! Our ‘Fancy Nancy’ made the everyday very beautiful and special, even the single flower she choose for a vase in the centre matched. As I cooked in the kitchen, she looked up on youtube how to turn napkins into roses! I didn’t even need to lift a finger. Truly, it meant more to our family that she’d taken such pride and pleasure in doing it than if I’d unearthed all the fine china.
There’s never too many cooks. My kids love to help in the kitchen, sometimes even a little too much. My youngest once ‘helped’ cover the cupboards and both of us in chocolate cake batter turning the mixer on high prematurely! While it means four times the mess, I am bound and determined my kids will learn to cook and clean. This is why I’ve said goodbye to keeping kids out of the kitchen for fear of a mess.
Nobody expects perfection. Years of entertaining taught me people do not in fact have more fun when everything is just perfect. They may ooh and ahh over it at first, but they have more fun when you are relaxed and enjoying their company, not striving for the impossible or worrying something may get ruined.
Add a little extra (to dinner). More times than I can count last minute dinner invitations have made for some of our most memorable times. Put a little extra on for unexpected guests (and memories!)
Many hands make light work. Let those who offer, bring something! I hate going places empty handed. I am relieved when someone tells me how I can contribute. Our last few dinners, I’ve happily made the main, the dessert (there is just no way I could ever outsource the dessert) and a side dish. My husband made the mashed potatoes (truly, no one makes them better than him anyways). Someone brought a salad and two others brought sides and another provided the wine. It turned out great – delicious food, great company and I wasn’t exhausted!
Strut the Stuff You Love When You Fancy. I really enjoy decorating cakes and of course, that has its place. Those old fashioned, hand written recipes that have been passed down through generations, those cakes covered in glorious swirls or mounds or nuts that you just can’t wait to dive into, those somehow have my heart. That being said, Ikea and I agree on their suggestion to ‘keep it simple (but delicious)!’
Simplify. Sometimes I struggle between what tastes amazing and what looks great when it comes to entertaining. I don’t think I need to say which one wins when it’s just me. The meals and recipes I get asked for the most by friends and family are the quickest and simplest to prepare. These are the ones that won’t win any competitions on looks but get asked for again and again because they are so comforting or downright delicious!
It’s all about the guest list. Yummy food just tastes better with the ones you care about (again I believe this is pure science – like dirty kitchen floors). Invite those you care about, that make you laugh over and embrace the way you do things. It doesn’t need to be the way the neighbours do it or the media says it needs to be done, but rather just the way that works for you and your family. It turns out that is more than enough.
So join the movement! #letsrelax
The post Goodbye Perfectionism appeared first on Creative Sides.
]]>The post Finding Dory Cupcake Tutorial *VIDEO* appeared first on Creative Sides.
]]>Finding Dory Cupcake Tutorial
Cupcakes and Icing

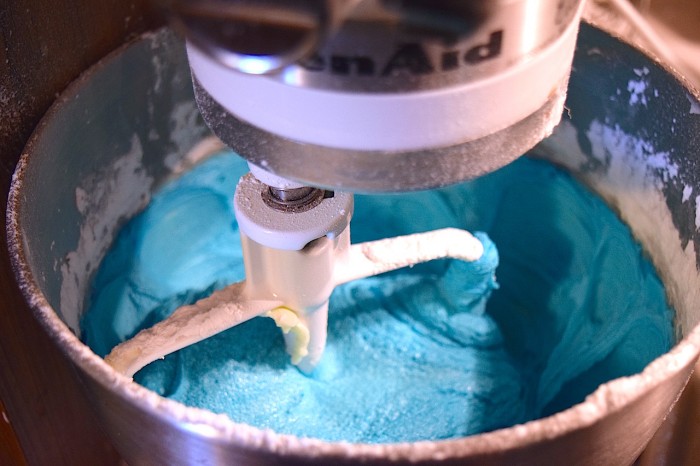
Step 1: Make a batch of your favourite vanilla cupcakes, adding a small amount of Wilton’s Gel Icing Color in Royal Blue into the batter before pouring into the cupcake liners and baking. (I found both Finding Dory themed and plain blue cupcake liners at Michael’s that worked perfectly).
Step 2: While the cupcakes are baking, mix up your buttercream icing (this is my favourite recipe), again adding a small amount of Wilton’s Gel Icing Color in Royal Blue to the mix to match the cupcakes. Spoon the icing into an icing bag fitted with a 1M decorating tip.
Step 3: When the cupcakes are cooled, ice the tops with a simple swirl of the buttercream icing.
Finding Dory Royal Icing Topper
Step 4: Print a colour Dory outline to use as your guide. This one worked well for me.
Step 5: Whip up a batch of Royal Icing, and separate into 4 parts.
Step 6: Using Wilton’s Color Right Performance System, color your separated portions of Royal Icing Blue (20 drops of blue, 1 drop of black), Yellow (20 drops of yellow)and Black (20 drops of black), leaving a very small portion white.
Step 7: Place the printed Dory outline on a large cutting board or cookie sheet and cover with waxed or parchment paper. Secure waxed paper, leaving the dory outline free to reposition as needed.
Step 8: Pour royal icing into individual icing bags fitted with a #2 decorating tip. Use a decorating bag holder or tall glass to hold the bags, ensuring each bag stays upright with the tip flush against the bottom so no icing leaks while not in use.
Step 9: Begin tracing the outline in blue, and follow in black. Let it rest for 10 minutes or until partially set.
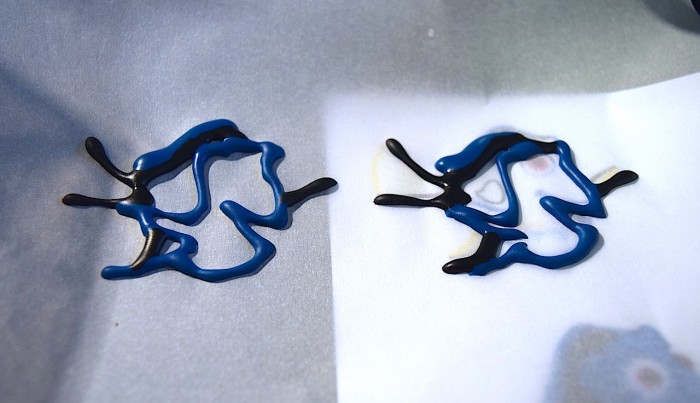
Step 10: Fill in the yellow parts of the fins and the white of the eye. Use a toothpick to place a dot of black in the centre of each eye. *note* in the images and video I started with a pink iris, however it was much too finicky and in the future I’ll omit the pink and stick with simple white and black eyes.
Step 11: Fill in the black are of the mouth and back, using a toothpick to spread and settle the icing in the large areas
Step 12: Fill in the blue of the body, using a toothpick to spread and settle the icing.
Step 13: Let finished toppers set for 4 hours, or overnight before placing on cupcakes.

Step 14: Serve and enjoy!
Watch the above steps in our handy-dandy Finding Dory Cupcake Topper Tutorial video.
If you’re looking for more Finding Dory Party Ideas, this is the place to find them!

The post Finding Dory Cupcake Tutorial *VIDEO* appeared first on Creative Sides.
]]>