The post Why You Should Use Canadian Ingredients For Your Next Recipe appeared first on Creative Sides.
]]>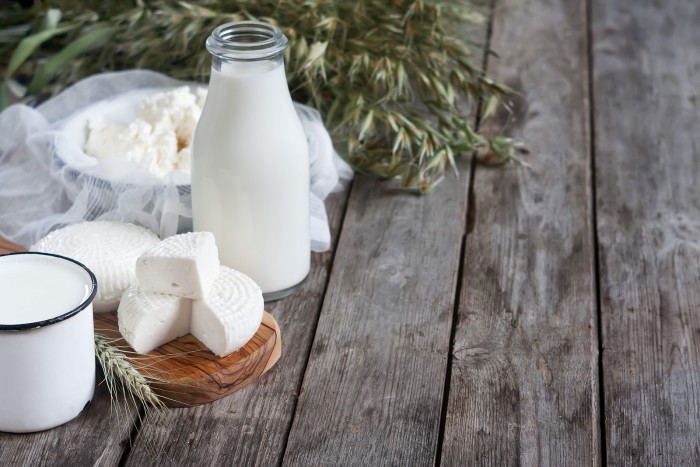
As a discerning home chef, you want to source the very best of ingredients for your next dish to impress and nourish your friends and family. You want to be proud of the food you put on your table and present to your guests. You can wow them with exotic finds from all the corners of the earth, but it turns out you don’t have to venture far from home to find what you need to make your next dinner party a success. Why use Canadian ingredients for your next recipe? These are a few reasons:
Reduce Your Carbon Footprint
Give the planet a break. Food that doesn’t have to travel as far has less of an impact on the atmosphere, climate change and contributes fewer pollutants to the air we breathe. You can reduce your carbon footprint by choosing Canadian ingredients when you prepare your next culinary masterpiece at home.
Contribute to the Canadian Economy
When you buy food grown in Canada, you are doing your part in supporting the Canadian economy. You are putting money in the pockets of Canadian farmers, Canadian truckers, Canadian feed stores and Canadian families. Buying Canadian is a great way to give back to your community and support the people in your own neighbourhood.
Add Local Flavour
Behind every one of Agropur’s Canadian products is a cooperative of passionate and committed dairy producers. These products taste like home. You can wander the entire earth and find beautiful places, but like Dorothy in the Wizard of Oz says, “There’s no place like home.” There’s no taste like home, either. Taste for yourself.
Reduce your carbon footprint, contribute to the Canadian economy and add local flavour by choosing Canadian ingredients for your next recipe. It’s as simple as that. Now, go make something to be proud of that tastes like home!
Our friends at Agropur sponsored this post but we agree with supporting Canada by enjoying delicious dairy products that taste like home. You can find them on Facebook and Twitter.
The post Why You Should Use Canadian Ingredients For Your Next Recipe appeared first on Creative Sides.
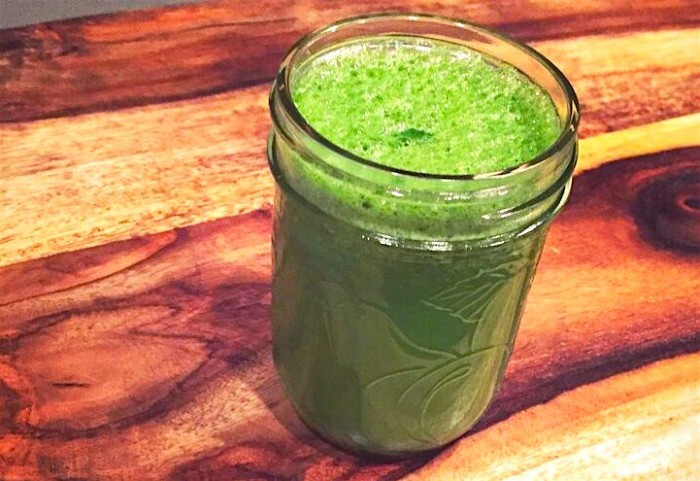
]]>The post Tropical Green Juice appeared first on Creative Sides.
]]>Ingredients
1 handful parsley
1 handful mint
3 – 4 kale leaves
1 lime, zest removed but leave as much pith (the white stuff in between the skin and the fruit) as possible
1/2 pineapple, peeled
1 green apple, cored

Directions
Feed fruits and vegetables through your juicer. I have an Omega J8006 which is a masticating juicer so I do my herbs first, followed by leafy greens and citrus, and I leave my hardest fruits and veg for the end to sort of “clean” as much out of the machine as possible.
Serve over ice. Makes two juices (quantity varies because of natural products).
- 1 handful parsley
- 1 handful mint
- 3 - 4 kale leaves
- 1 lime, zest removed but leave as much pith (the white stuff in between the skin and the fruit) as possible
- 1/2 pineapple, peeled
- 1 green apple, cored
- Feed fruits and vegetables through your juicer, herbs first, followed by leafy greens and citrus. Leave hardest fruits and veg for the end to sort of "clean" as much out of the machine as possible.
- Serve over ice.
The post Tropical Green Juice appeared first on Creative Sides.
]]>The post Cheers To The Holidays appeared first on Creative Sides.
]]>These are some ideas of some magical drinks for your holiday party:

The nice thing about the sangria is you can make it a couple days ahead. The liqueur we love most for this drink is made with 100% BC raspberries and there are no colourings, chemicals or preservatives used in its production. Pure flavour from pure ingredients make pure fun.

Spice up your holiday season with a spicy seasonal beverage. This warm, luxurious drink pairs nicely with the most blustery of winter days. The cherry and apple flavourings go together like mistletoe and kisses and unite to bring out the very best of the season.

The raspberry liqueur tastes just like fresh picked raspberries (but with a punch) because it’s made from 100% locally grown fruits from British Columbia. You might not be home for the holidays, but your drink will taste like you are right where you belong.
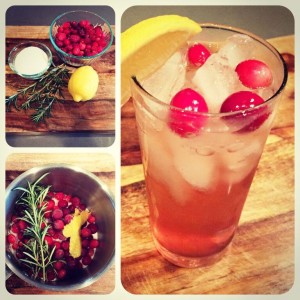
Rosemary Cranberry Simple Syrup Recipe:
Keep it simple this holiday season with this simple syrup for your cocktails that adds remarkable dimension. Suitable for use in alcoholic or non-alcoholic creations, this syrup is easy to make but tastes great.
Drink in the best of the season with these delicious drink recipes. Hosting a memorable event is easy with these fruity treats that are sure to impress your guests. Pop into your local Metro to get everything you need to be ready for your event yet. Tis the season to stock up for entertaining, and Metro has you set in that department so you can sit back, relax and enjoy. Cheers to a happy holiday party!
Disclaimer: Although this post has been sponsored, the opinions and language are my own. If I would not serve it for my family, I would never suggest you serve it to yours.
The post Cheers To The Holidays appeared first on Creative Sides.
]]>The post Focus And Clarity In A Mug appeared first on Creative Sides.
]]>As someone who deals with chronic pain, cares for two small kids, and is growing a business where I work from home, my brain is taxed to the limit. It takes laser focus to get through all that stuff with a smile on my face and the kids by my side. So many days I have just wished that things would come easy, just this once. I am thankful to be so busy, but I need a little kick in the morning to get through everything on my to-do list. Or even to make a teeny-tiny dent.
Bulletproof Coffee in my cup gives many, many kicks to get me moving. I’m moving on my business goals, I’m moving on my mommy goals and I’m even moving on my blogging goals. I even got my husband to switch over from the “dark side” (coffee with a gallon of milk and sugar.)

At the best of times I need an extra boost. This past few weeks have been even more full than usual, between planning my daughter’s winter birthday party and the Christmas tree needing a makeover. Beyond that, there’s the shopping and all of the events that come along with being a blogger at Christmas time. Events are like tinsel, bright and shiny but so tightly scheduled they get stuck together. This is prime time, baby.
How ever was I going to get it all done? I’m tired, I’m sore, I’m cranky and to be honest it all felt a bit much. Enter Bulletproof Coffee to save the day. Santa’s sleigh is pulled by 8 tiny reindeer, and my holiday season is pulled by the contents of my coffee mug. What the heck is this stuff, you ask?
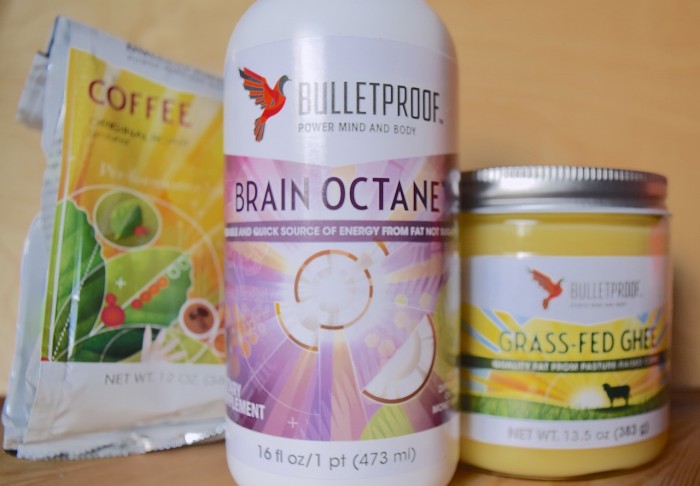
Bulletproof Coffee is Upgraded Coffee blended with grass-fed unsalted butter & Brain Octane Oil. It’s also low toxin, high performance & full of healthy fats to fuel me. It’s a way better energy source than sugar because you don’t crash. But what about the low-toxin part? Well, low-quality beans can actually contain mould. Gross. Upgraded Coffee beans are certified clean so you don’t have to worry about that. Thank goodness. I’ve got enough to worry about!
All that energy did me well. I decorated the Christmas tree with my family and I blogged all the blogs and wrote all the plans and wrangled all the kids and planned the most exciting birthday party ever. I had my best week yet! I was proud of everything I had accomplished and I didn’t feel like I was treading water at a polar bear swim anymore. I really needed this confidence boost Bulletproof Coffee delivers.

I thought I was a bit old to still believe in magic, but this season Bulletproof Coffee helped me believe in the magic of the season and in myself. That gift, my friend, is priceless. It turns out I really needed to give myself a break – a coffee break.
I’m so glad the rain (and brain fog) is gone and I can see clearly now. I’ve got Bulletproof Coffee in my mug and I can take on the world (even tinsel.)
The post Focus And Clarity In A Mug appeared first on Creative Sides.
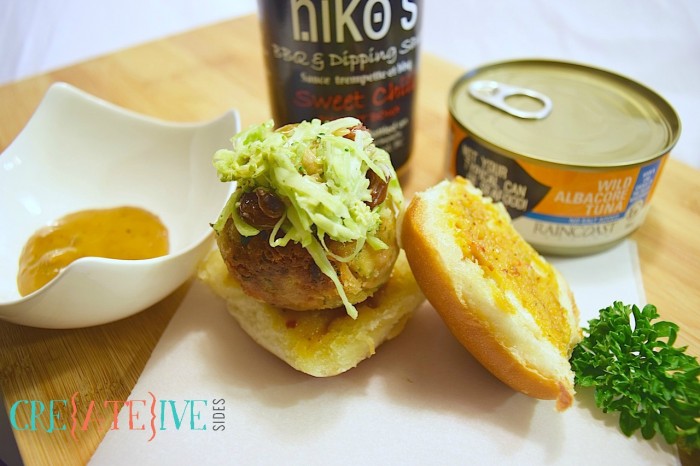
]]>The post West Coast Tuna Sliders and Salmon Cucumber Rolls appeared first on Creative Sides.
]]>Tuna Sliders
- 1 tbsp extra virgin olive oil
- 1 clove garlic, minced
- 1 red chili, minced
- 1 rib celery, finely diced
- ¼ tsp celery seeds
- ¼ tsp sea salt
- ¼ tsp pepper
- 1 egg, beaten
- 3 green onions, thinly sliced
- ¼ cup fresh parsley, minced
- 1 tbsp heavy cream
- 1 tbsp Dijon mustard
- 2 cans Raincoast Wild Solid White Albacore Tuna
- ⅓ cup dry breadcrumbs
- 2 tbsp all-purpose flour
- Canola oil
- 8 buns/dinner rolls
- Niko's Sweet Chili Dipping Sauce (found at St. Jean's Cannery and Smokehouse)
- Broccoli Kale Coleslaw
- Heat olive oil in a pan over medium heat and sauté the olive oil, garlic, red chili, celery, celery seeds and salt and pepper. Remove from heat and set aside.
- In another bowl, mix together egg, green onions, parsley, cream, dijon mustard, two cans of tuna, and breadcrumbs. Add in the chili, garlic, celery mixture and combine well.
- Shape mixture into small patties and dredge in flour.
- Place the patties in the freezer for 10-12 minutes.
- Heat the canola oil in a large frying pan. Fry the patties for 5-7 minutes, until crispy and heated through.
- Toast the buns and brush with Niko's Sweet Chili BBQ & Dipping Sauce
- Top the buns with the tuna patty and coleslaw and serve with a side of dipping sauce.
- You may also substitute Raincoast Trading Wild Solid White Albacore Tuna - No Salt for a lower sodium option.
St. Jean’s has been an important part of my family’s table for many years. They still process all the fish my dad catches and each time we travel to see my husband’s family in France, we stock up on cans of salmon and frozen filets and bring them as gifts. Canned Salmon as gifts, you say? Not Nanaimo Bars? Yes, it is a huge hit every year. Next year we’ll be bringing the dips and marinades.
After finding out St. Jean’s Cannery acquired Raincoast Trading in 2013 I was happy that the standards of sustainable catching (hook and line caught – no nets, yay dolphins!) and processing (these guys know their stuff) will continue to be top notch. All of their fish is sustainably sourced in the Pacific Northwest off the coast of BC. All wild – not farmed.
Raincoast Trading Tuna and Salmon is only cooked once during the canning process and there are no preservatives. It is not packed in water – just the fish and all of its natural oils and nutrients. This means the tuna provides as much as 8 times the Omega 3 Fatty Acids compared to other commercial brands. As for quality, open a can of salmon or tuna from a competitor brand and a can from Raincoast Trading and do a side by side comparison to see the difference – it’s striking.
Raincoast Trading products are available at most major grocery retailers in Canada as well as online at Amazon.ca
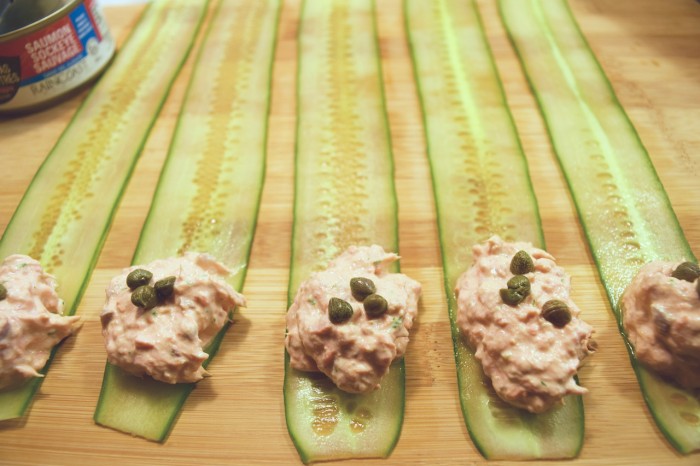
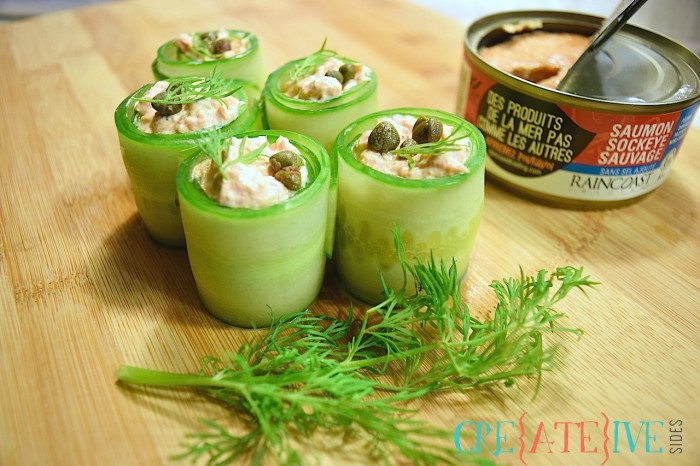
Salmon Cucumber Rolls
- 1 can Raincoast Trading Wild Sockeye Salmon - No Salt
- 1/2 cup cream cheese
- 1/4 cup firm goat cheese
- 1 tbsp lemon juice
- 1 tbsp fresh dill, minced
- 1/2 tsp sea salt
- 1/2 tsp fresh ground pepper
- 1 english cucumber, very thinly sliced lengthwise using a mandolin
- 2 tbsp capers
- Sprigs of fresh dill for garnish
- In a mixing bowl, combine salmon, cream cheese, goat cheese, lemon juice, dill, salt and pepper. Mix until well combined.
- Place 1 tbsp of mixture at the end of each cucumber slice and add a few capers on top. Roll up the cucumber tightly using a toothpick to secure if needed.
- Garnish with remaining fresh dill

This project is supported by the BC Government’s Buy Local Program; delivered by the Investment Agriculture Foundation of BC with funding from the BC Ministry of Agriculture. #BCBuyLocal
Disclaimer: Although this post has been generously sponsored and compensated by Raincoast Trading, the opinions and language are my own. If I would not serve it to my family, I would never suggest you serve it to yours.
The post West Coast Tuna Sliders and Salmon Cucumber Rolls appeared first on Creative Sides.
]]>The post Black Bean Sweet Potato Soup appeared first on Creative Sides.
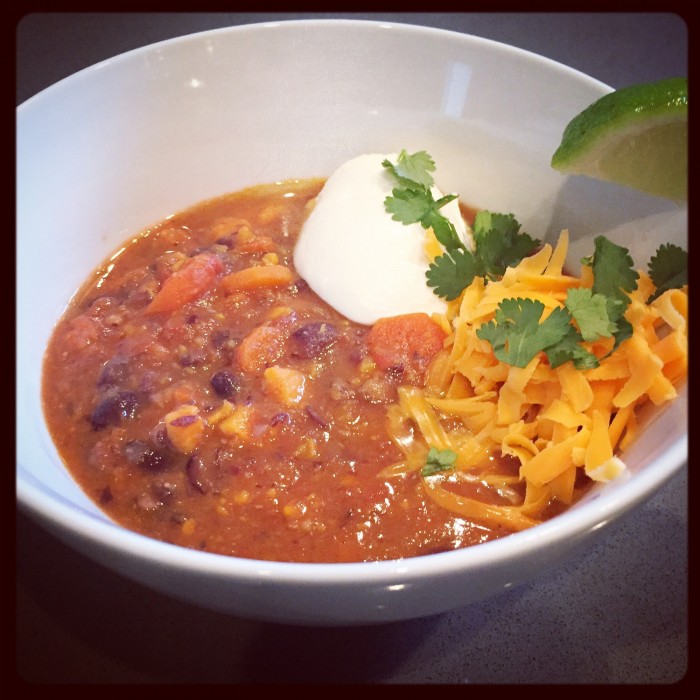
]]>This Black Bean Sweet Potato soup is quick and easy to throw together, full of vitamins and minerals, and is comprised wholly of ingredients I always have in my pantry (a major win in my books). It can be jazzed up with shredded cheese and sour cream or left plain and simple. The recipe makes a lot but it freezes well.
- 2 tablespoons olive oil
- 1 onion, finely diced
- 4 carrots, sliced (approximately 1 cup)
- 1 sweet potato, finely diced (approximately 3 cups)
- 3 cloves garlic, minced
- 1/2 teaspoon cumin
- 1 x 796mL can diced tomatoes, with juice
- 2 x 540mL can black beans, drained and rinsed well
- 4 cups vegetable or chicken broth
- salt and pepper to taste
- Heat olive oil in large soup pot over medium high heat. Add onions, carrots, and sweet potatoes and cook until softened, 7 - 10 minutes.
- Add garlic and cumin and cook, stirring constantly, for another minute or two.
- Add tomatoes with their juice, beans, and broth. Bring to a boil and cook until vegetables are completely tender, anywhere from 5 - 15 minutes depending on how big you sliced your veg.
- You can leave this soup as-is or you can blend all (or part) of it for a smoother consistency. I like to use my immersion blender and blend in quick bursts to end up with a sort of half-smooth-half-chunky consistency.
- Serve with sour cream, shredded cheese, sliced green onions, fresh cilantro, lime wedges, hot sauce, etc. The sky's the limit.
A version of this post originally appeared on Hillary with 2 Ls.
The post Black Bean Sweet Potato Soup appeared first on Creative Sides.
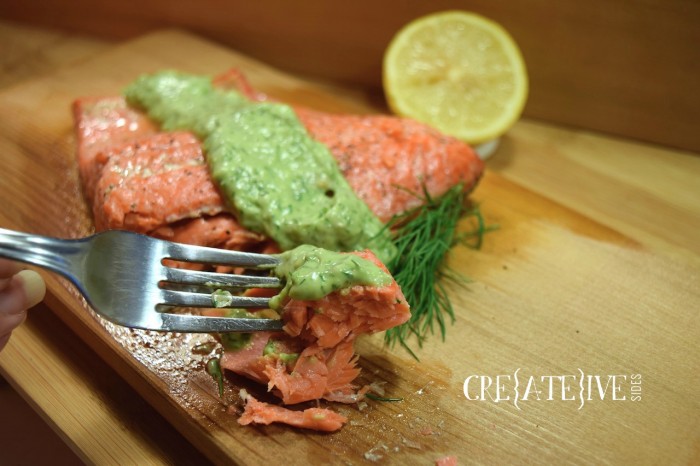
]]>The post Salmon with Avocado Dill Yogurt Sauce appeared first on Creative Sides.
]]>
Here on the West Coast of Canada, there are a few things we know to be true:
- We live in the tropics of Canada – yes it rains, but not nearly as much as we say it does because then everyone would want to move here.
- We can BBQ all year round without having to shovel snow to reach our BBQ – you don’t have to shovel rain… see #1.
- We are lucky to have an abundance of fresh local ingredients available within 100 miles.
- West Coast Spirit… easily observed in a gathering of great people, relaxed, welcoming, and – more often than not – planned on the spur of the moment.
Some of our best and most memorable gatherings are planned at the last minute. Friends coming over? Put some ice in a bucket with your beverage of choice, throw a salmon on the BBQ and whip up this tasty sauce. This sauce is quicker to prepare than the salmon and is a crowd pleaser. It adds a lot of flavour and interest to a simple meal and it lets you spend more time with your friends than in the kitchen.
What’s the secret to this easy sauce? Olympic Natural Yogurt. I’ve raved about it before in my Coconut Lime Banana Bread recipe. I love it because it’s so versatile and can be used at breakfast, lunch and dinner. Does this make me a Yogurt Aficionado?
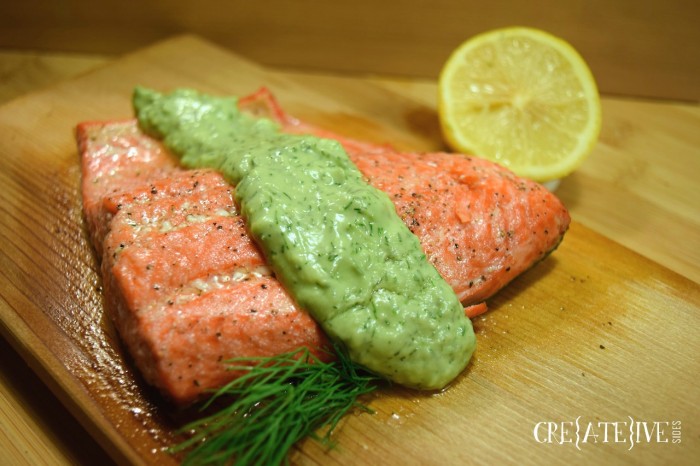
Cedar Planked Salmon with Avocado Dill Yogurt Sauce
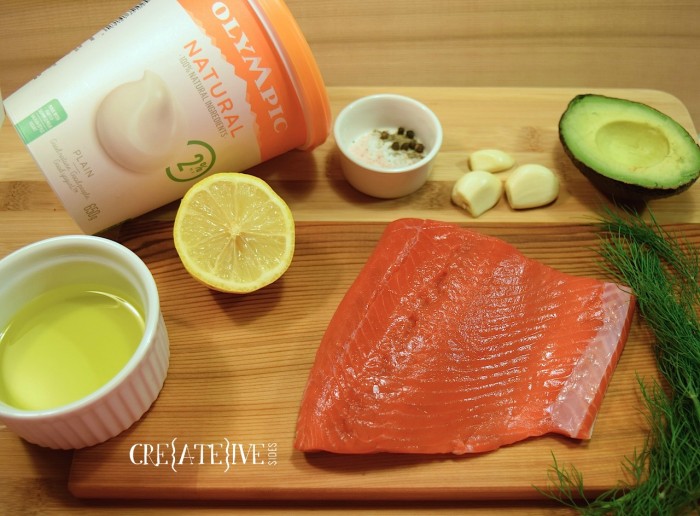
Ingredients
1 avocado
½ cup Olympic Natural Plain yogurt
3 tbsp dill (chopped)
1 clove garlic (pressed)
2 tbsp lemon juice
Salt
Pepper
4 salmon fillets
1 tbsp olive oil
Cedar Plank or parchment lined baking tray
Instructions
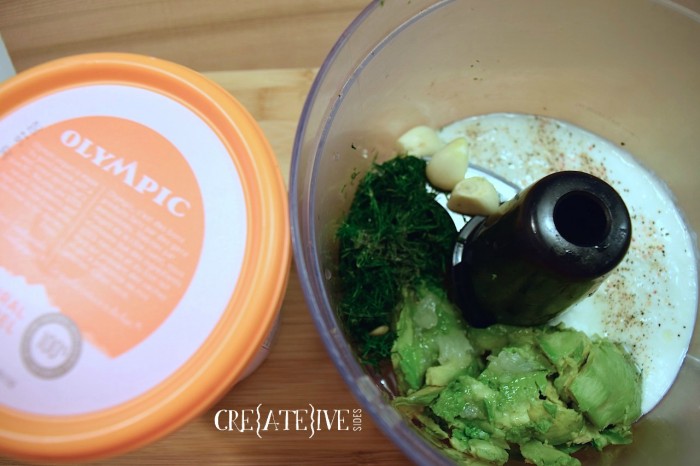
Avocado Dill Yogurt Sauce
- In a food processor, combine avocado, Olympic Natural yogurt, dill, pressed garlic, lemon juice, salt and pepper until smooth and creamy.
- For garlic lovers you can blend the cloves of garlic whole but you may end up with small chunks in the sauce. If you prefer a smoother sauce, press the garlic first.
Cedar Plank Salmon (Baked)
- Submerge your cedar plank in water for 2-6 hours prior to cooking. Weigh down the plank with a heavy object.
- Preheat oven to 400 degrees
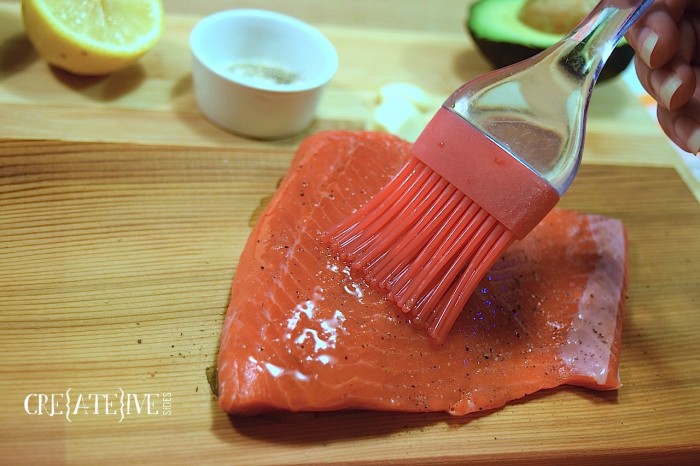
- Place salmon skin side down on cedar plank.
- Brush olive oil on salmon then season with salt and pepper.
- Bake for approximately 10-15 minutes depending on thickness of your fillets. A good rule of thumb is 10 minutes of baking time for each 1” of thickness.
- Serve topped with Avocado Dill Yogurt Sauce
Cedar Plank Salmon (BBQ)
- Complete Steps 1-4 as above
- Place the plank on a preheated hot grill. Turn down to low and close the lid.
- Keep the lid closed as much as possible. Plank should smoulder not flame. If the plank starts to flame, spritz the plank with a spray bottle of water.
- Serve topped with Avocado Dill Yogurt Sauce
As mentioned in my previous post, Olympic products are made right here on the west coast in Delta, B.C. with 100% natural ingredients and fresh milk from cows who live close to their dairies. The milk has a shorter commute than my husband does to go to work. It’s that fresh!
Olympic’s packaging has a great new look and easily spotted in the grocery isle (as well as my fridge – my husband and I both went to the store and picked up yogurt last Tuesday without telling the other. I’ll be referencing these recipes over the next few weeks as I have approximately 3kg of yogurt in my fridge. Thank goodness it’s Back to School time!)
Disclaimer: Although this post has been generously sponsored by Olympic, the opinions and language are my own. If I would not serve it to my family, I would never suggest you serve it to yours.
The post Salmon with Avocado Dill Yogurt Sauce appeared first on Creative Sides.
]]>The post Finding Dory Cupcake Tutorial *VIDEO* appeared first on Creative Sides.
]]>Finding Dory Cupcake Tutorial
Cupcakes and Icing
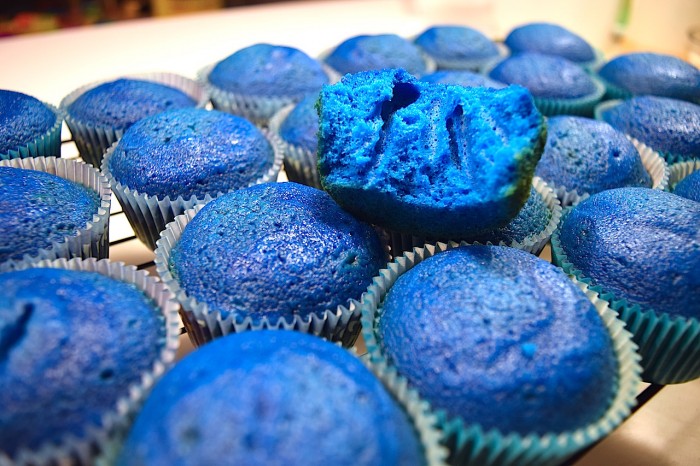
Step 1: Make a batch of your favourite vanilla cupcakes, adding a small amount of Wilton’s Gel Icing Color in Royal Blue into the batter before pouring into the cupcake liners and baking. (I found both Finding Dory themed and plain blue cupcake liners at Michael’s that worked perfectly).
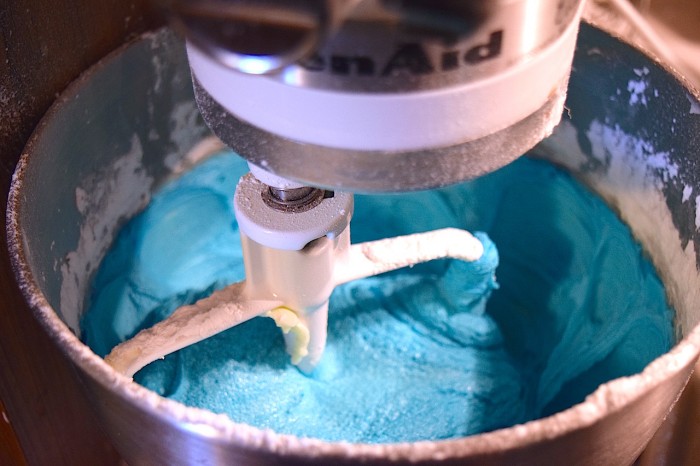
Step 2: While the cupcakes are baking, mix up your buttercream icing (this is my favourite recipe), again adding a small amount of Wilton’s Gel Icing Color in Royal Blue to the mix to match the cupcakes. Spoon the icing into an icing bag fitted with a 1M decorating tip.
Step 3: When the cupcakes are cooled, ice the tops with a simple swirl of the buttercream icing.
Finding Dory Royal Icing Topper
Step 4: Print a colour Dory outline to use as your guide. This one worked well for me.
Step 5: Whip up a batch of Royal Icing, and separate into 4 parts.
Step 6: Using Wilton’s Color Right Performance System, color your separated portions of Royal Icing Blue (20 drops of blue, 1 drop of black), Yellow (20 drops of yellow)and Black (20 drops of black), leaving a very small portion white.
Step 7: Place the printed Dory outline on a large cutting board or cookie sheet and cover with waxed or parchment paper. Secure waxed paper, leaving the dory outline free to reposition as needed.
Step 8: Pour royal icing into individual icing bags fitted with a #2 decorating tip. Use a decorating bag holder or tall glass to hold the bags, ensuring each bag stays upright with the tip flush against the bottom so no icing leaks while not in use.
Step 9: Begin tracing the outline in blue, and follow in black. Let it rest for 10 minutes or until partially set.

Step 10: Fill in the yellow parts of the fins and the white of the eye. Use a toothpick to place a dot of black in the centre of each eye. *note* in the images and video I started with a pink iris, however it was much too finicky and in the future I’ll omit the pink and stick with simple white and black eyes.
Step 11: Fill in the black are of the mouth and back, using a toothpick to spread and settle the icing in the large areas
Step 12: Fill in the blue of the body, using a toothpick to spread and settle the icing.
Step 13: Let finished toppers set for 4 hours, or overnight before placing on cupcakes.

Step 14: Serve and enjoy!
Watch the above steps in our handy-dandy Finding Dory Cupcake Topper Tutorial video.
If you’re looking for more Finding Dory Party Ideas, this is the place to find them!

The post Finding Dory Cupcake Tutorial *VIDEO* appeared first on Creative Sides.
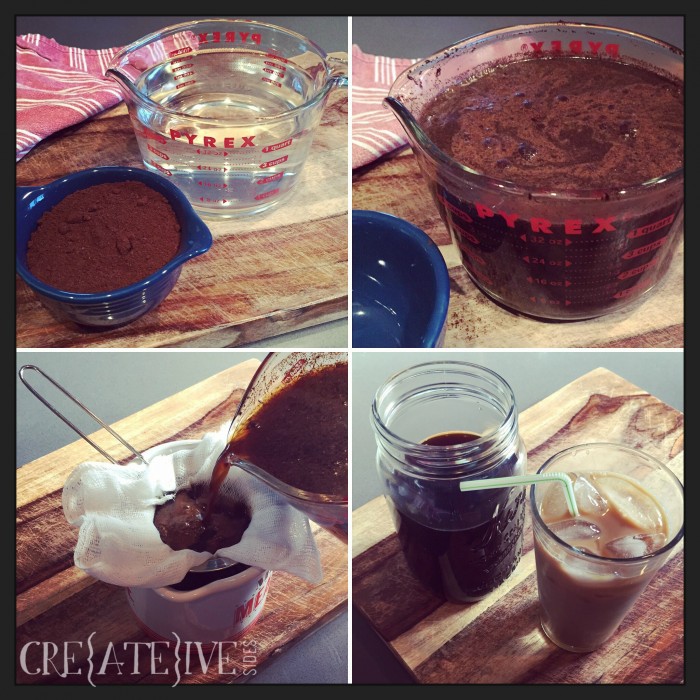
]]>The post Cold Brew Coffee appeared first on Creative Sides.
]]>
The weather is warming up which means it’s the season of flip-flops, late evening sunsets, and my favourite summer staple: cold brew coffee. Don’t confuse cold brew with iced coffee; this isn’t your traditionally brewed coffee poured over ice. Cold brew takes time and a little love but it’s worth the wait. Removing heat from the brewing process removes coffee’s acidity so you end up with a coffee concentrate that’s subtly sweet. It’s also ridiculously cheap to make so wave goodbye to your overpriced lattes and embrace the magic that is making a week’s worth of coffee for just a couple of bucks.
Ingredients
1 cup coarsely ground coffee
4 cups cold-to-room-temperature water
Directions
Pour 4 cups of (not hot) water into a container that gives you a bit of stirring room at the top once you add your coffee. Sprinkle coffee over the top and give your mixture a gentle stir to incorporate your grounds and make sure they aren’t dry. Cover container with plastic wrap and store at room temperature for 12 – 24 hours.
Strain mixture through cheesecloth or a very fine sieve. Cover tightly and store in the fridge.
This makes approximately 3-3/4 cups of coffee concentrate. Serve over ice with water or milk, depending on how you like your brew. I’m a fan of a 1:1 coffee concentrate to water ratio with a healthy splash of cream and a dash of maple syrup but half the fun is playing around with ratios and additions to find your perfect cup o’ (cold) joe.
The post Cold Brew Coffee appeared first on Creative Sides.
]]>The post Apricot Glazed Pork Kebabs appeared first on Creative Sides.
]]>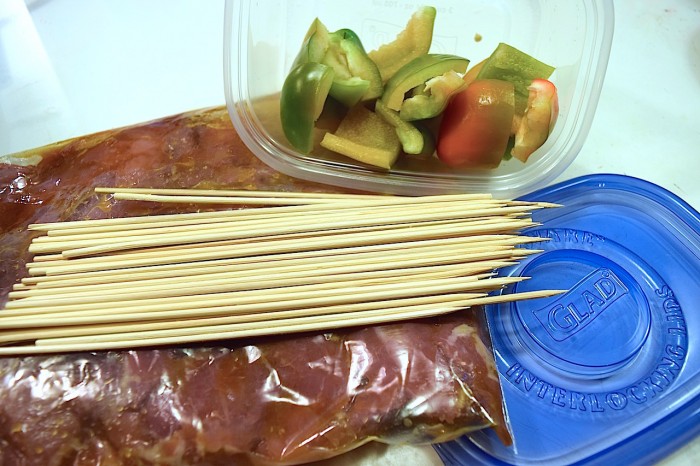
Freeze-Ahead Apricot Glazed Pork Kebabs
If you are planning to make this meal to freeze, follow the recipe below but mix the pork AND the peppers in with the marinade. Then, once you have threaded the skewers, my secret tip is to seal them individually with GLAD® Press’n Seal. I lay out a sheet (textured side up) that is twice as long as the skewers plus an extra inch. Then I lay 3-4 skewers side by side, leaving an inch between each skewer, plus an inch on either end. I fold the sheet length wise overtop of the pork kebabs and run my finger along each edge to seal. Then I run a finger in between each kebab to seal them off individually and voilà! No more fighting with kebabs that are stuck together! You can place each packet into a GLAD® Freezer Bag and you’re good to go.
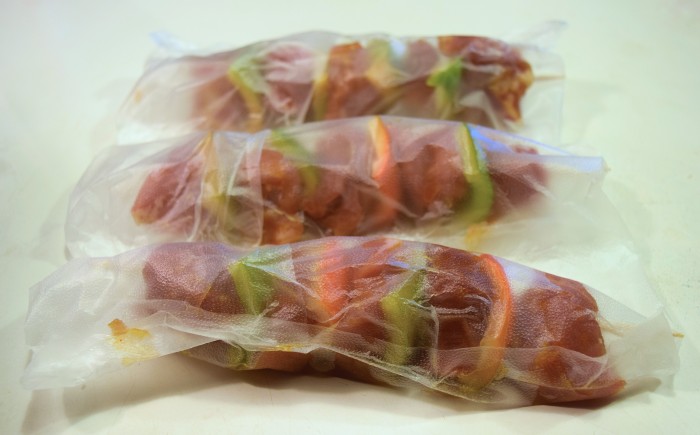
One thing to note: some people prefer their kebabs with extra crisp vegetables. If this is you, I would recommend freezing meat-only kebabs, and making separate vegetable kebabs the same day you’ll be eating them. If you’re not so picky about the texture of the vegetables, or like them a bit softer, you’re good to freeze.
To cook, thaw the pork kebabs overnight in the refrigerator, or for a few hours on the counter. Then grill away!

- 8 oz jar of apricot jam
- 2 tbsp soy sauce
- 1 tbsp lemon juice
- 4 garlic cloves, minced
- 1 tbsp chipotle child powder
- salt & pepper
- 2 lbs pork tenderloin, cubed
- 1 green pepper
- 1 sweet pepper
- Warm apricot jam in the microwave for 1 minute
- In a mixing bowl, combine jam, soy sauce, lemon juice, garlic and chill powder, stirring well
- Cube pork tenderloin and place into a large zipper plastic bag
- Pour 3/4 of the mixture into the bag with the pork and let it marinade for at least 30 minutes
- Chop green and sweet peppers
- Preheat BBQ to medium heat
- Alternate threading pork and pepper cubes onto bamboo or metal skewers
- Dust with salt and pepper, and additional chili powder to taste
- Place skewers on the BBQ and baste with remaining apricot mixture
- Cook for 3 minutes and turn
- Baste other half and cook for an additional 4 minutes or until done.
- If you don't have a BBQ, the kebabs can be cooked in the oven at 375°F for 25-30 minutes
I’m a big fan of weekly meal planning and prepping. You can find more prepare-ahead recipe ideas here, plus be sure to check out my meal planning tips too! Happy cooking!
All on the table disclaimer: Although this post has been generously sponsored by GLAD®, the opinions and language are my own. If I would not use it with my family, I would never suggest you use it with yours. Read our full disclosure statement here.
The post Apricot Glazed Pork Kebabs appeared first on Creative Sides.
]]>