The post DIY T-Shirt Upcycle appeared first on Creative Sides.
]]>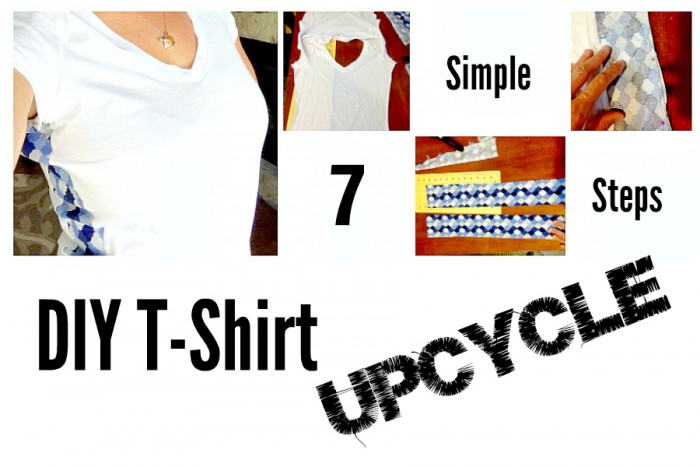
Spring has officially sprung, and whether you are experiencing warmer weather or still waiting for the thaw to come, it’s never to early to spruce up your wardrobe.
This t-shirt upcycle is a great project to do for 3 reasons:
- You have 6 t-shirts that are all the same and if you have to wear them one more time you are going to rip your arm off.
- You have a favourite t-shirt that you wear All. The. Time. And it may be looking a little tired under the arms (ahem… stains)
- You are bored to death with the t-shirt options and want to do something a bit funky
DIY T-Shirt Upcycle Instructions
What you need:
- 1 T-shirt (if you are buying a new one buy one or two sizes too small. I am a size medium and I would buy a small or extra small depending on the width of panel that I want to put in … wider the panel means smaller the shirt)
- 1 piece of materiel (cotton is easier than knit but both work) 2 inches longer than the measurement of armpit to bottom hem on the t-shirt.)
- Scissors or rotary cutter (I use a rotary cutter and cutting pad because I am the absolute worst at cutting a straight line)
- Pins
- Sewing machine
- Measuring tape
- Iron
How to do it:
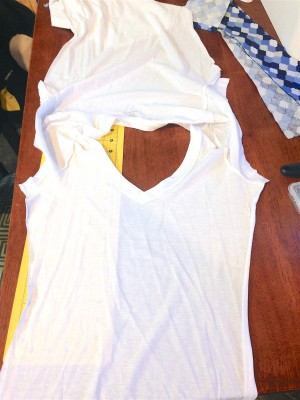
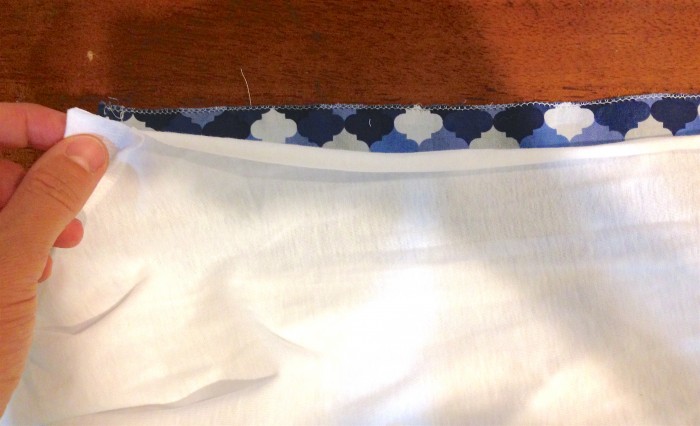
Step 1: Carefully cut right next to both sides of the side seams on the t-shirt. I carefully undid the seam the first time I did this project and that is 40 minutes I will never get back. Just trust yourself and cut those seams out. You will end up with an “opened up smock-like-thing”.
Step 2: Cut your piece of material into 2 strips/panels 2 inches longer than the measure of your t-shirt side seam. You will use the extra length for your seams. The width is totally up to you. You can also choose to cut them straight or flaring slightly at the bottom depending on the finished look that you want to achieve. Flared will create a more flowy top.
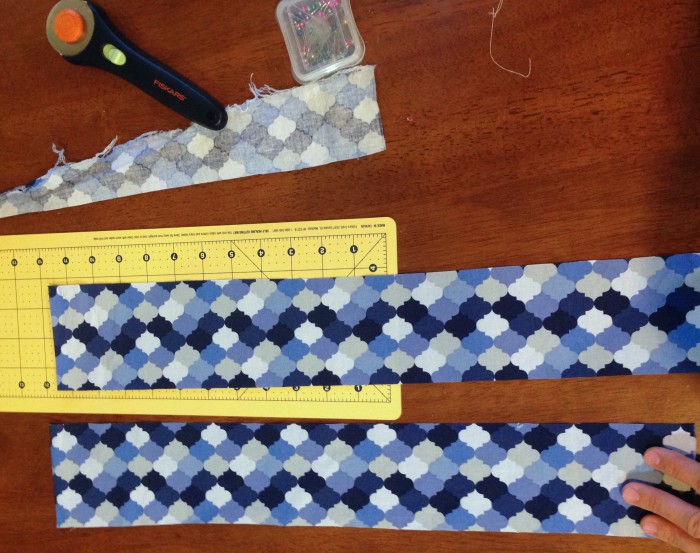
Step 3: If you are not using a knit fabric (they are a bit trickier so for a first go I suggest cotton) set your machine to a simple zig-zag stitch and whip around the edges to finish them.
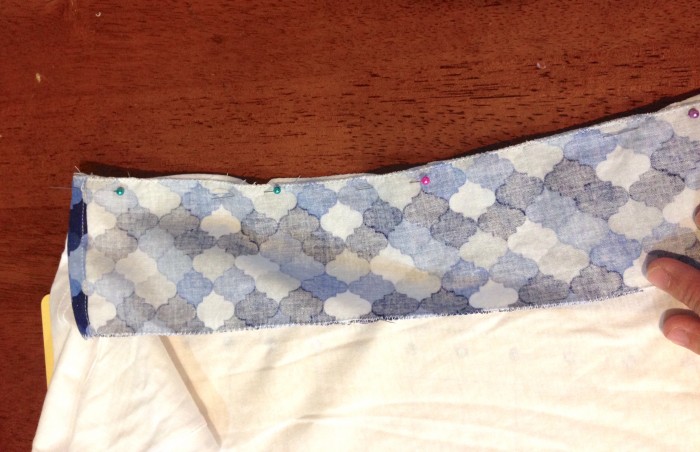
Step 4: Then fold the top edge over about ½ inch & press with a hot iron (trust me this is an important step that makes it come together so much better! Oh and don’t forget to use an ironing board or at the very least put a folded towel down on whatever surface you use!!). Fold over again and repeat pressing. Repeat on both panels. Sew this hem with a straight stitch.
Step 5: Put the good side of the t-shirt face up and the good side of panel face down (right-side to right-side). Place the hem you just made even with the armpit seam on the t-shirt and pin together all the way down the shirt. Sew this seam with a straight stitch. Make sure that you do a few stitches forward, backwards then forwards again at the beginning and end to secure it.
You’re doing great!
Step 6: Now keeping right-side to right-side pin and sew the other side of the panel.
Don’t worry about the bottom yet. Take a break and shake out.
Repeat with the other side of the shirt.
Step 7: Now repeat the fold press fold sew that you did at the top of the shirt down at the bottom so that you line up the panel to the rest of the t-shirt. When you sew start on the t-shirt and secure it well. Try and line up the stitching for a better look.
Et Voila! You are a creative GENIUS!!!


The post DIY T-Shirt Upcycle appeared first on Creative Sides.
]]>The post Refurbished Vanity DIY appeared first on Creative Sides.
]]>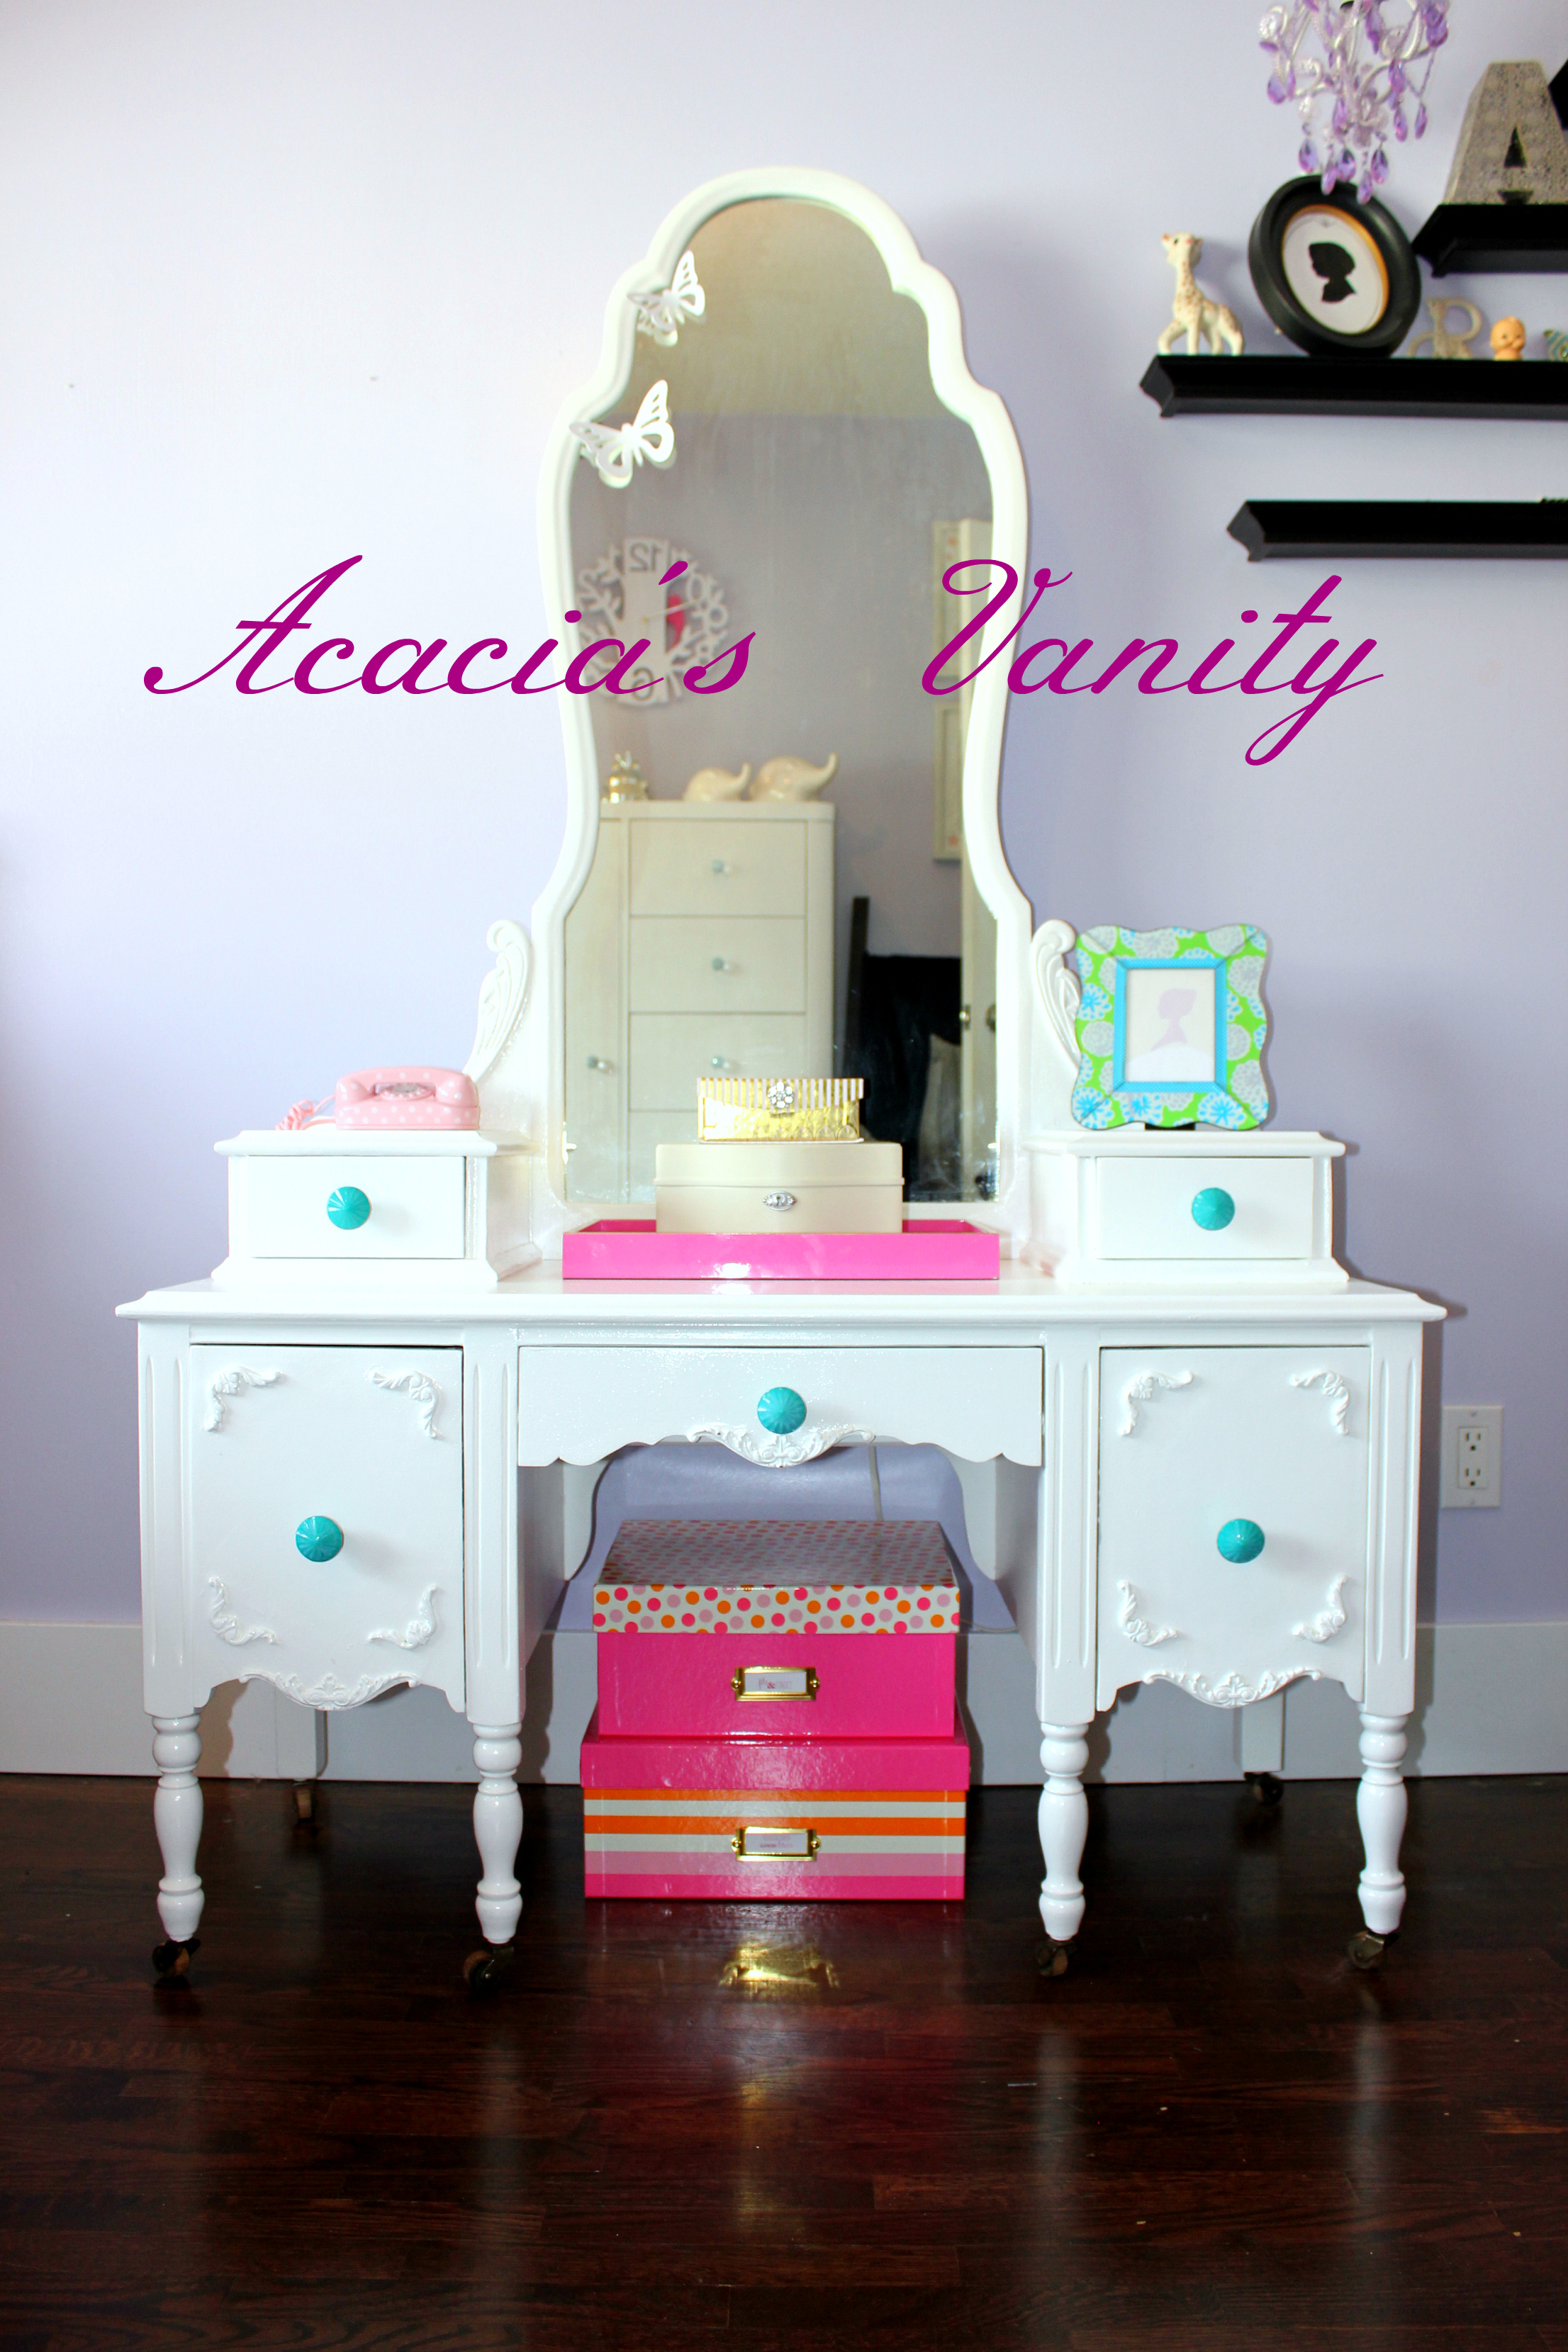
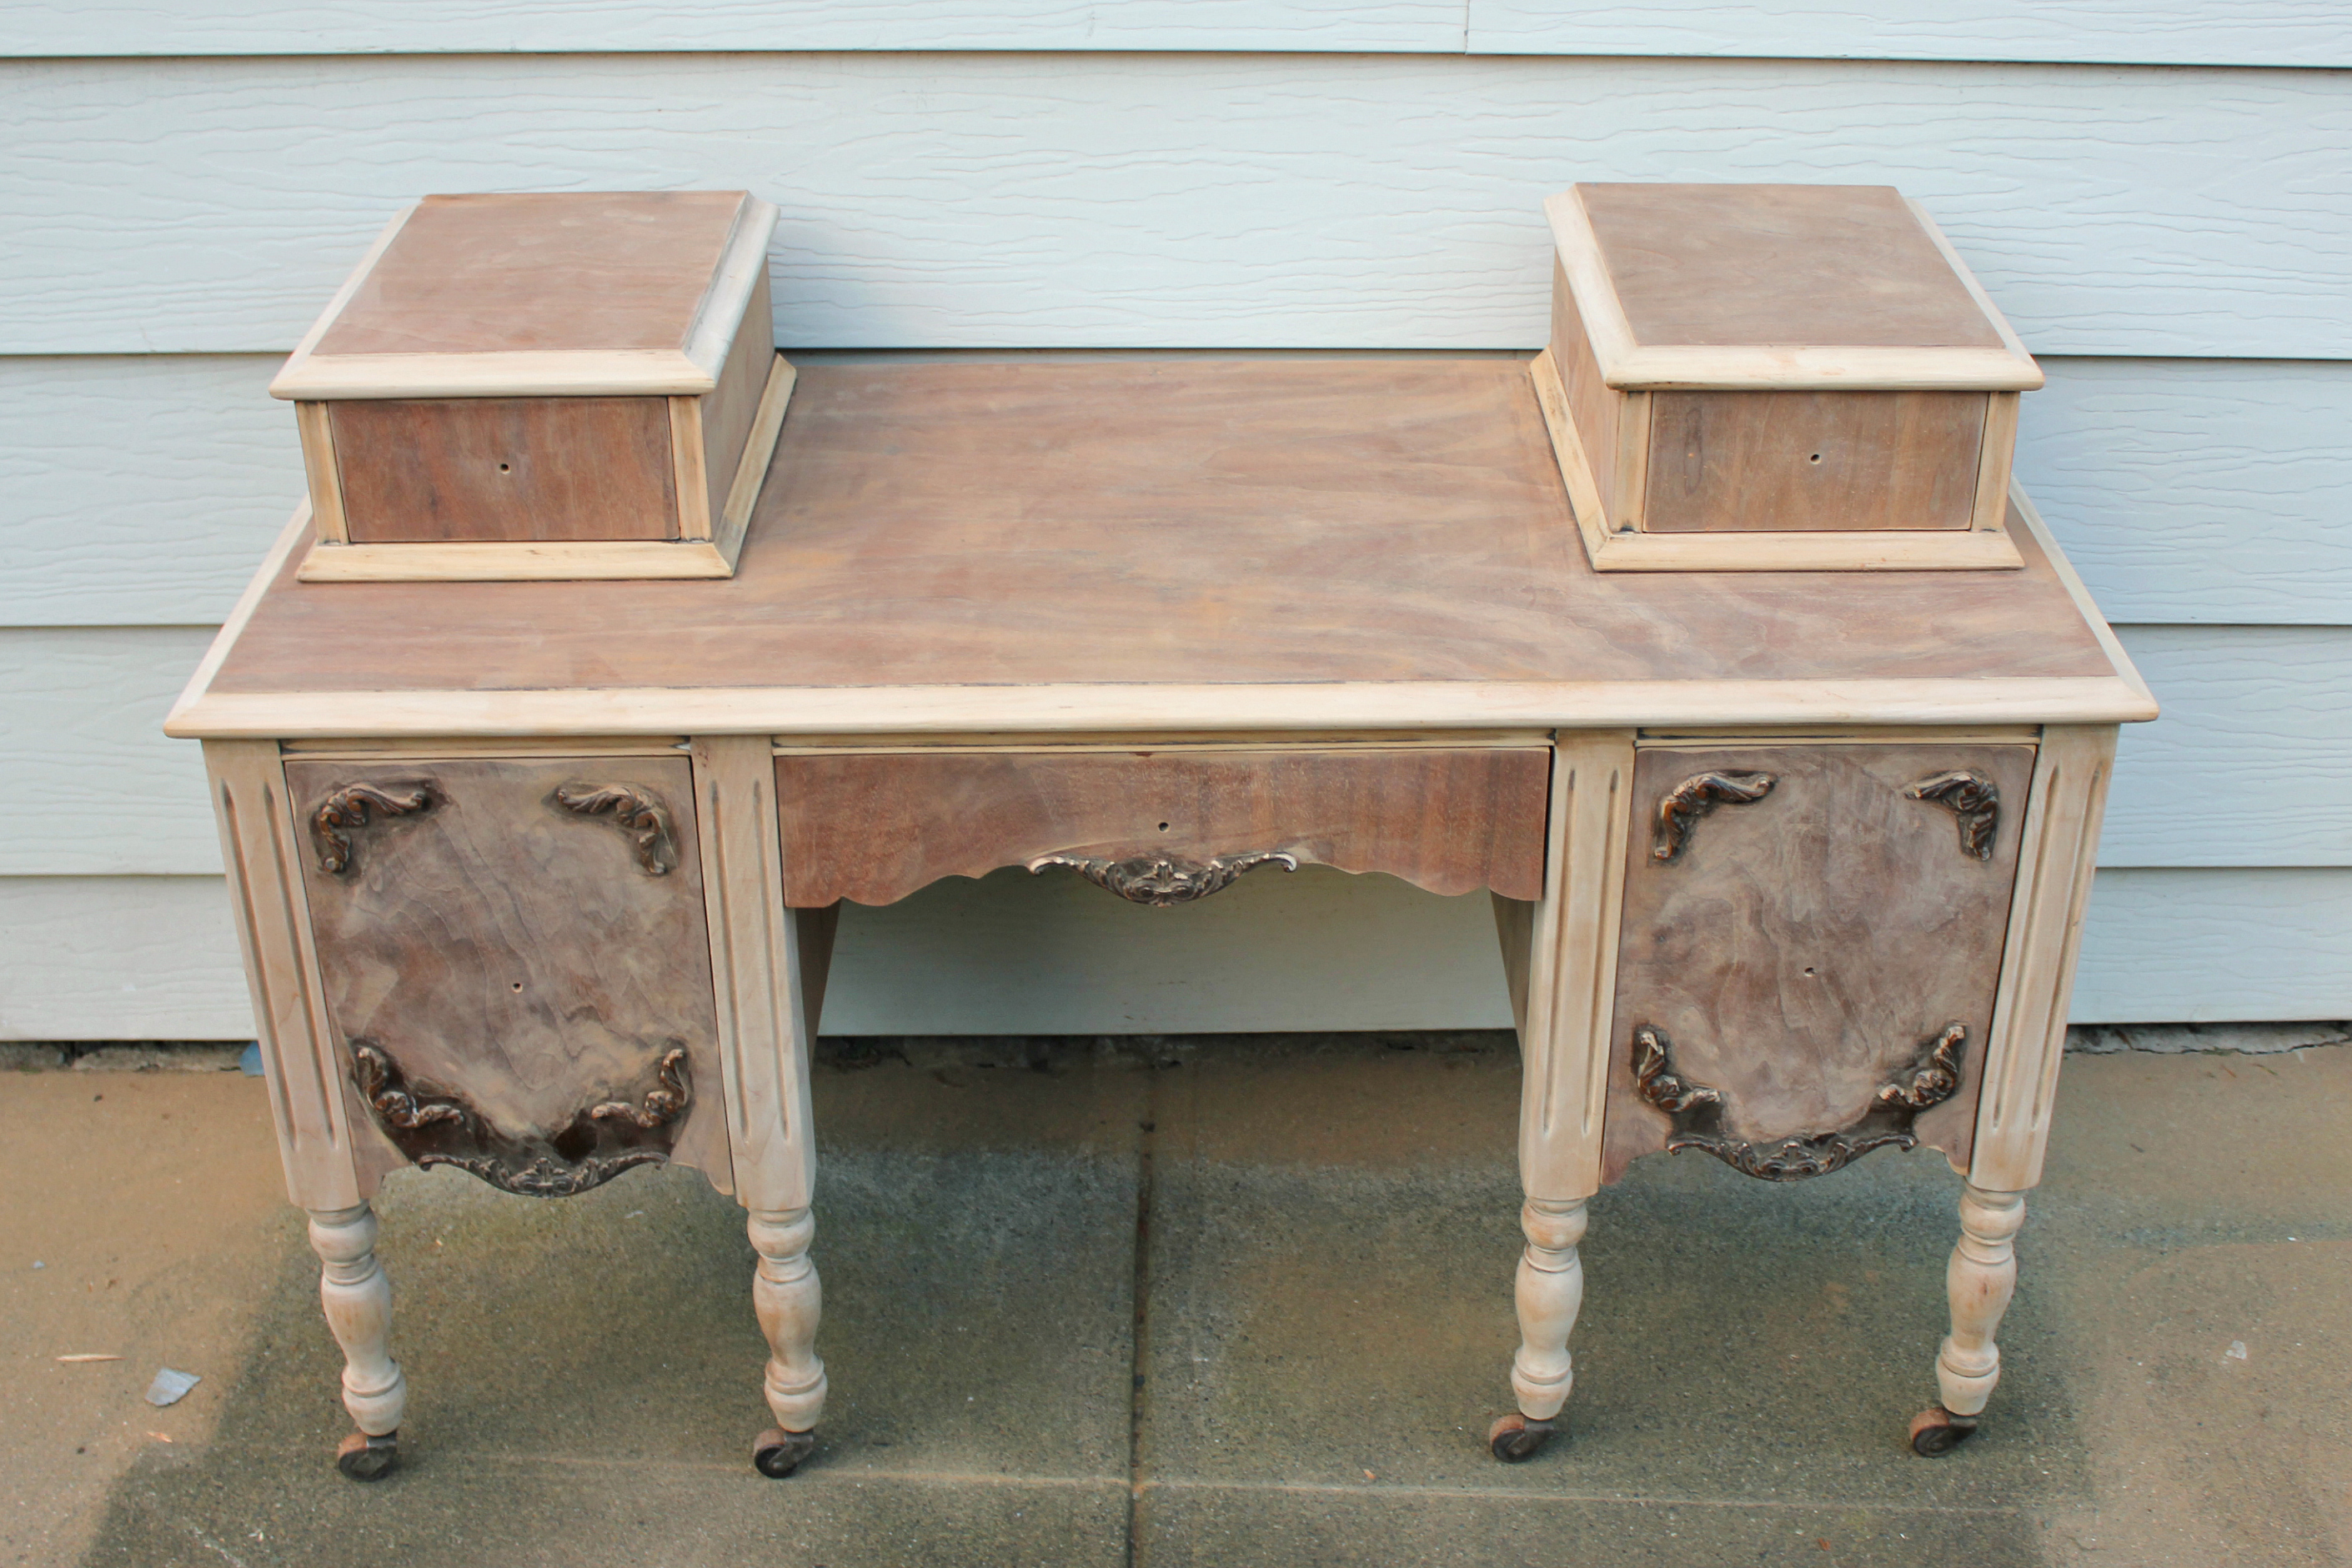
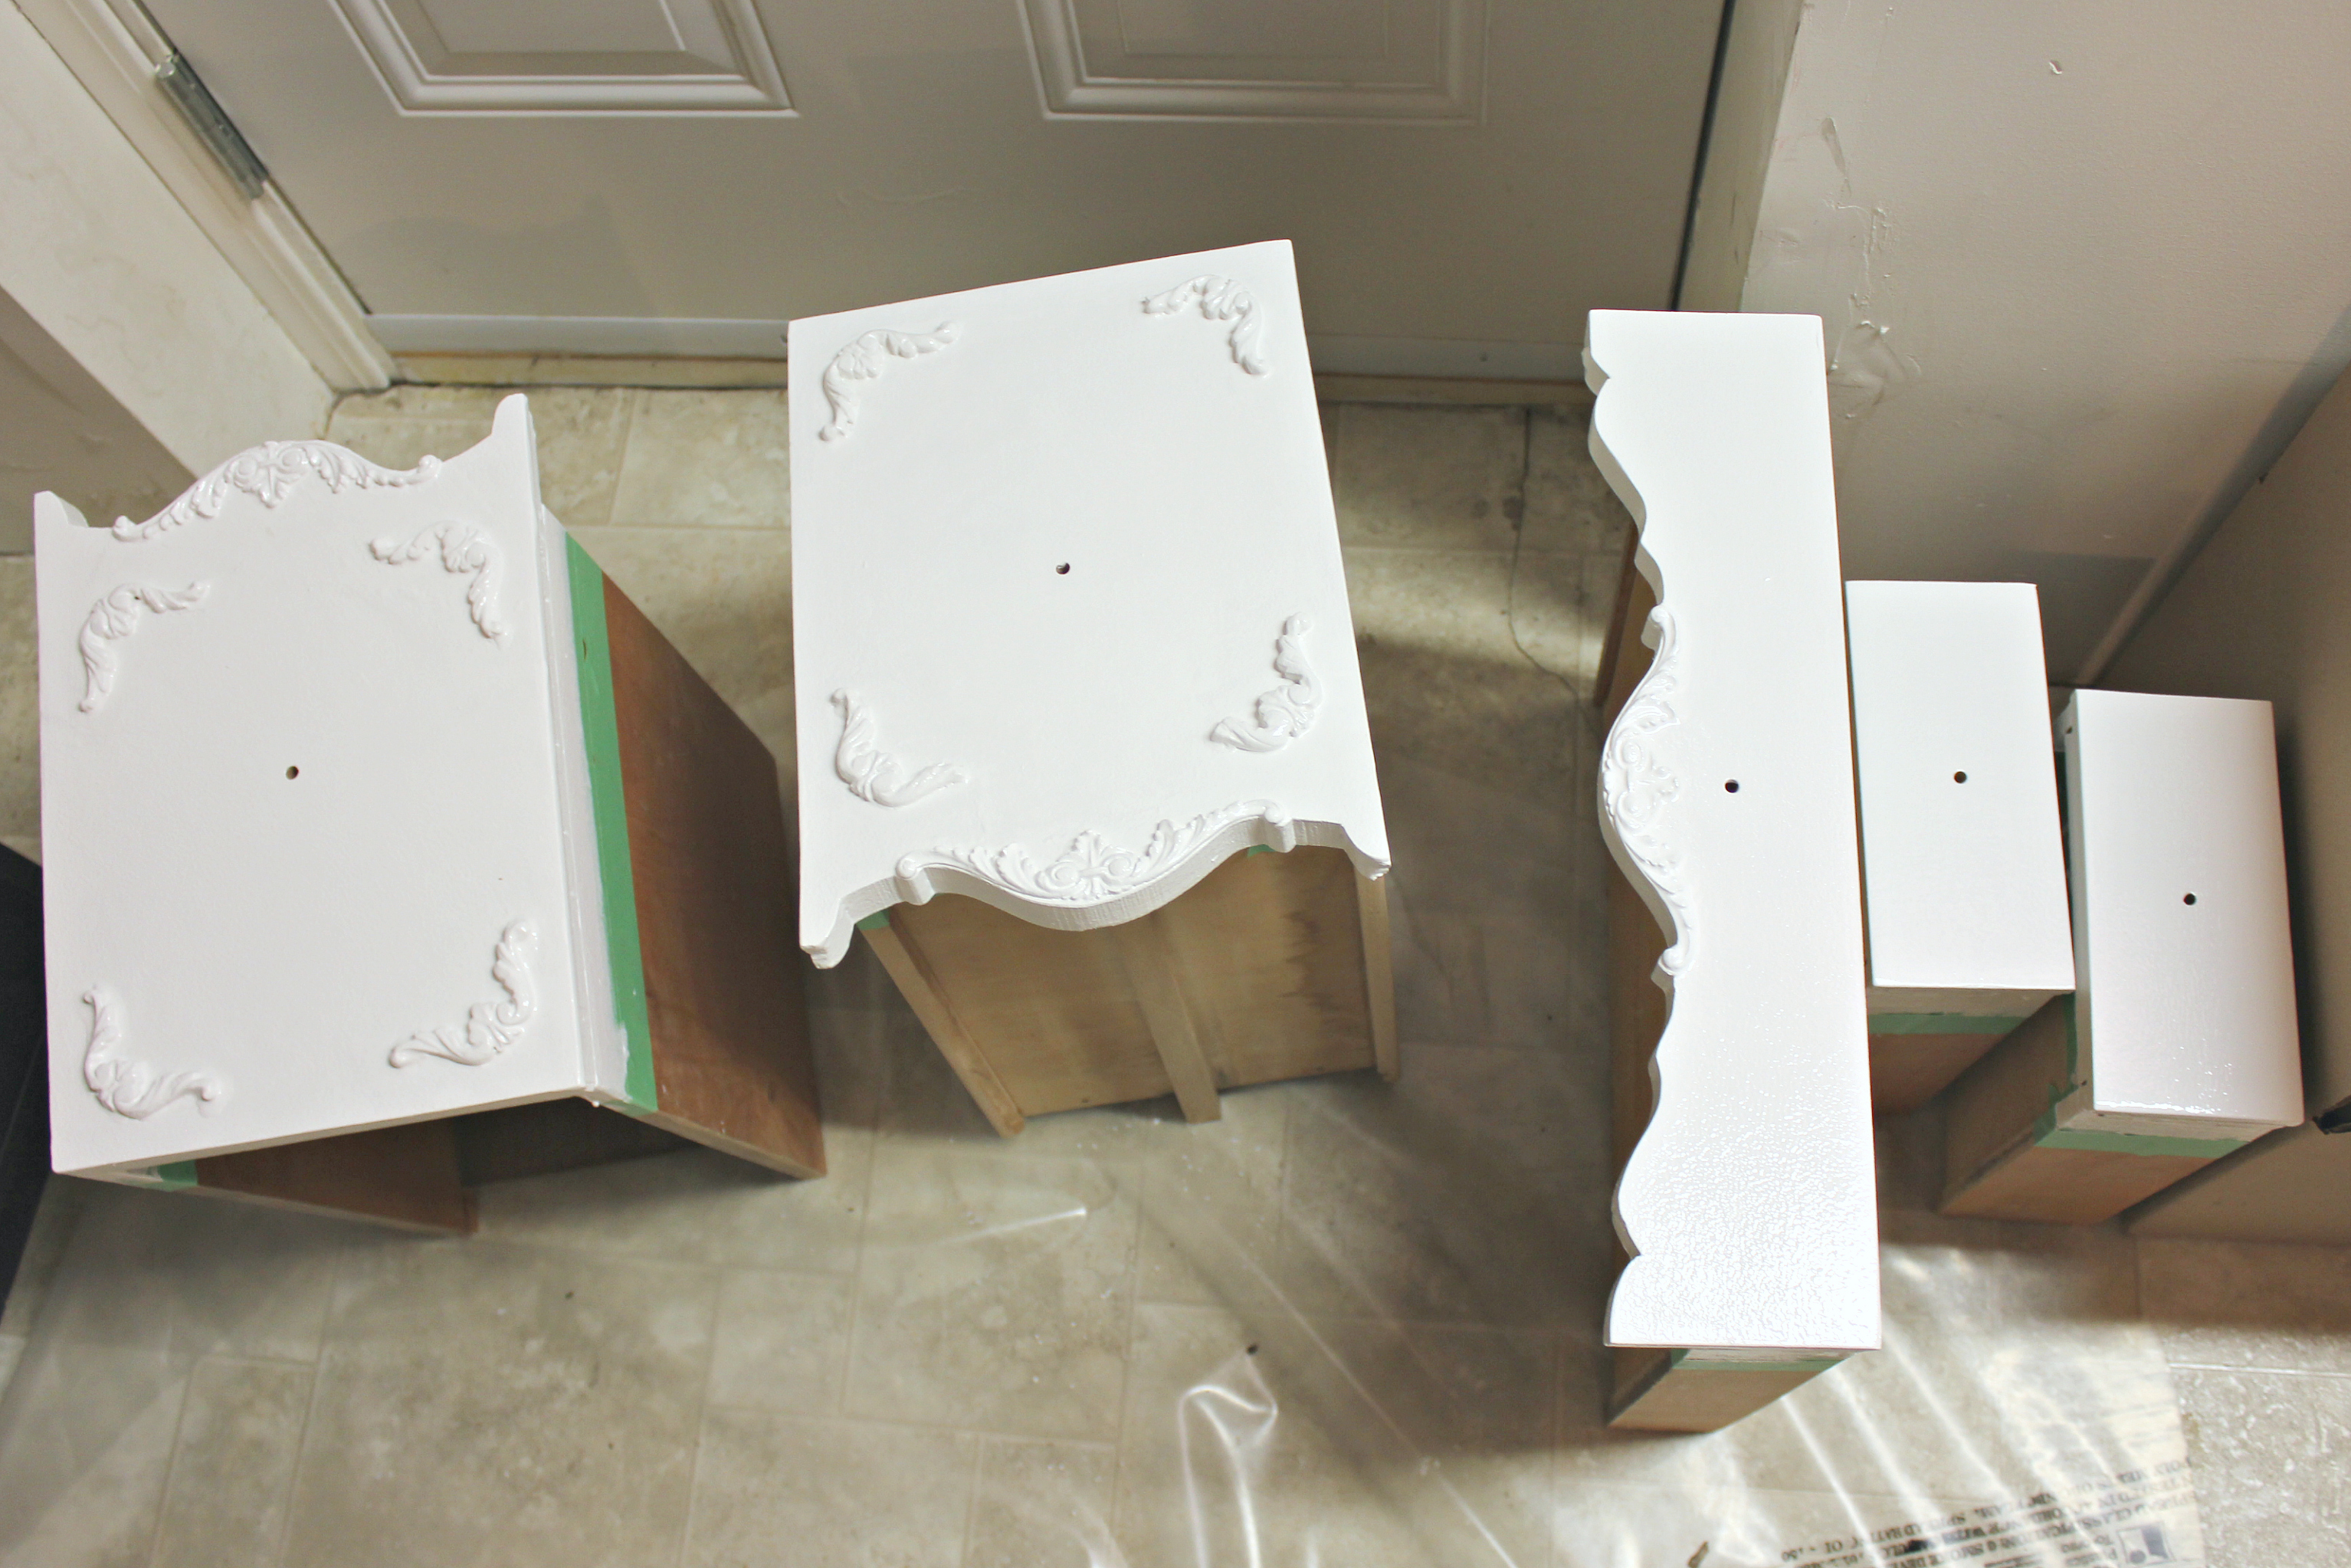
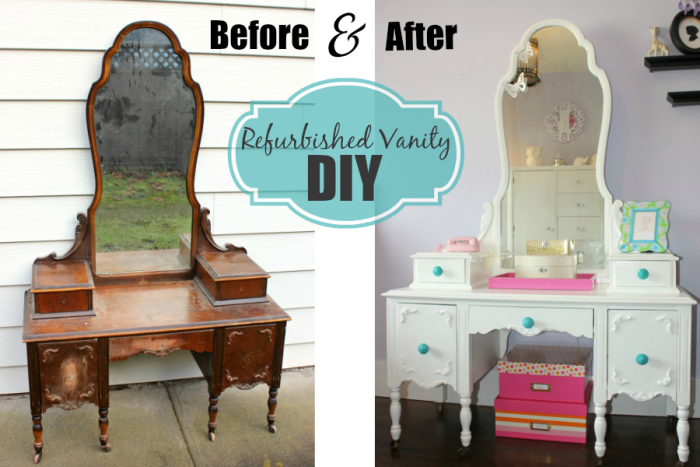
In an effort to transform our youngest daughter’s room from a nursery to a little girl’s domain, we had a couple projects up our sleeves. The first of these was refinishing this beautiful antique child’s vanity that my husband had acquired from a second hand store several years back. It was finally it’s moment to come up from the basement and shine!
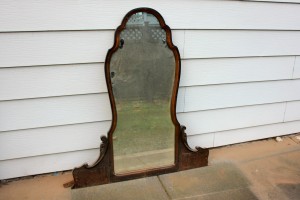
Before:
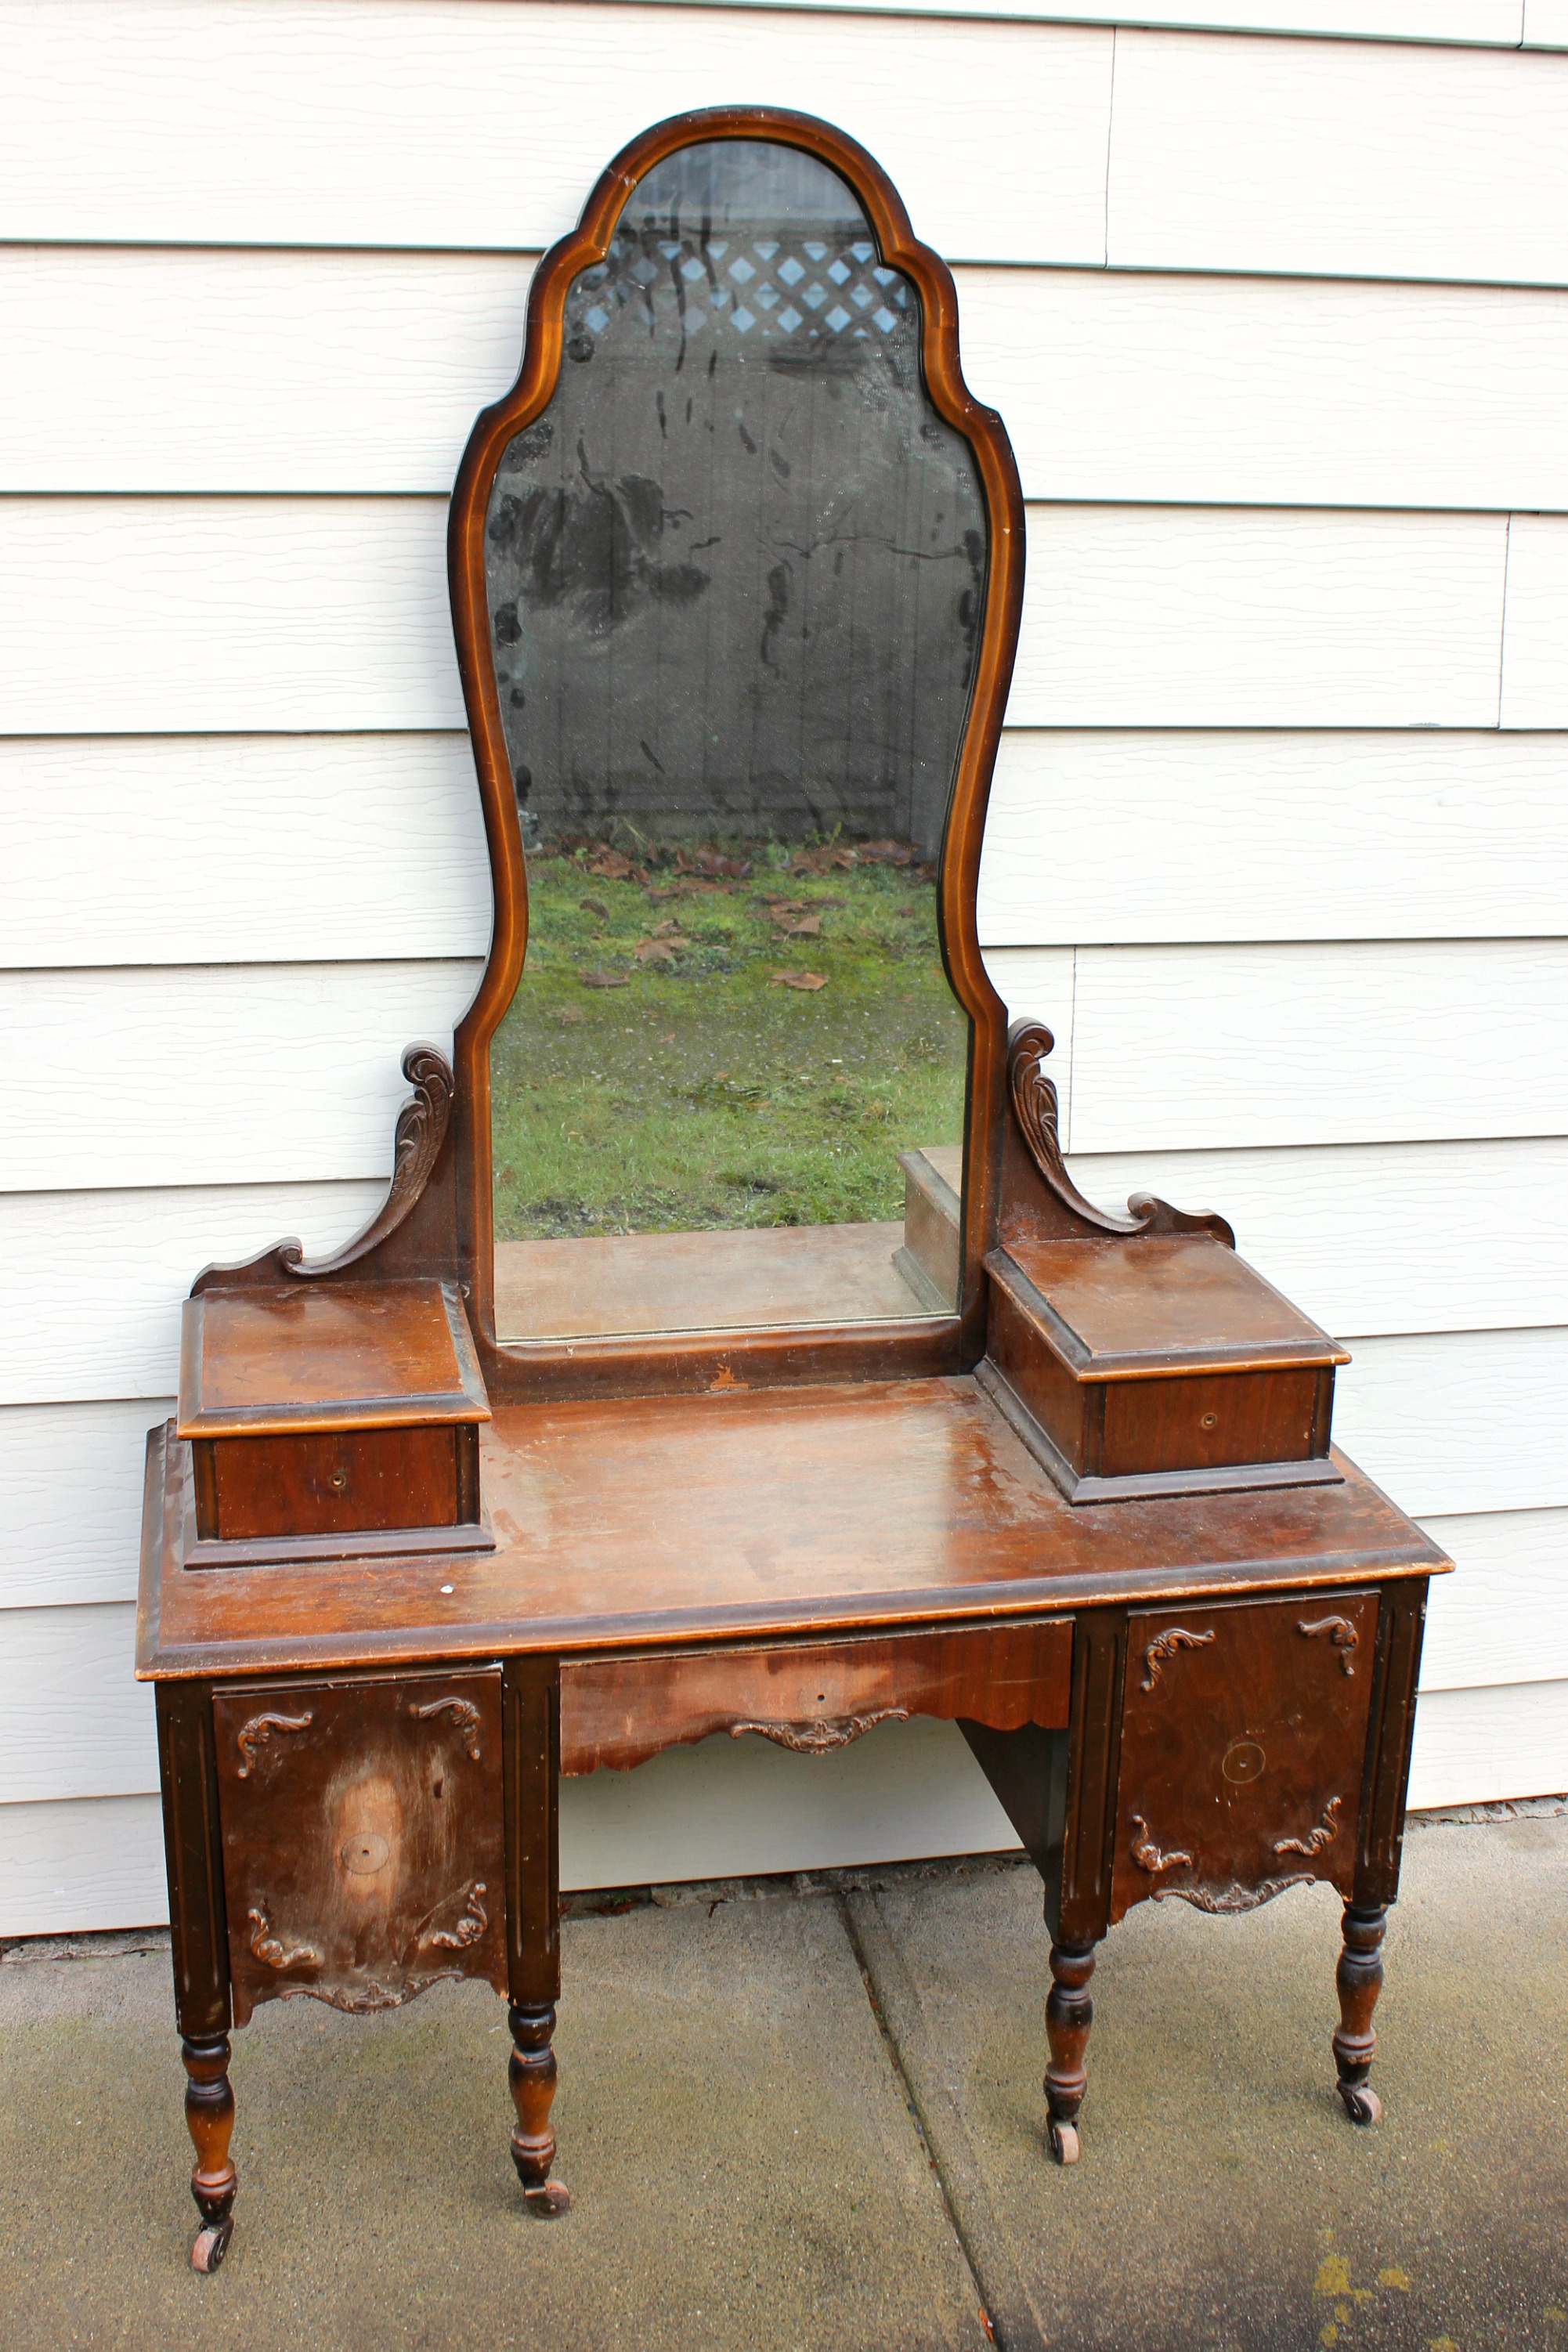
Just bursting with potential! You can see why the Hubster, with his woodwork loving ways, brought this gem home. I mean really, can’t you just see the potential bursting all over the place already?!
Refurbished Vanity DIY
Tools and Supplies:
Finishing nails (we saved the original)
Screws (we saved the original)
Sandpaper – 20, 120 and 200 grit
Orbital Sander (optional)
Lint free cloth
Drop Cloth or Plastic (optional – to protect your work area)
Painters Tape
Smooth 4″ Foam roller
2″ Paint Brush
Paint Tray
Zinsser Cover Stain Interior/Exterior Primer-Sealer Stain Killer
Benjamin Moore’s High-gloss Latex Paint in Chantilly lace (OC-65)
Hammer
Drill and corresponding bits
Hardware (handles/pulls)
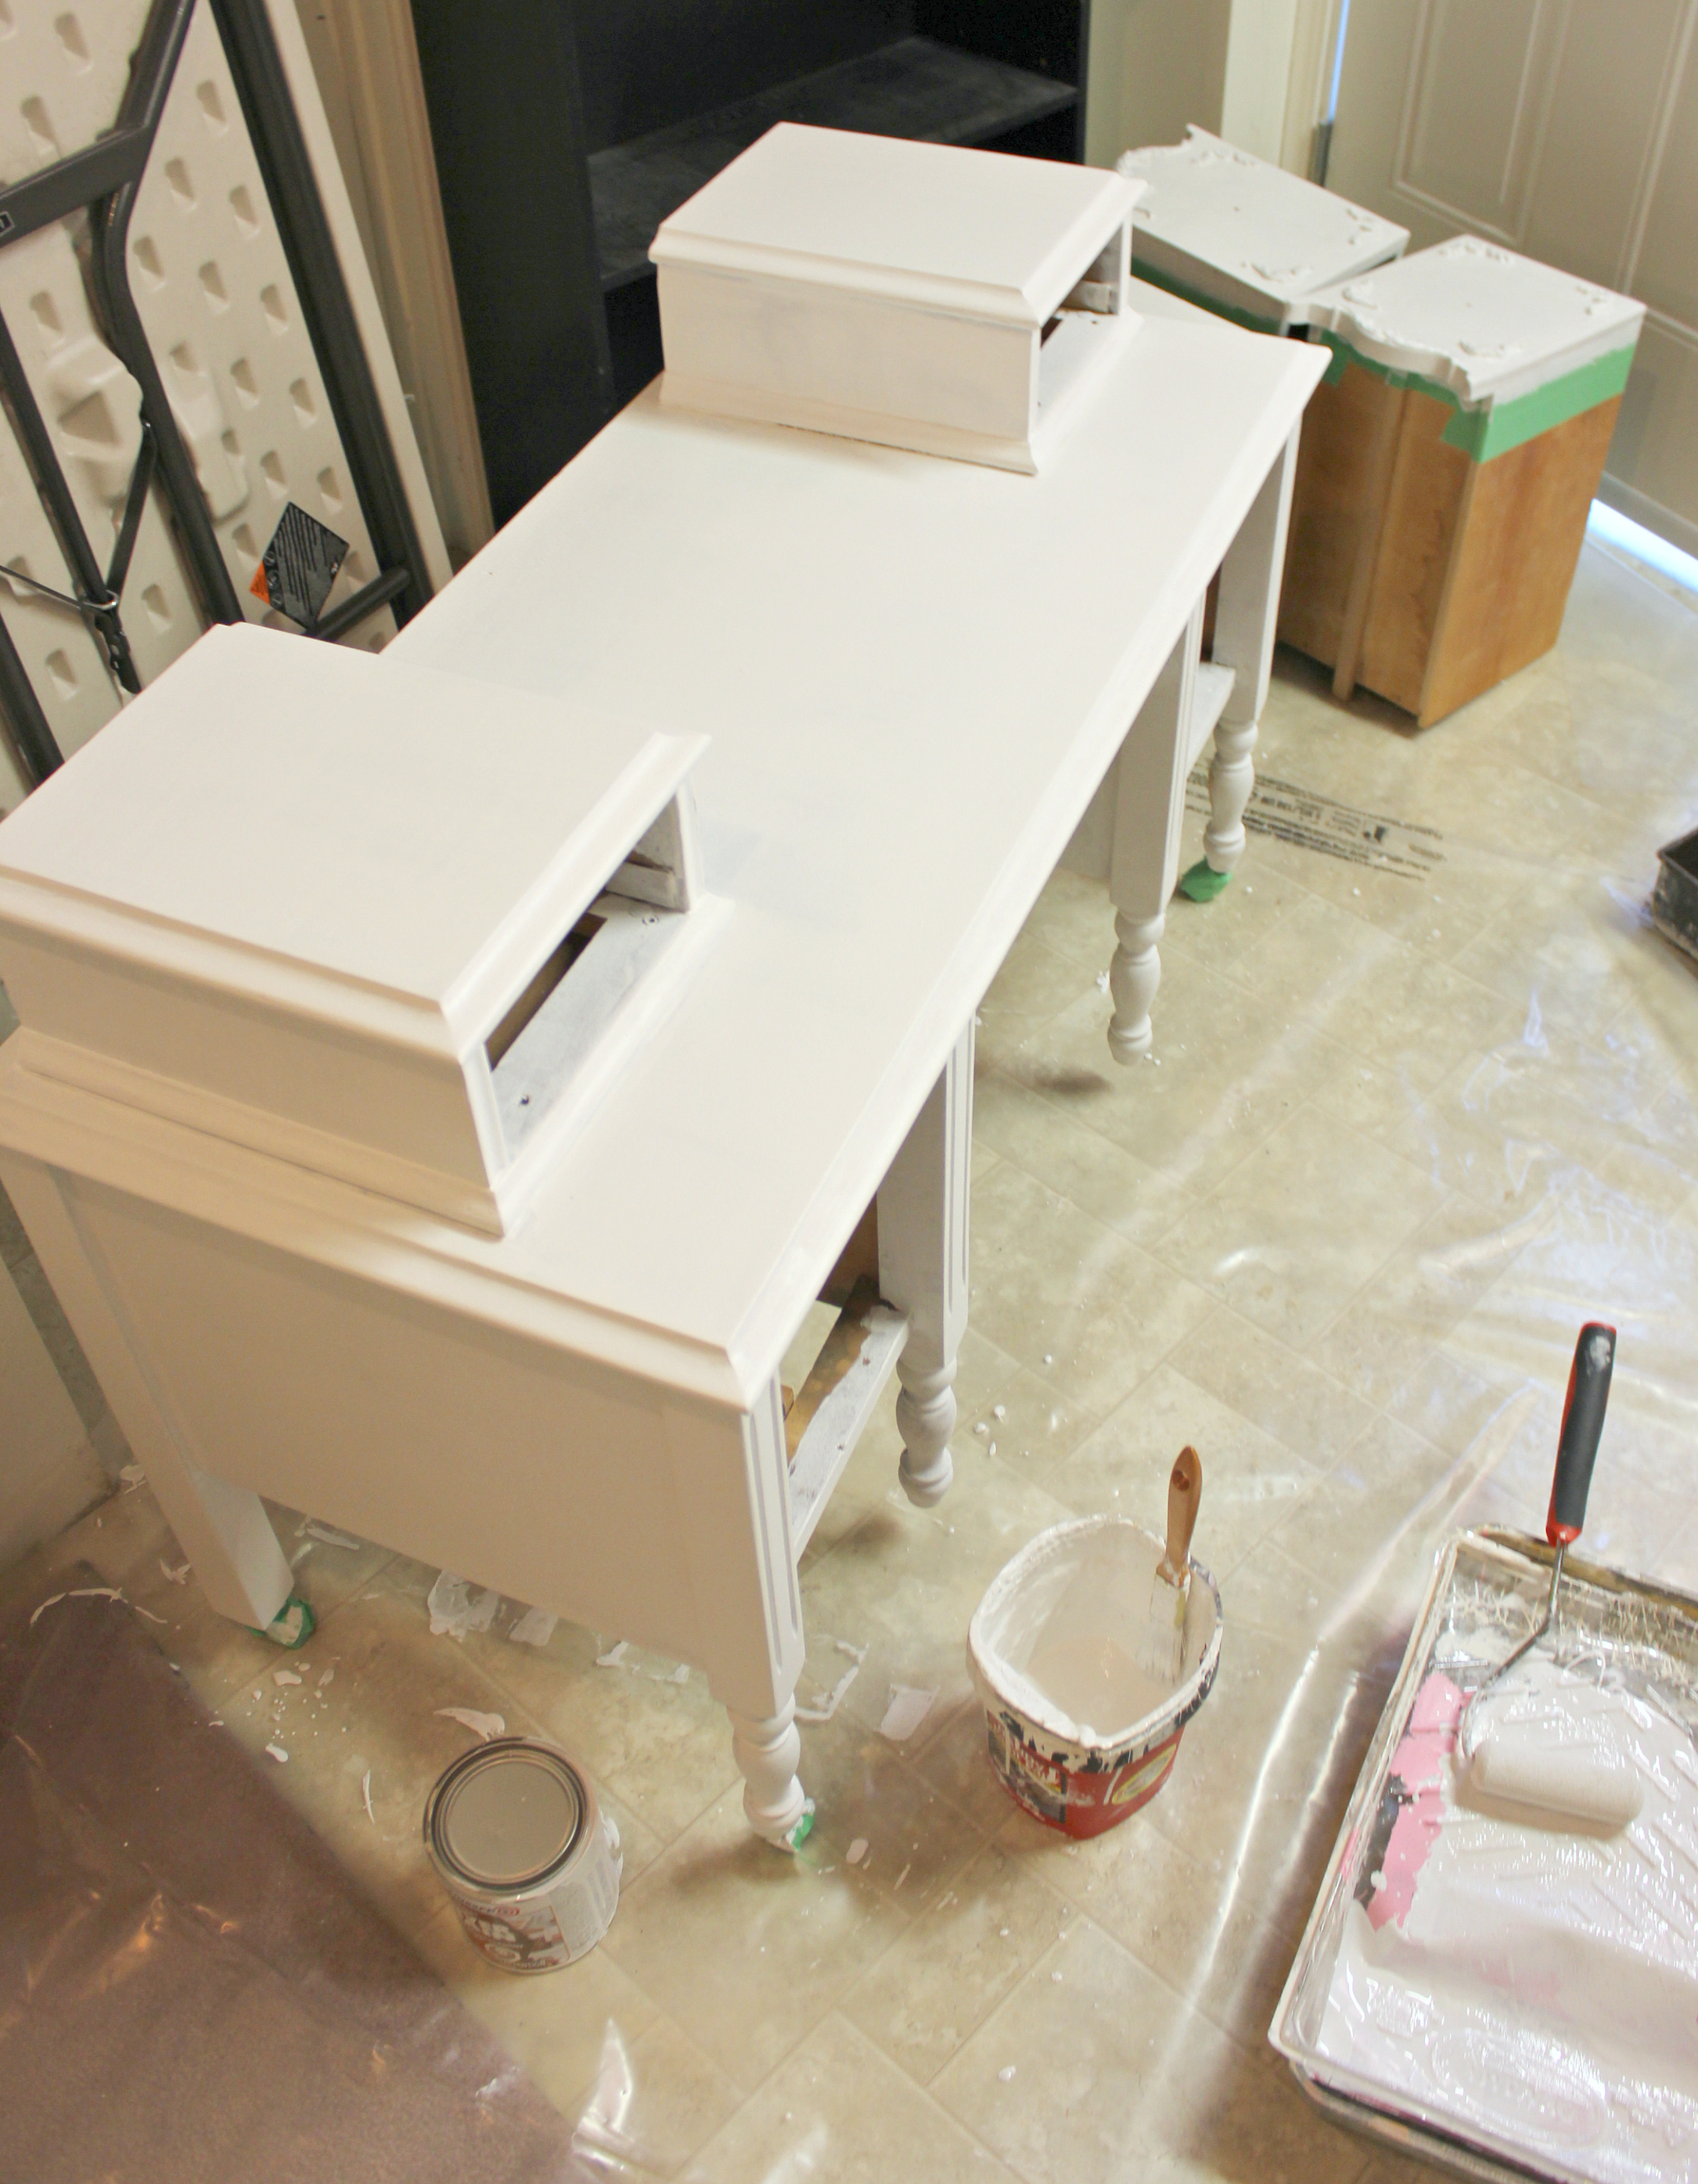
Step 1:
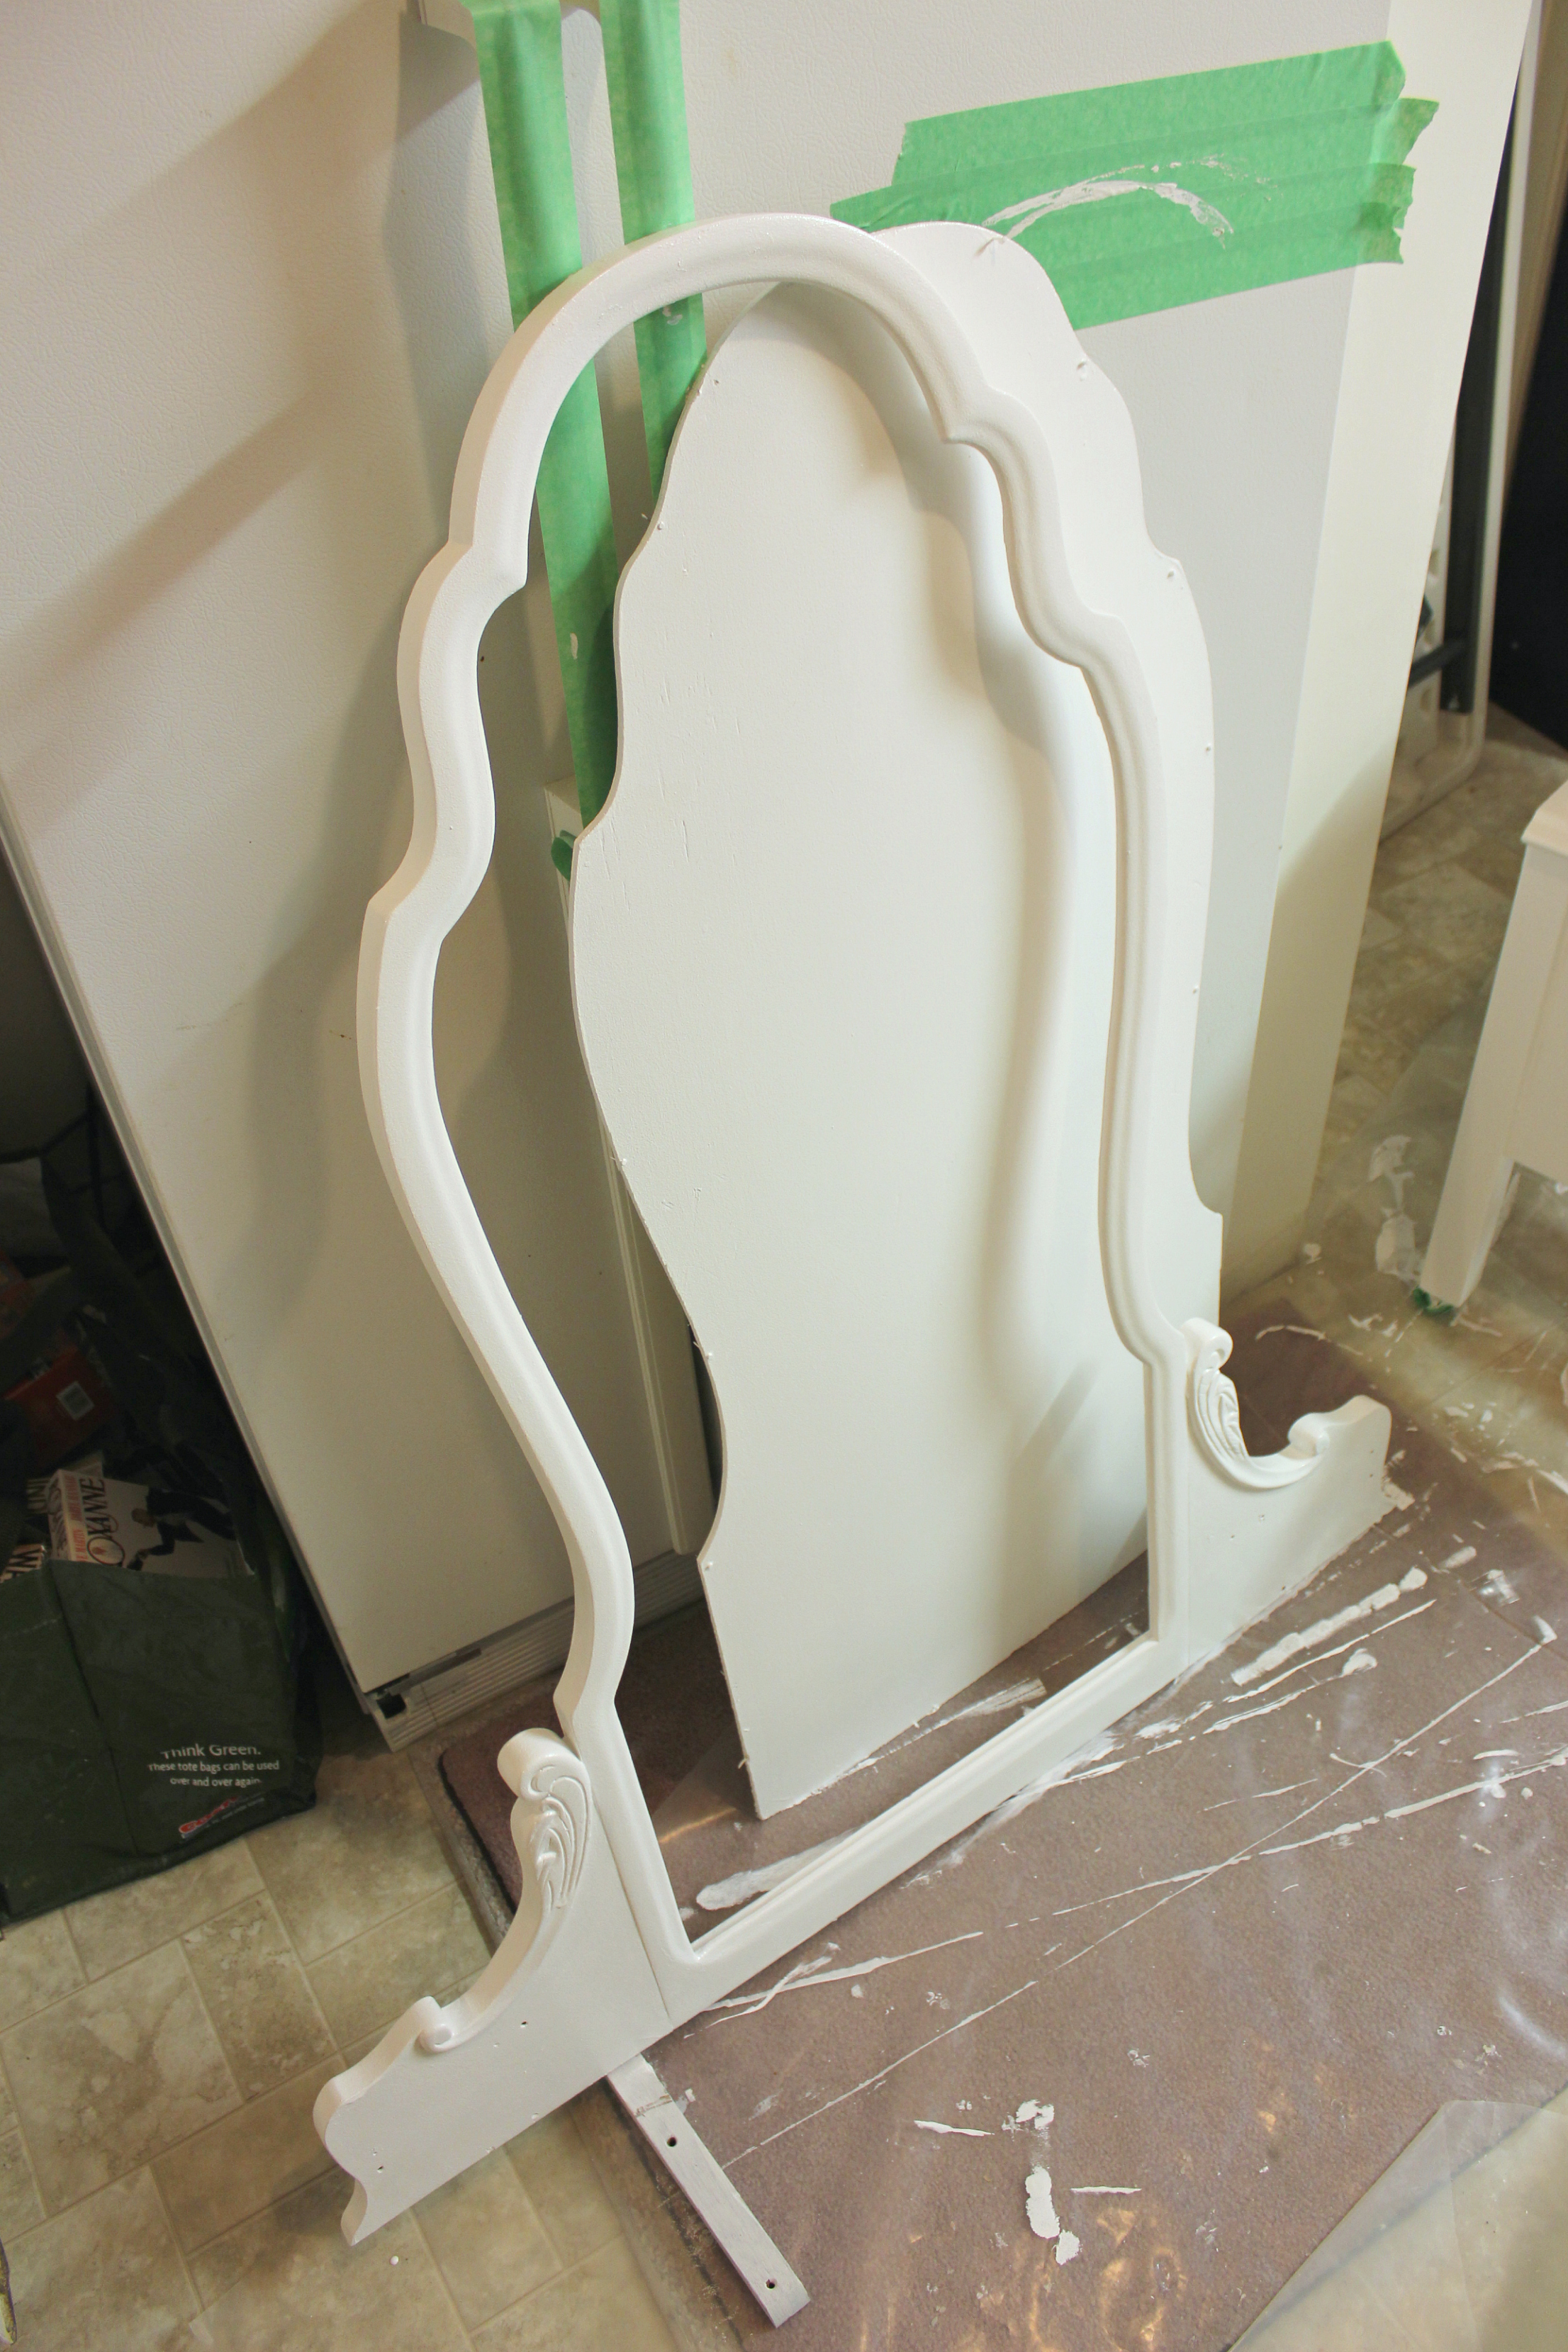
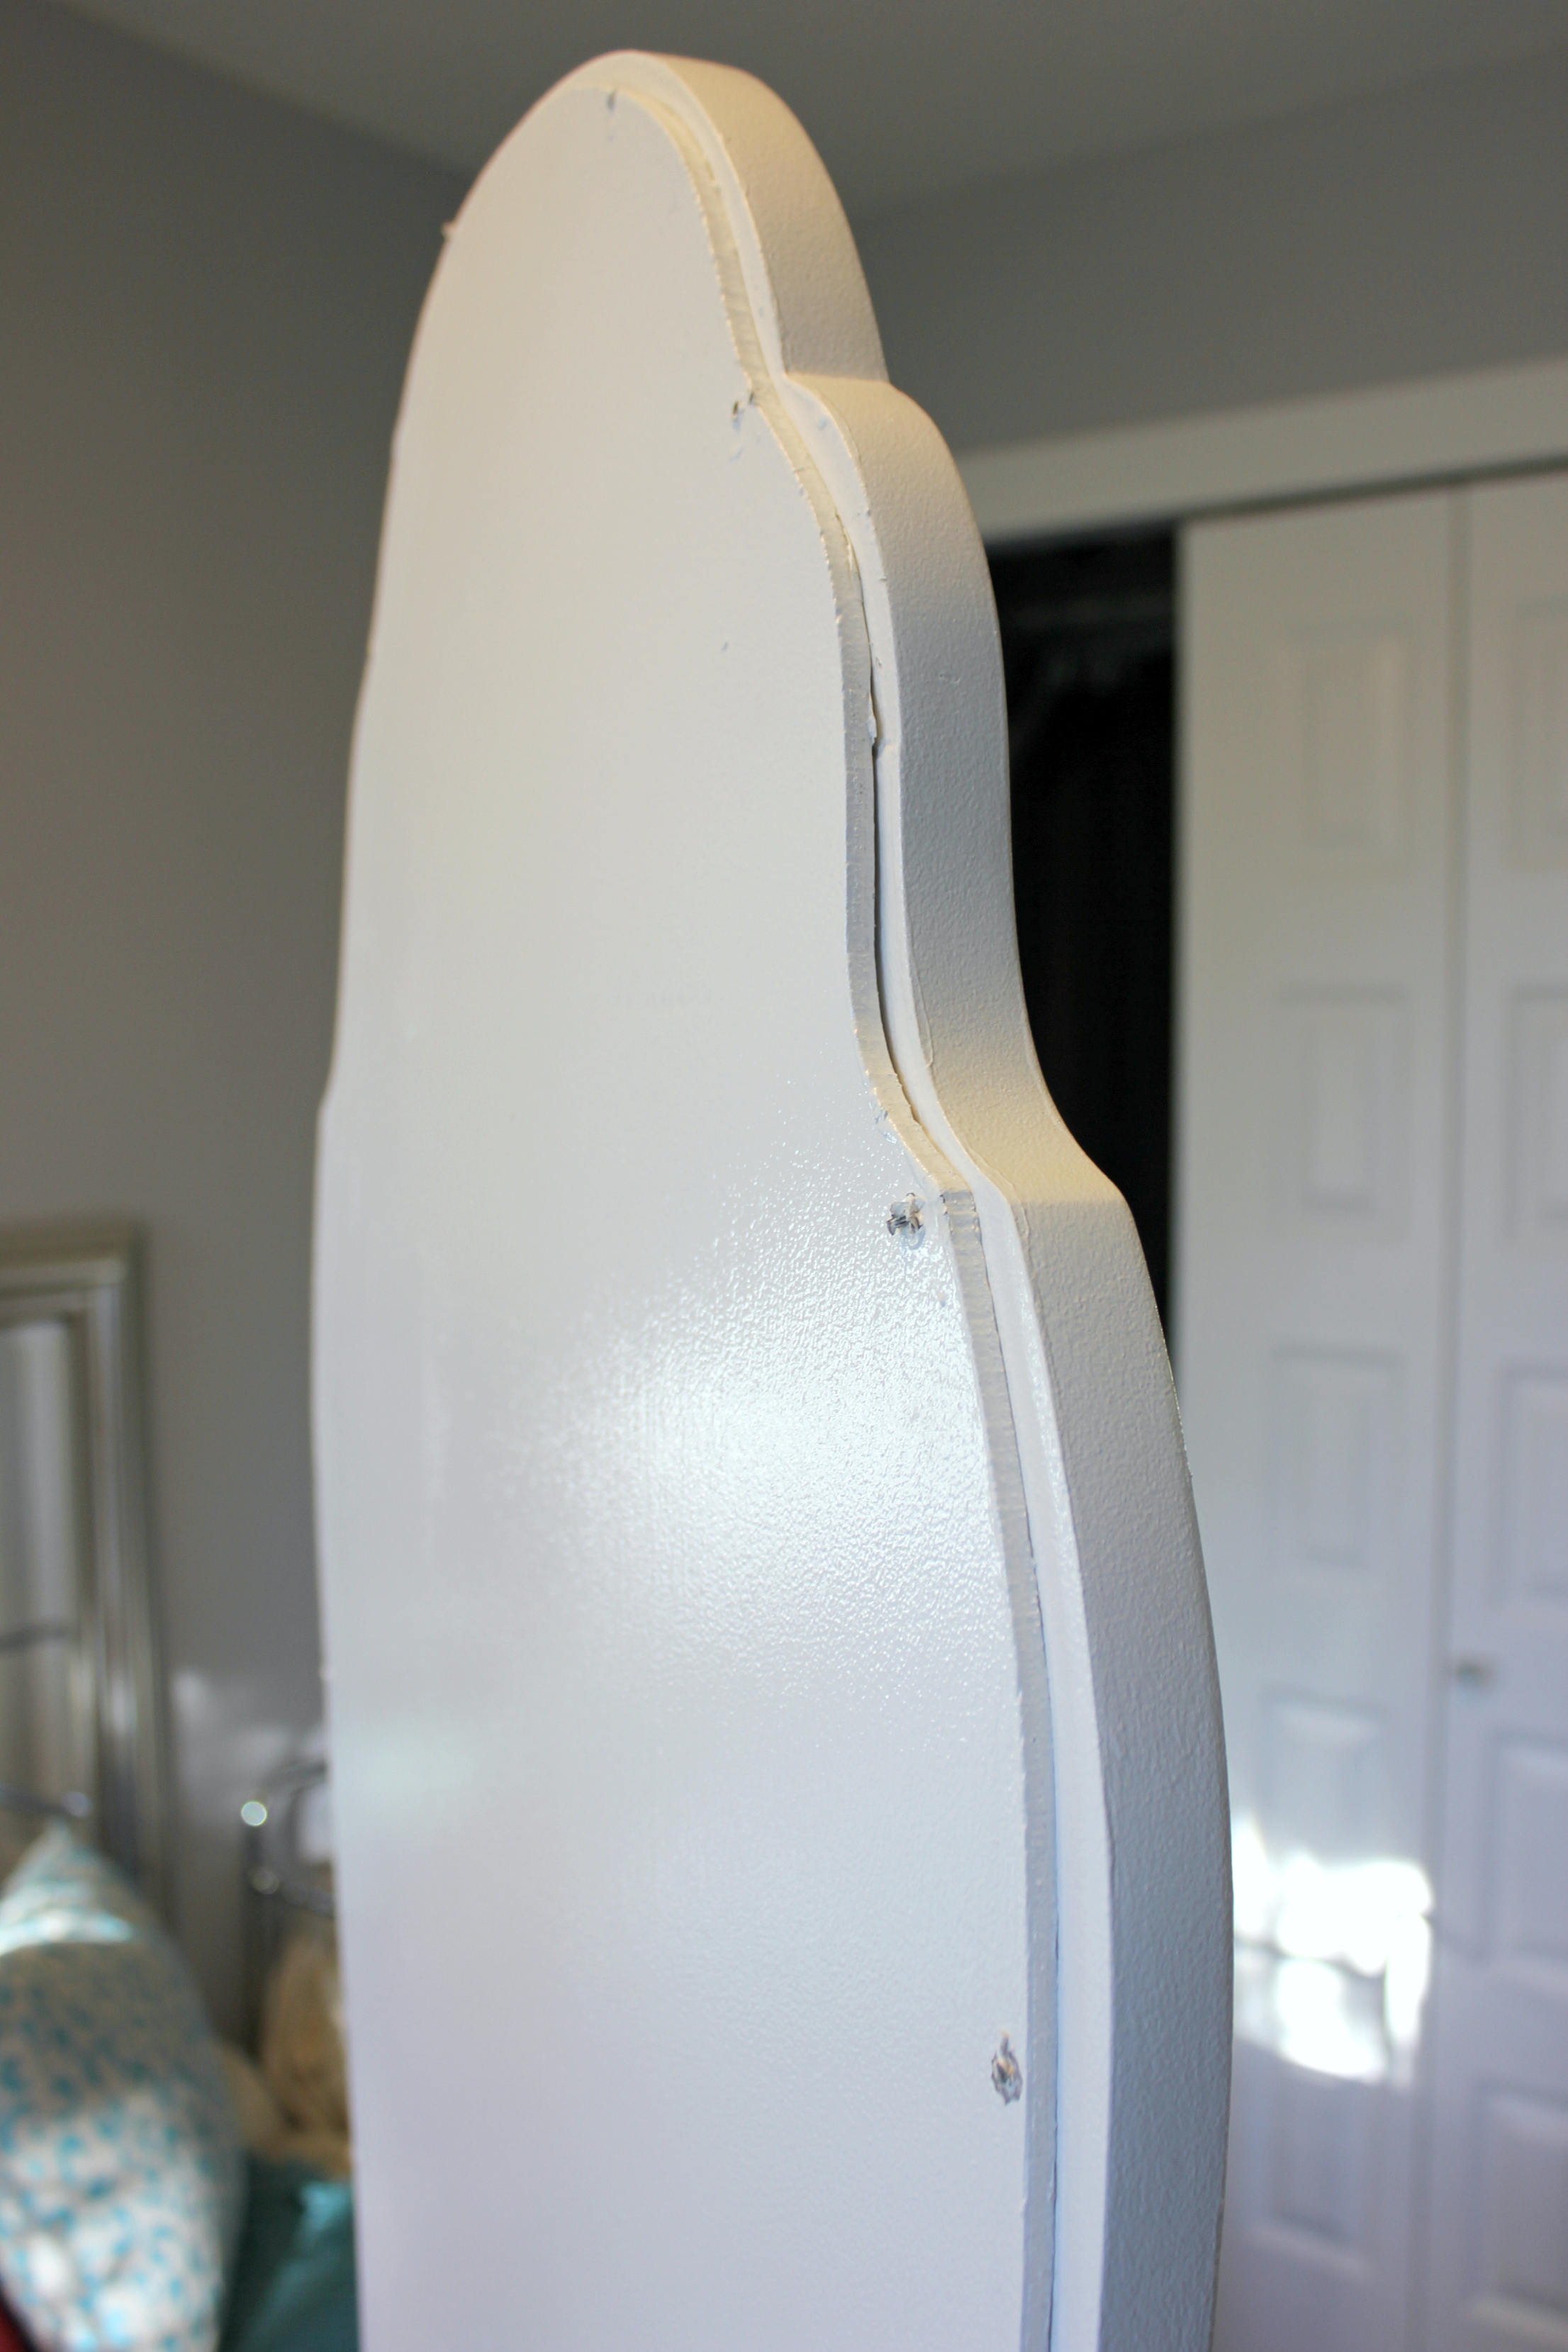
The first order of business was taking it apart. We removed the mirror by detaching it from the unit. Then we took off the wood backing and removed the mirror itself, putting it carefully aside. It is important to remove the mirror so that the inside edge of the vanity frame can be painted. This way you will not see a dark reflection of unpainted wood along the outer edge of the mirror when it is finished.
Step 2:
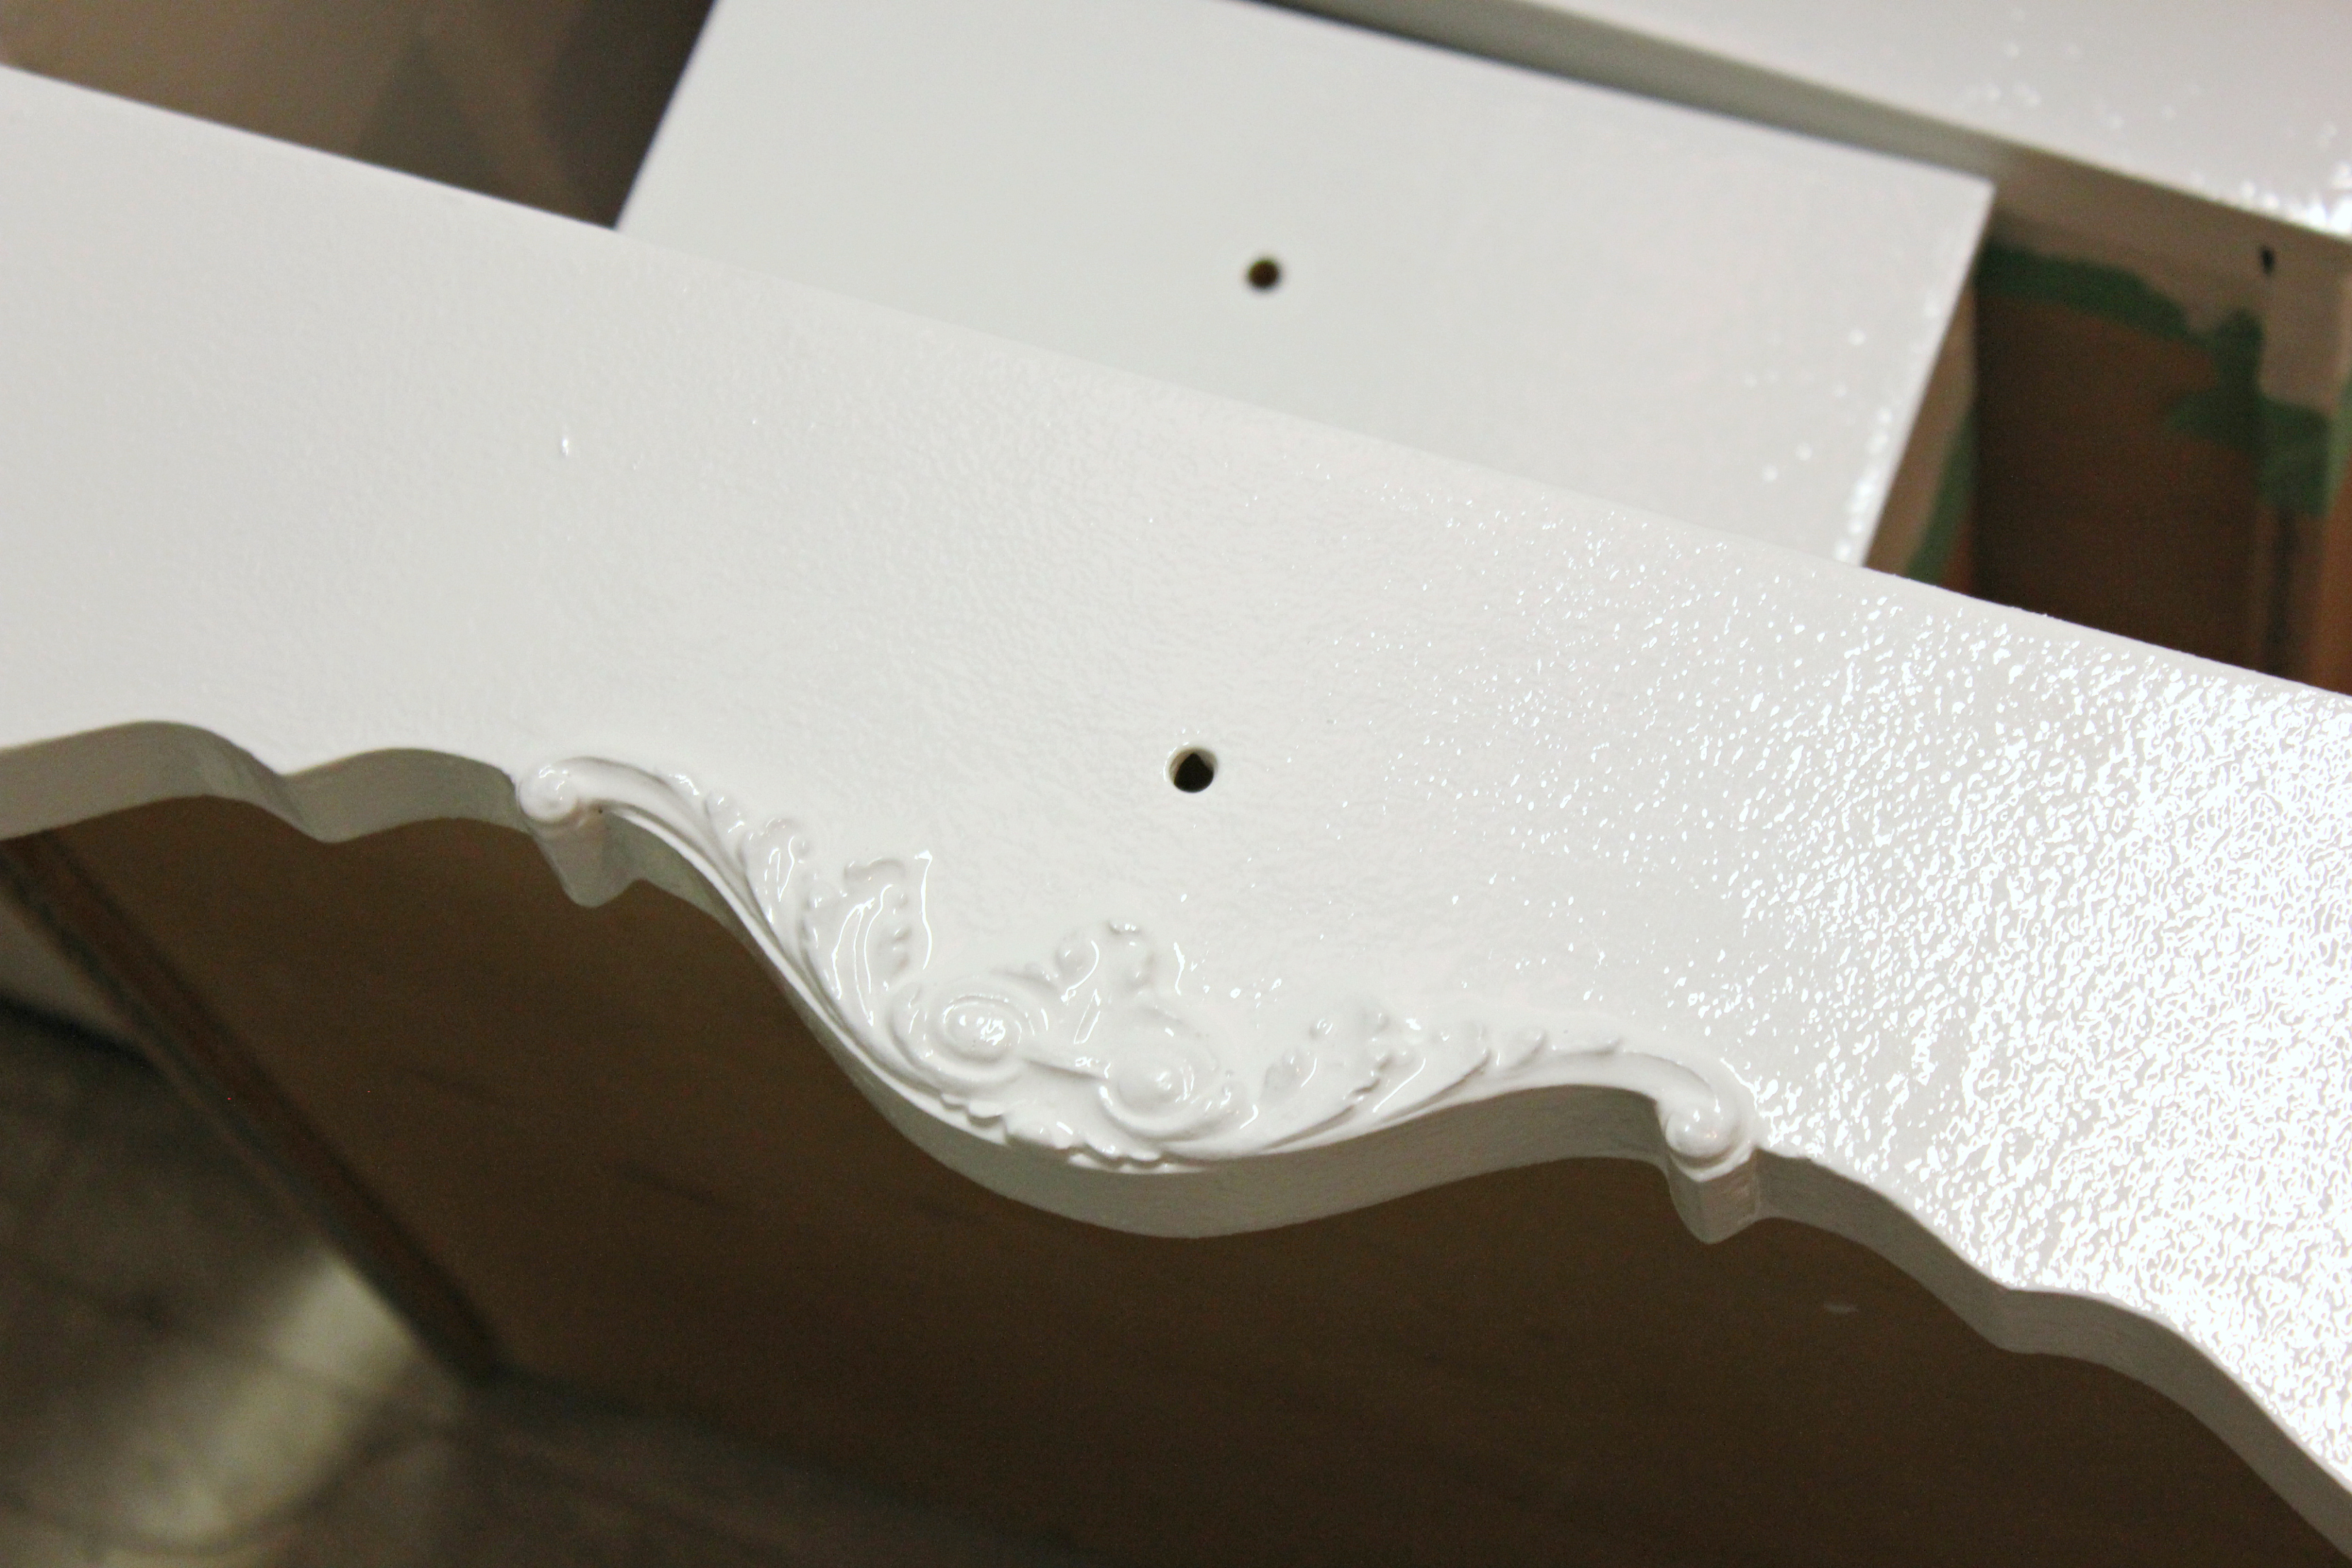
Next came the sanding. All the sanding! My husband’s perfectionist tendencies come in very handy for these sorts of things. We wanted to make sure any sort of finish or varnish had been removed before proceeding. This was achieved with an 80, 120 and then a 200 grit sand paper on an orbital sander.
Step 3:
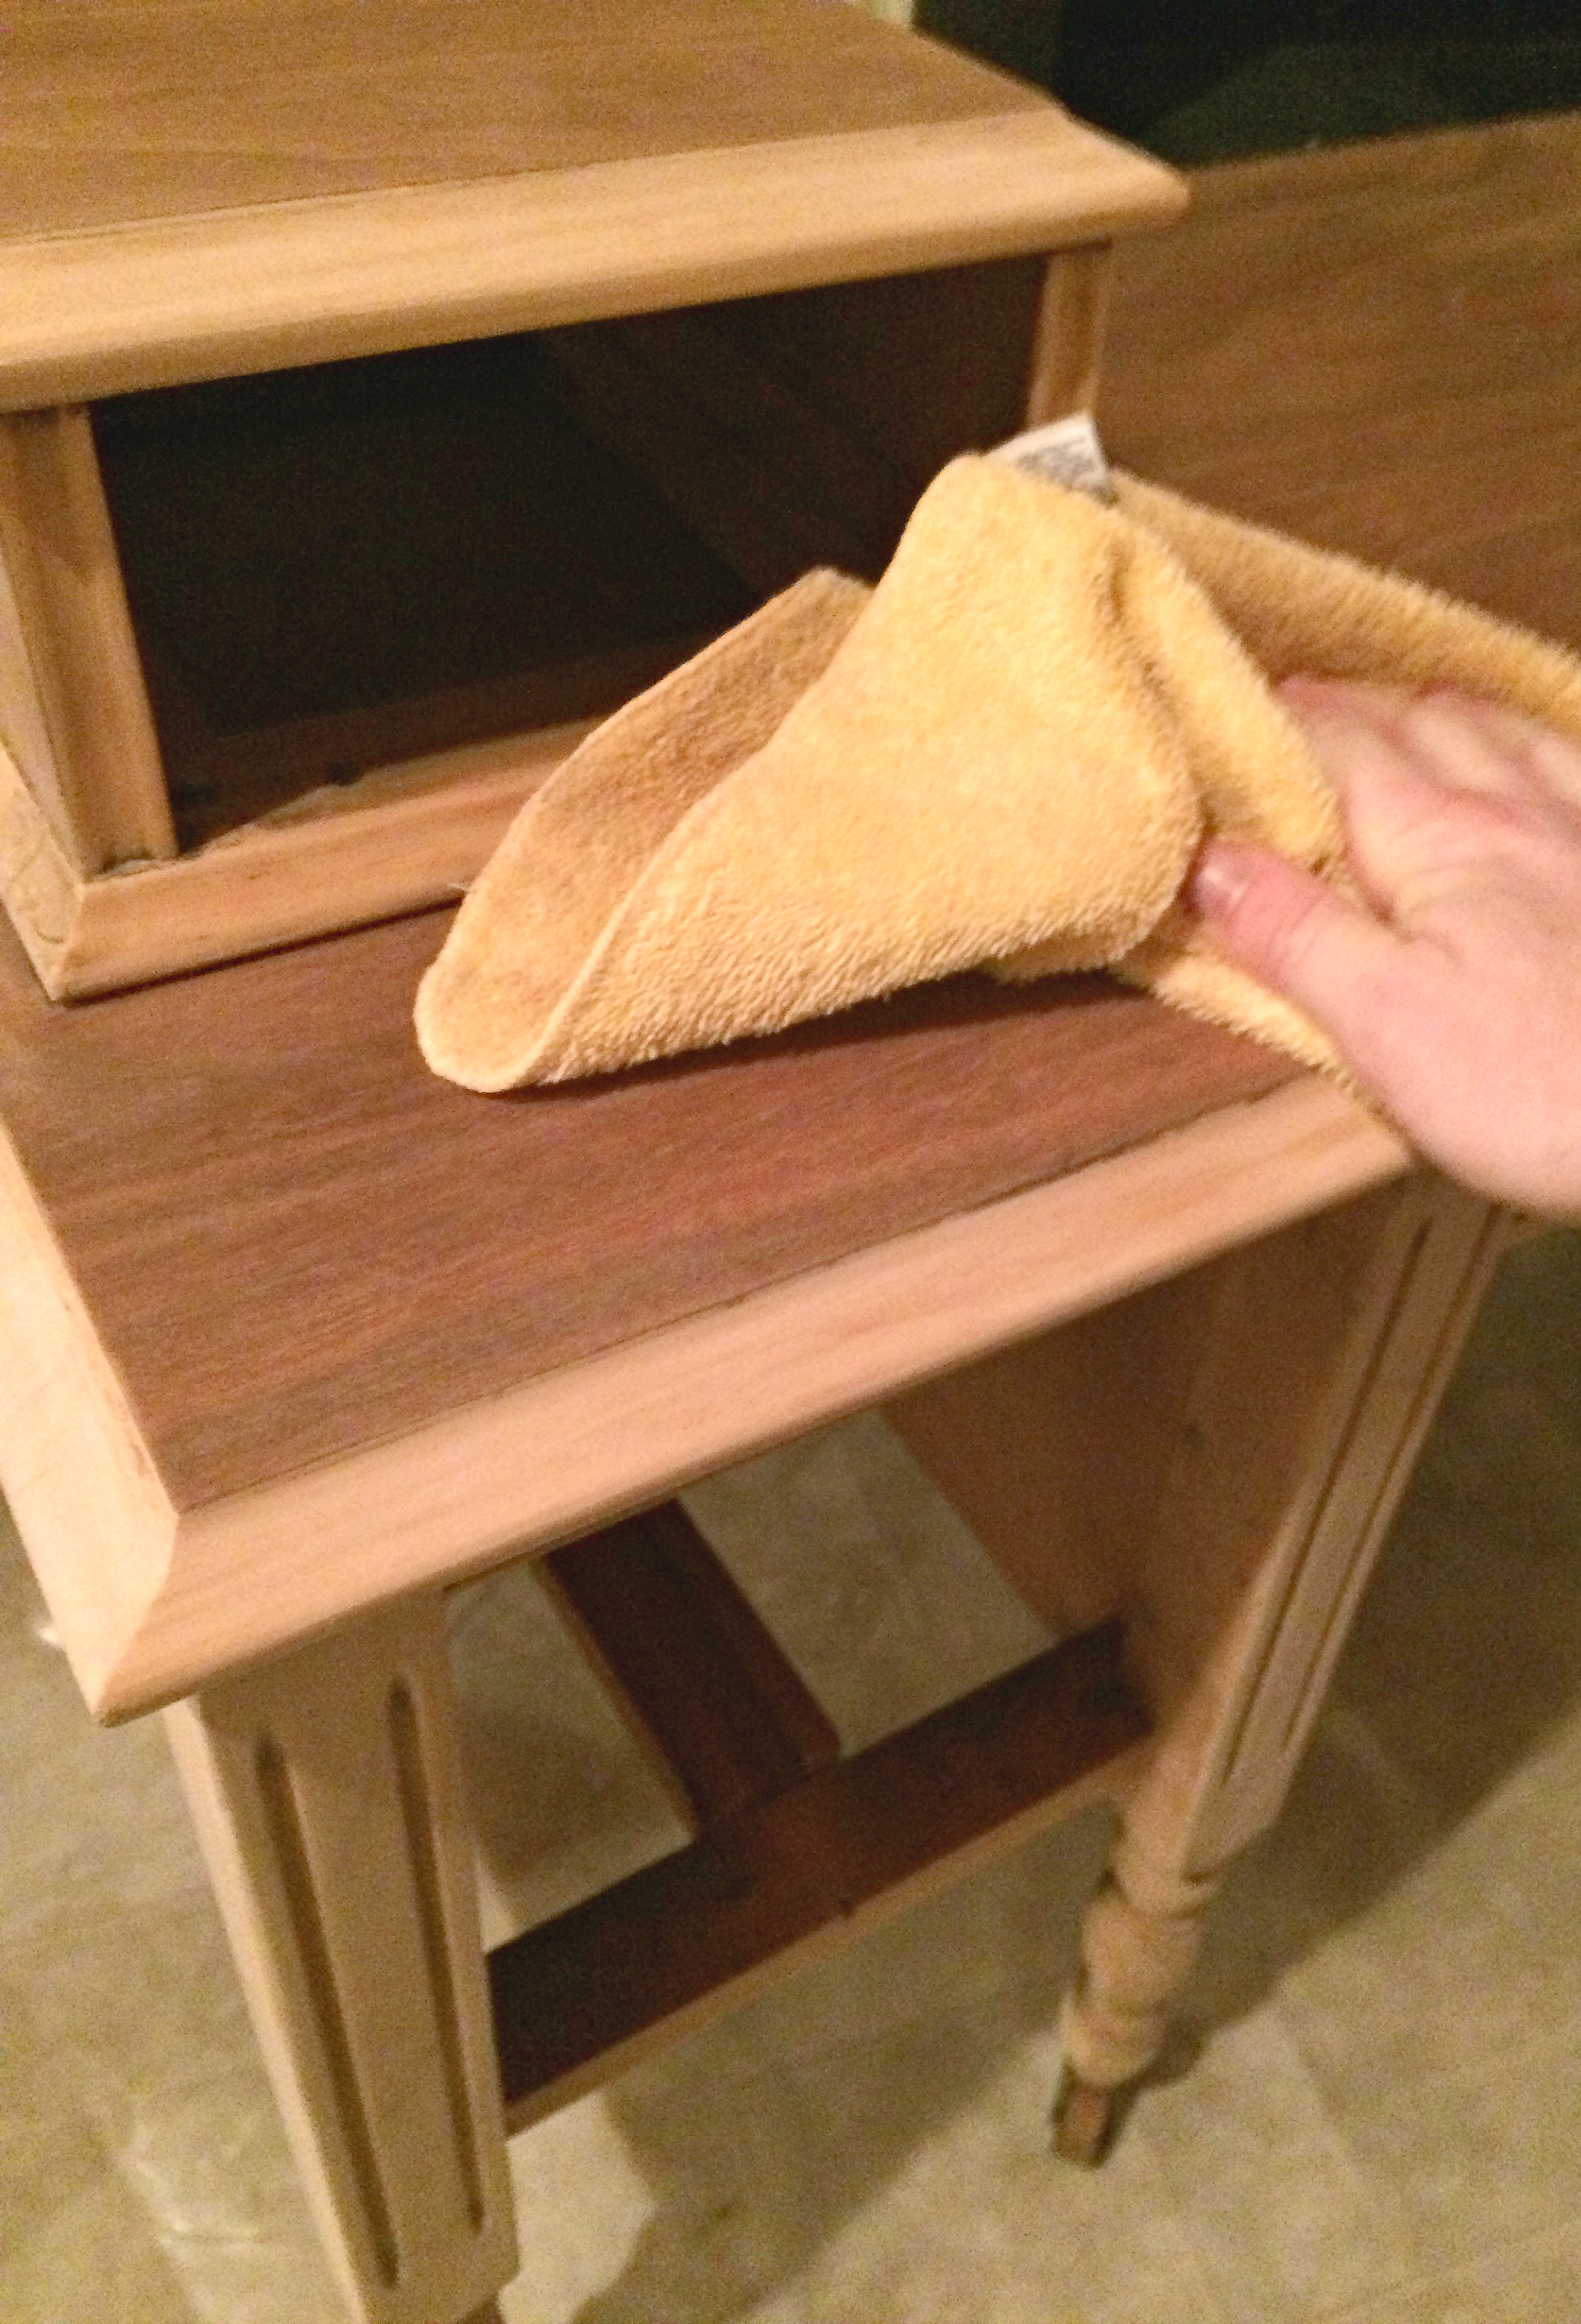
Carefully wipe down any and all dust with a damp cloth.
Step 4:
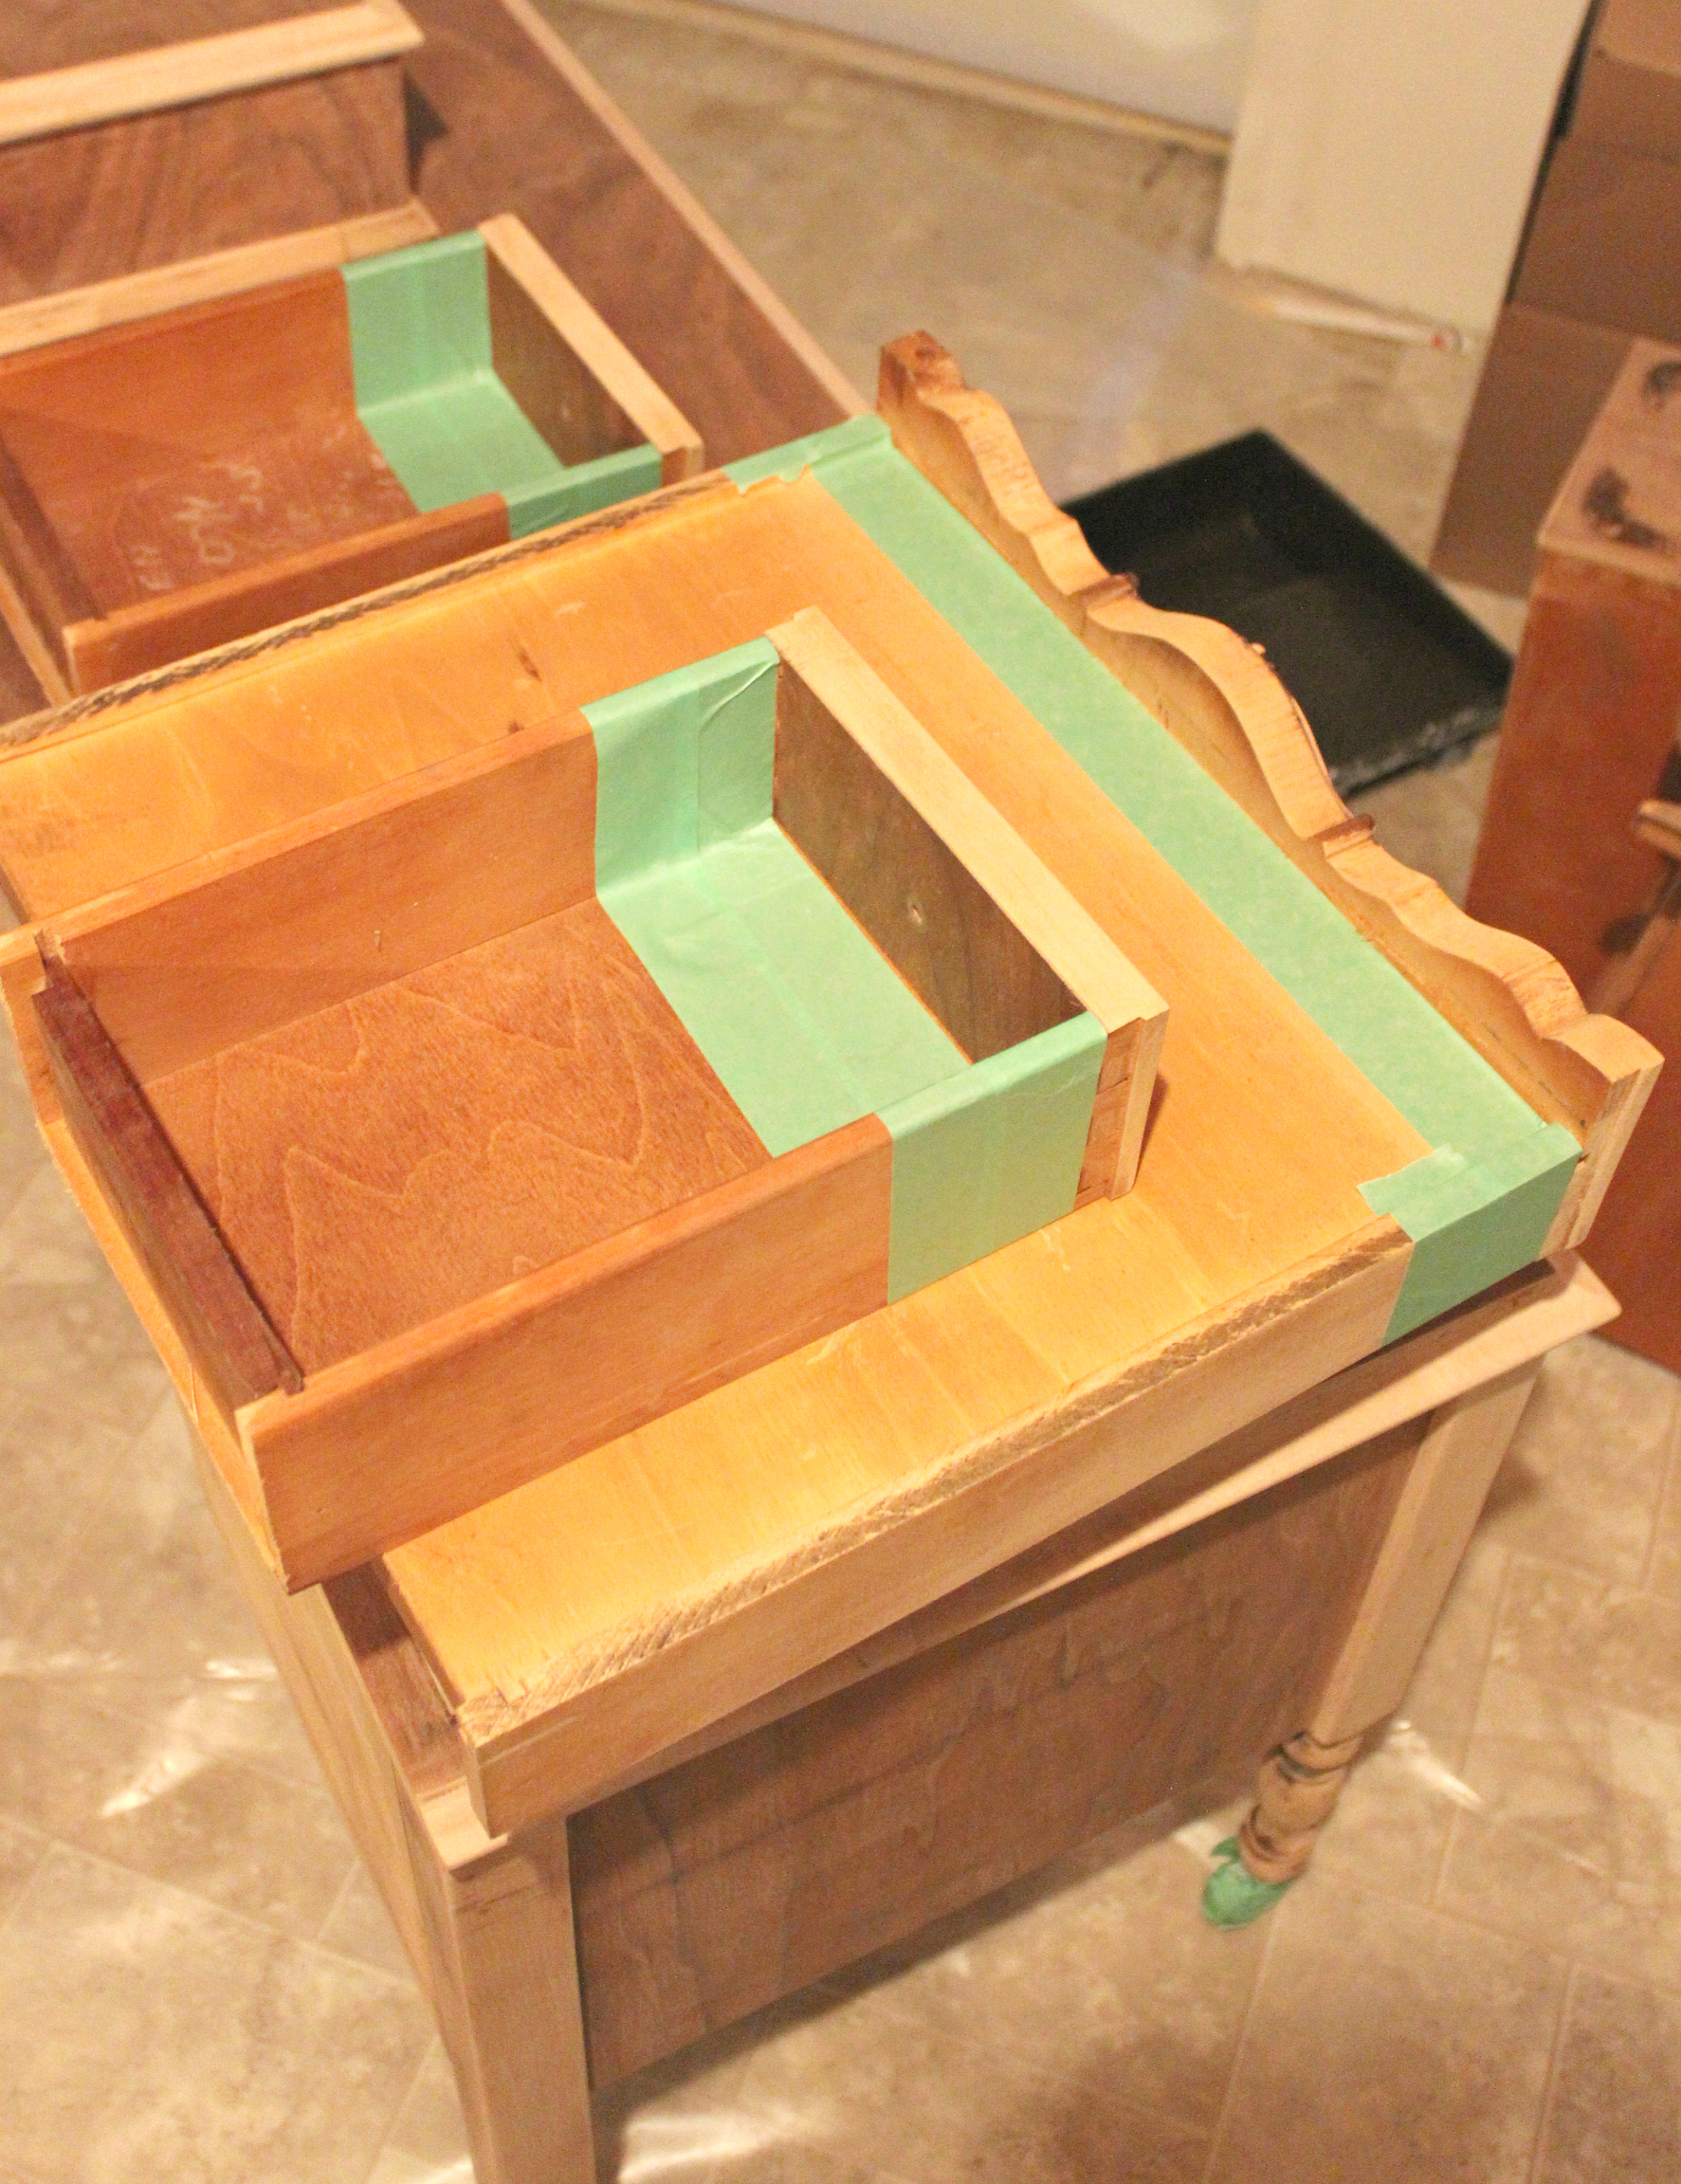
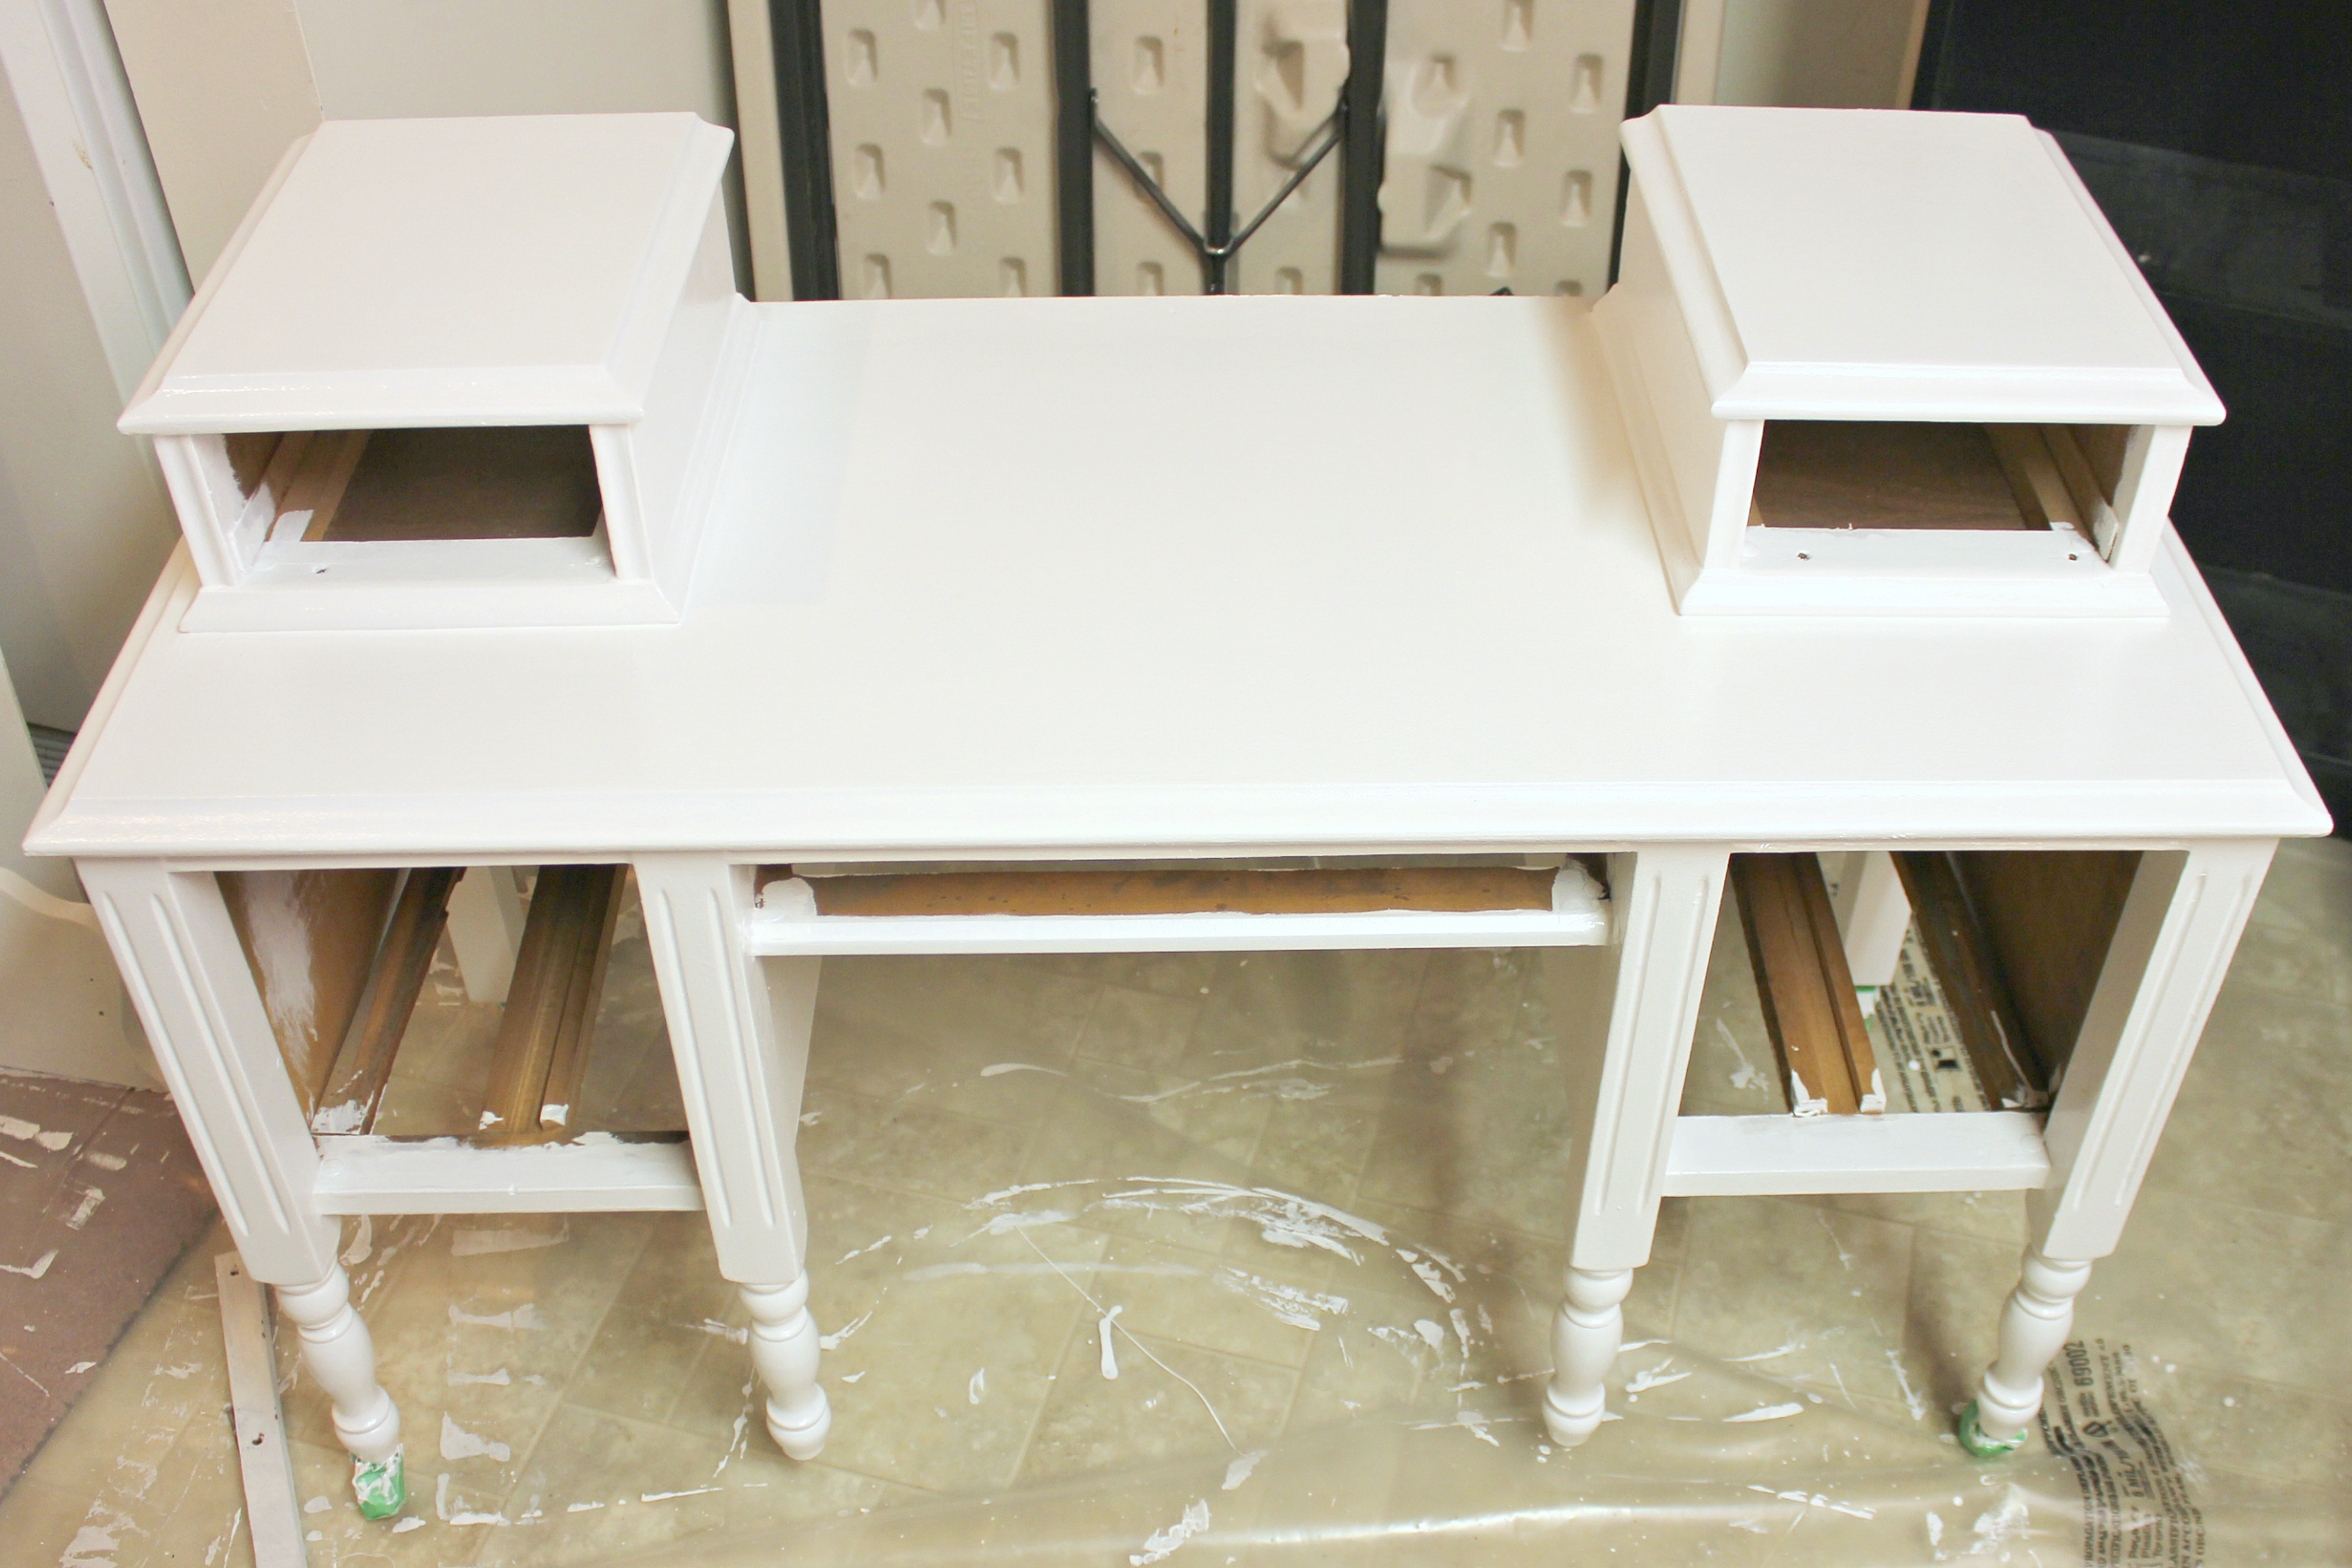
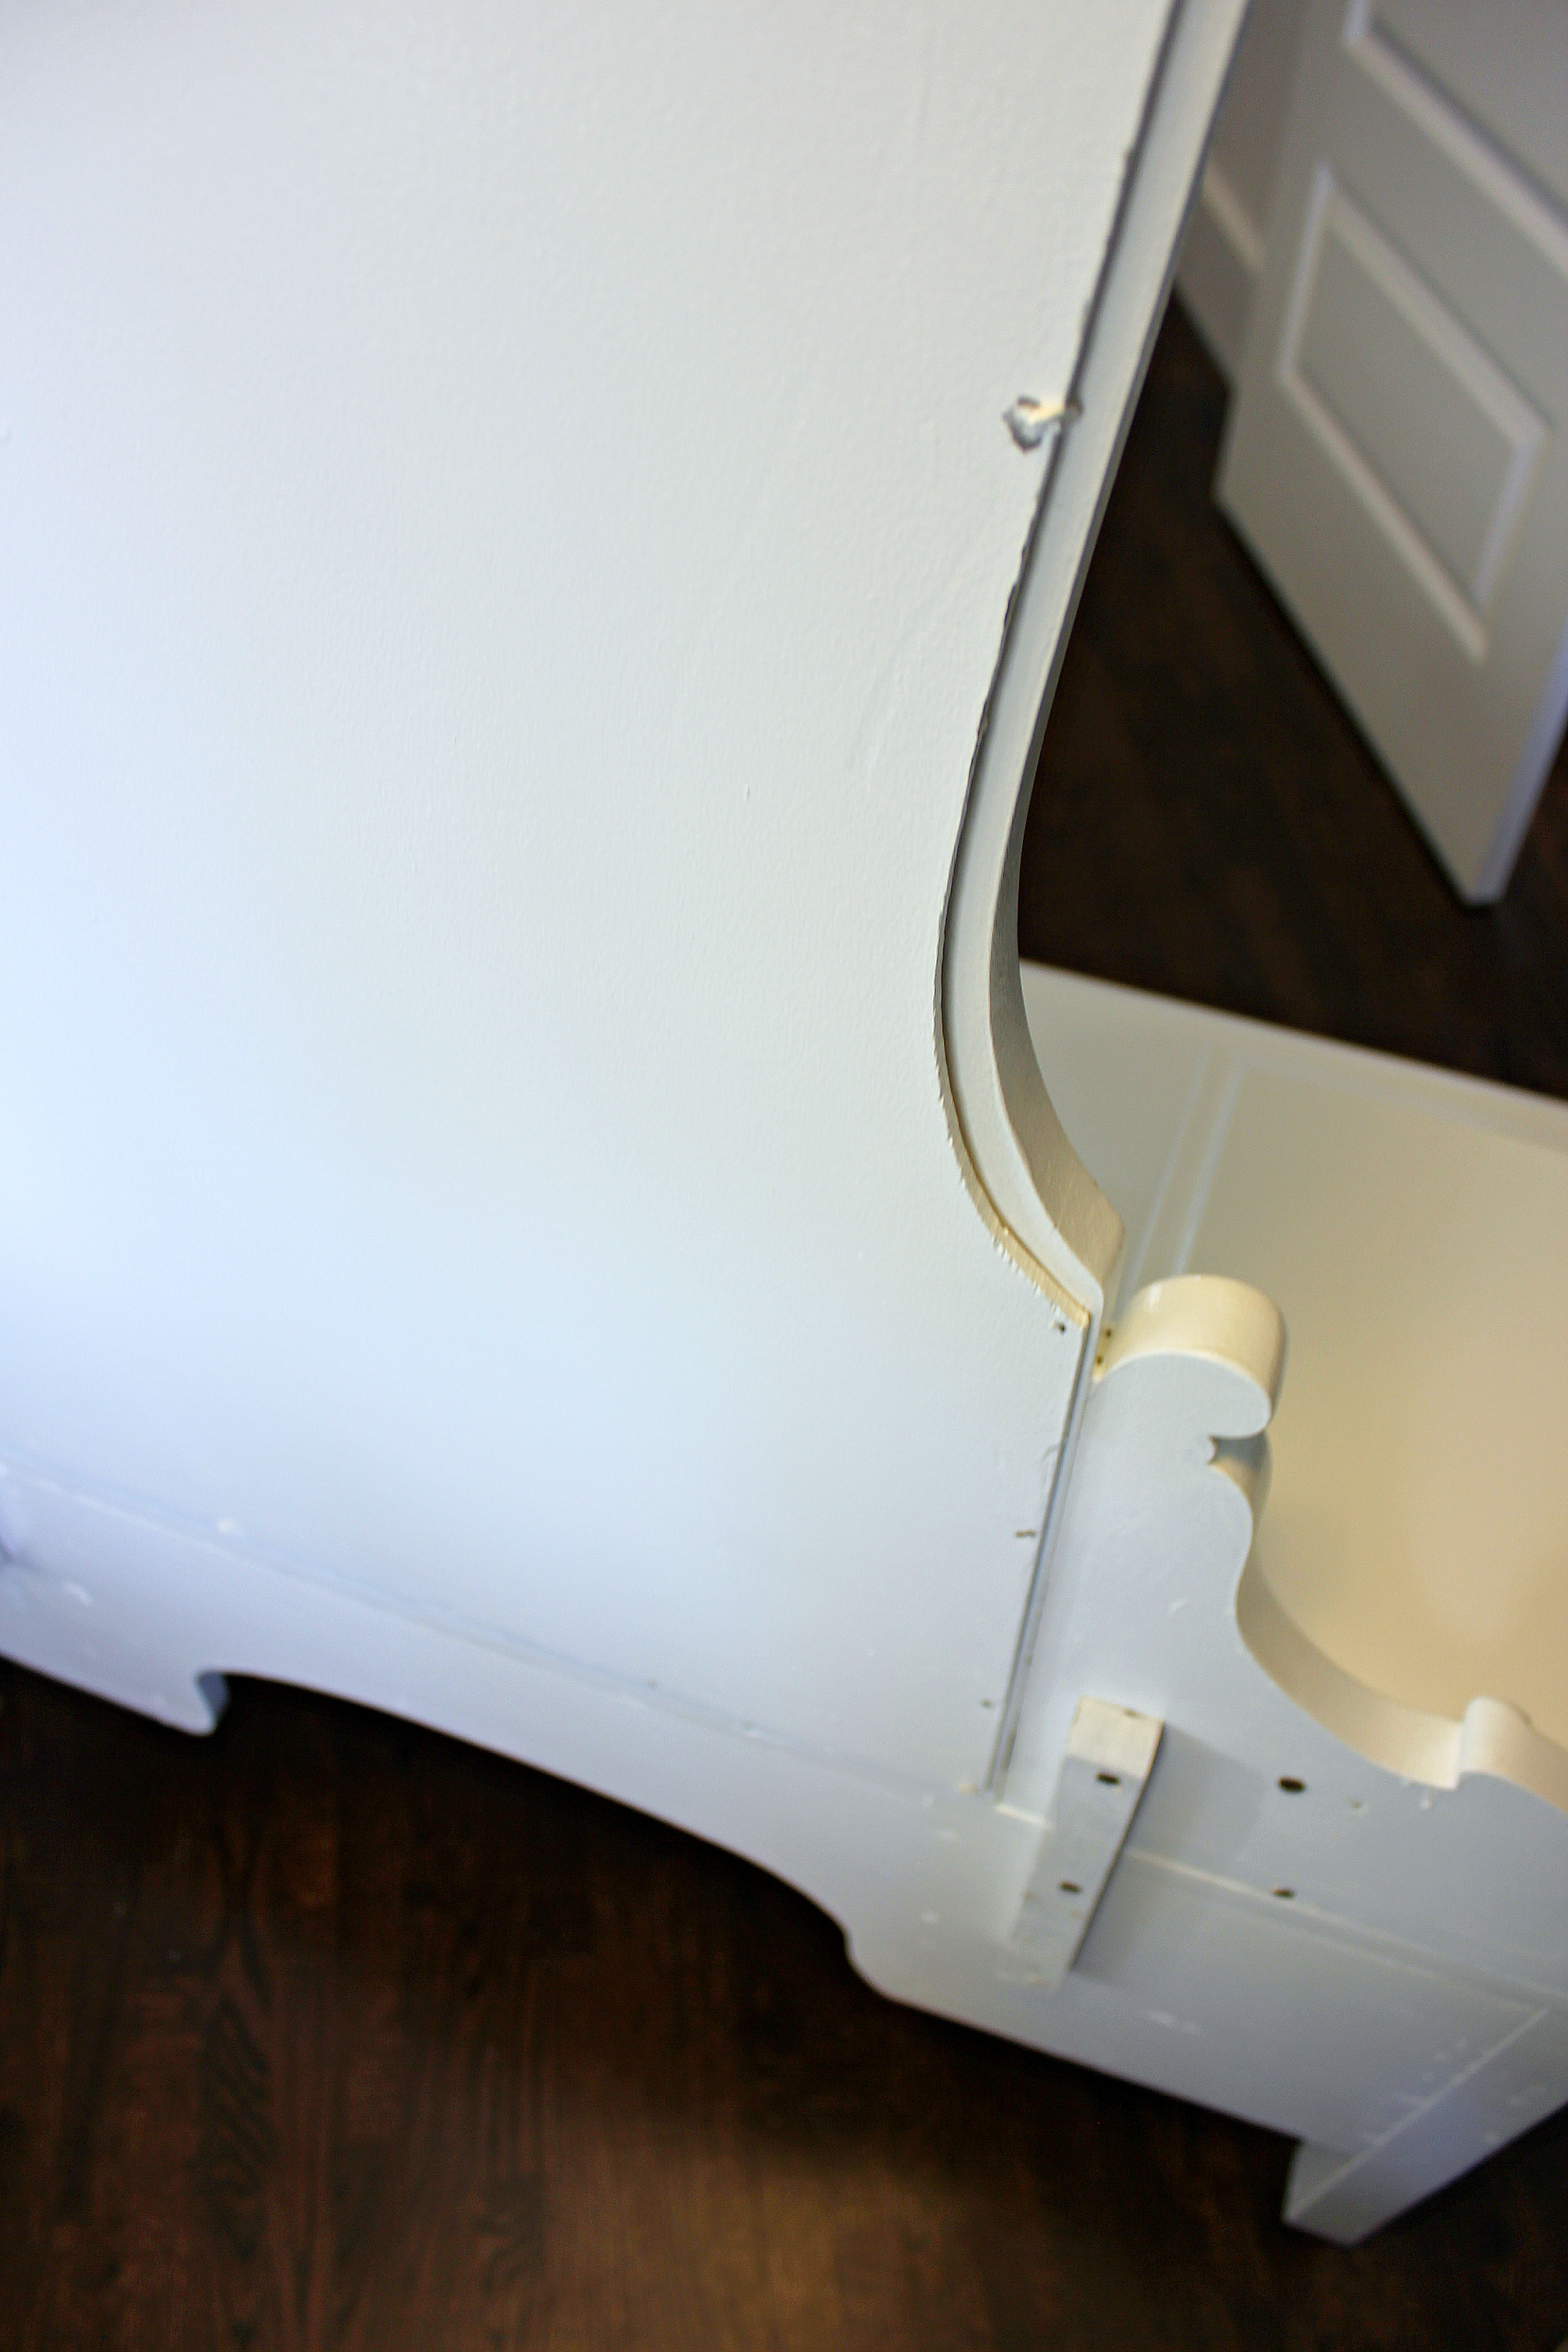
Next he taped off inside the drawers with painters tape so there would be straight lines where the paint stopped. This makes a much more finished look when the drawers are opened. He also taped off the casters on the bottom of the unit, alternatively you could just remove them.
Step 5:
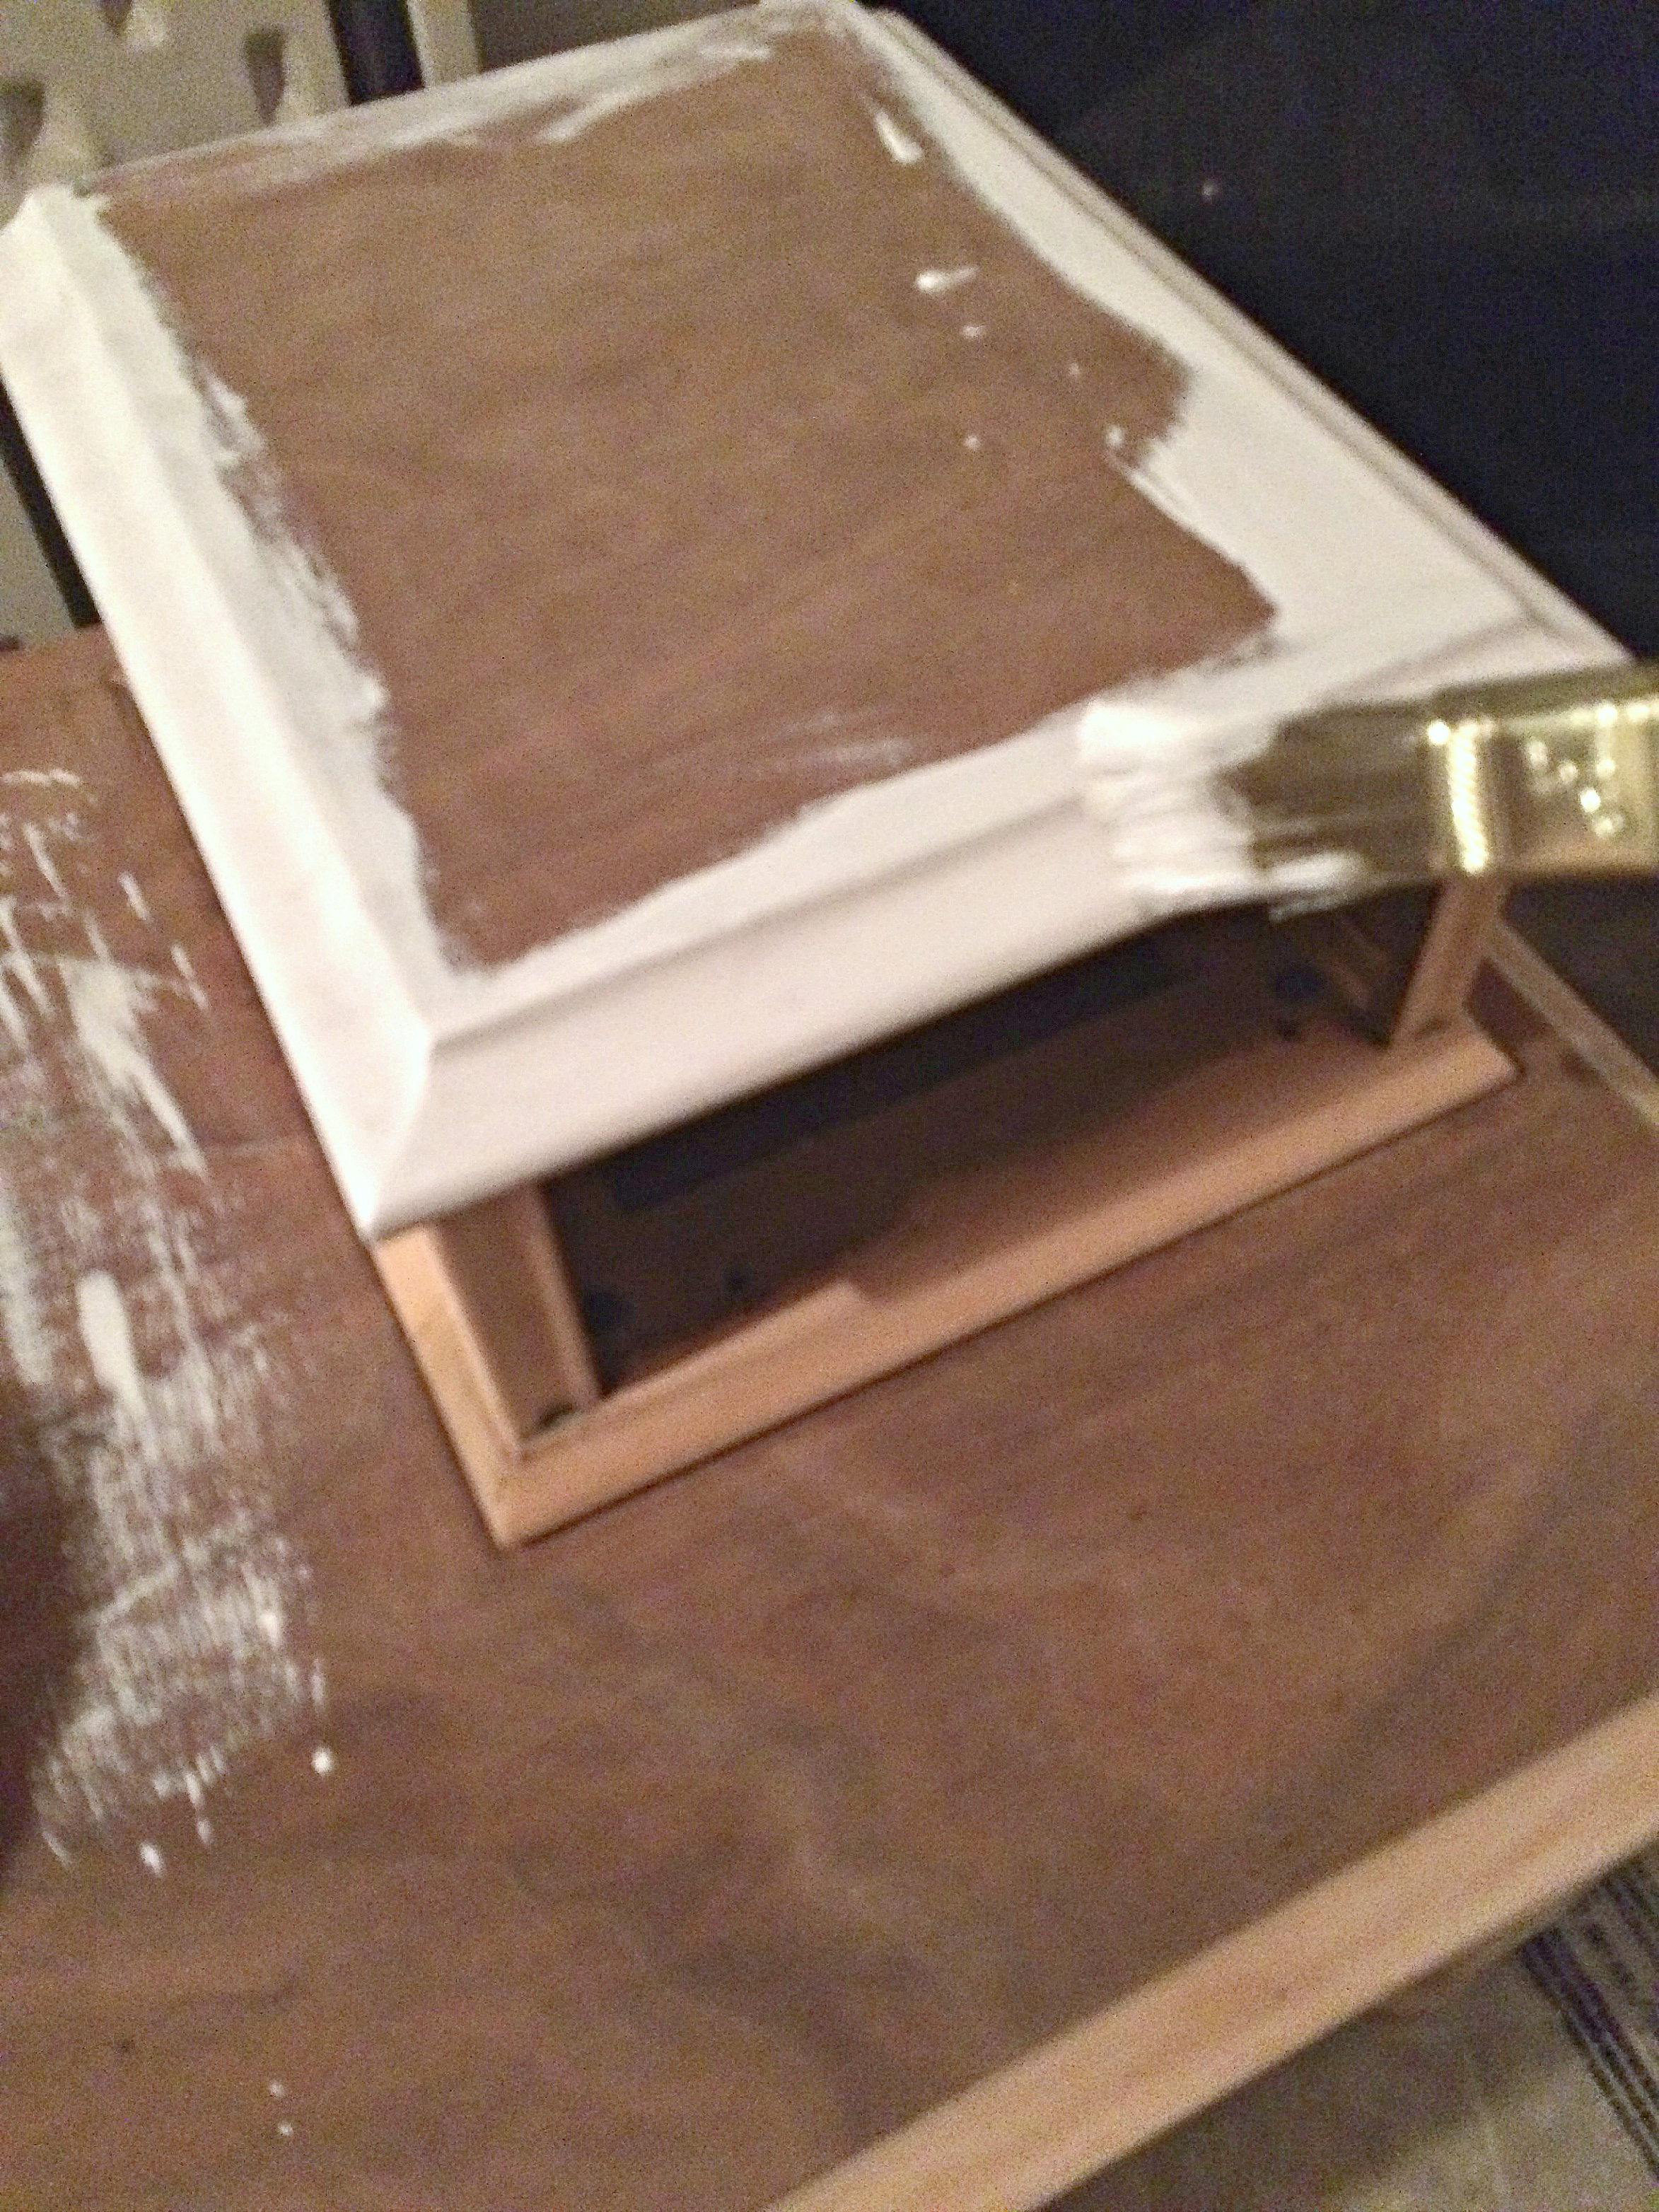
Then we meticulously applied a coat of primer, paying extra attention to any detail and being mindful for drips. We used a paint brush for all the detail work and then finished off with a smooth faced foam roller. We used Zinsser Cover Stain Primer-Sealer Stain Killer so as to give a good solid coat that wouldn’t allow any lingering stain that is embedded in the woodgrain to seep through later. We have used this product multiple times before on other projects with happy results. Allow to dry completely.
Step 6:
Once completely dry, we applied two coats of Benjamin Moore’s High-gloss latex paint in Chantilly Lace (OC-65). A few minutes after applying the first coat, check to ensure that paint runs have not formed. If they have, be sure to quickly smooth with the paint brush or roller before the paint dries. Then allow time for the first coat to dry completely before applying the second coat.
Step 7:
Allow the paint to dry and cure according to directions (we gave ours a week). Also make sure you allow this to take place without the drawers in place or they may get stuck.
Step 8:
Once the paint was no longer soft, we put the mirror back in place and the wood backing was secured with the original finishing nails. Then it was reattached to the unit with the original screws, saved from disassembly. It took both of us, one holding the mirror in place while the other attached it to the back of the vanity.
Step 9:
Next, if you are anything like me, dance your way to Anthropologie, overjoyed to finally have a reason to actually purchase some of their amazingly beautiful handles, rather than just oohing and ahhing at your every visit!
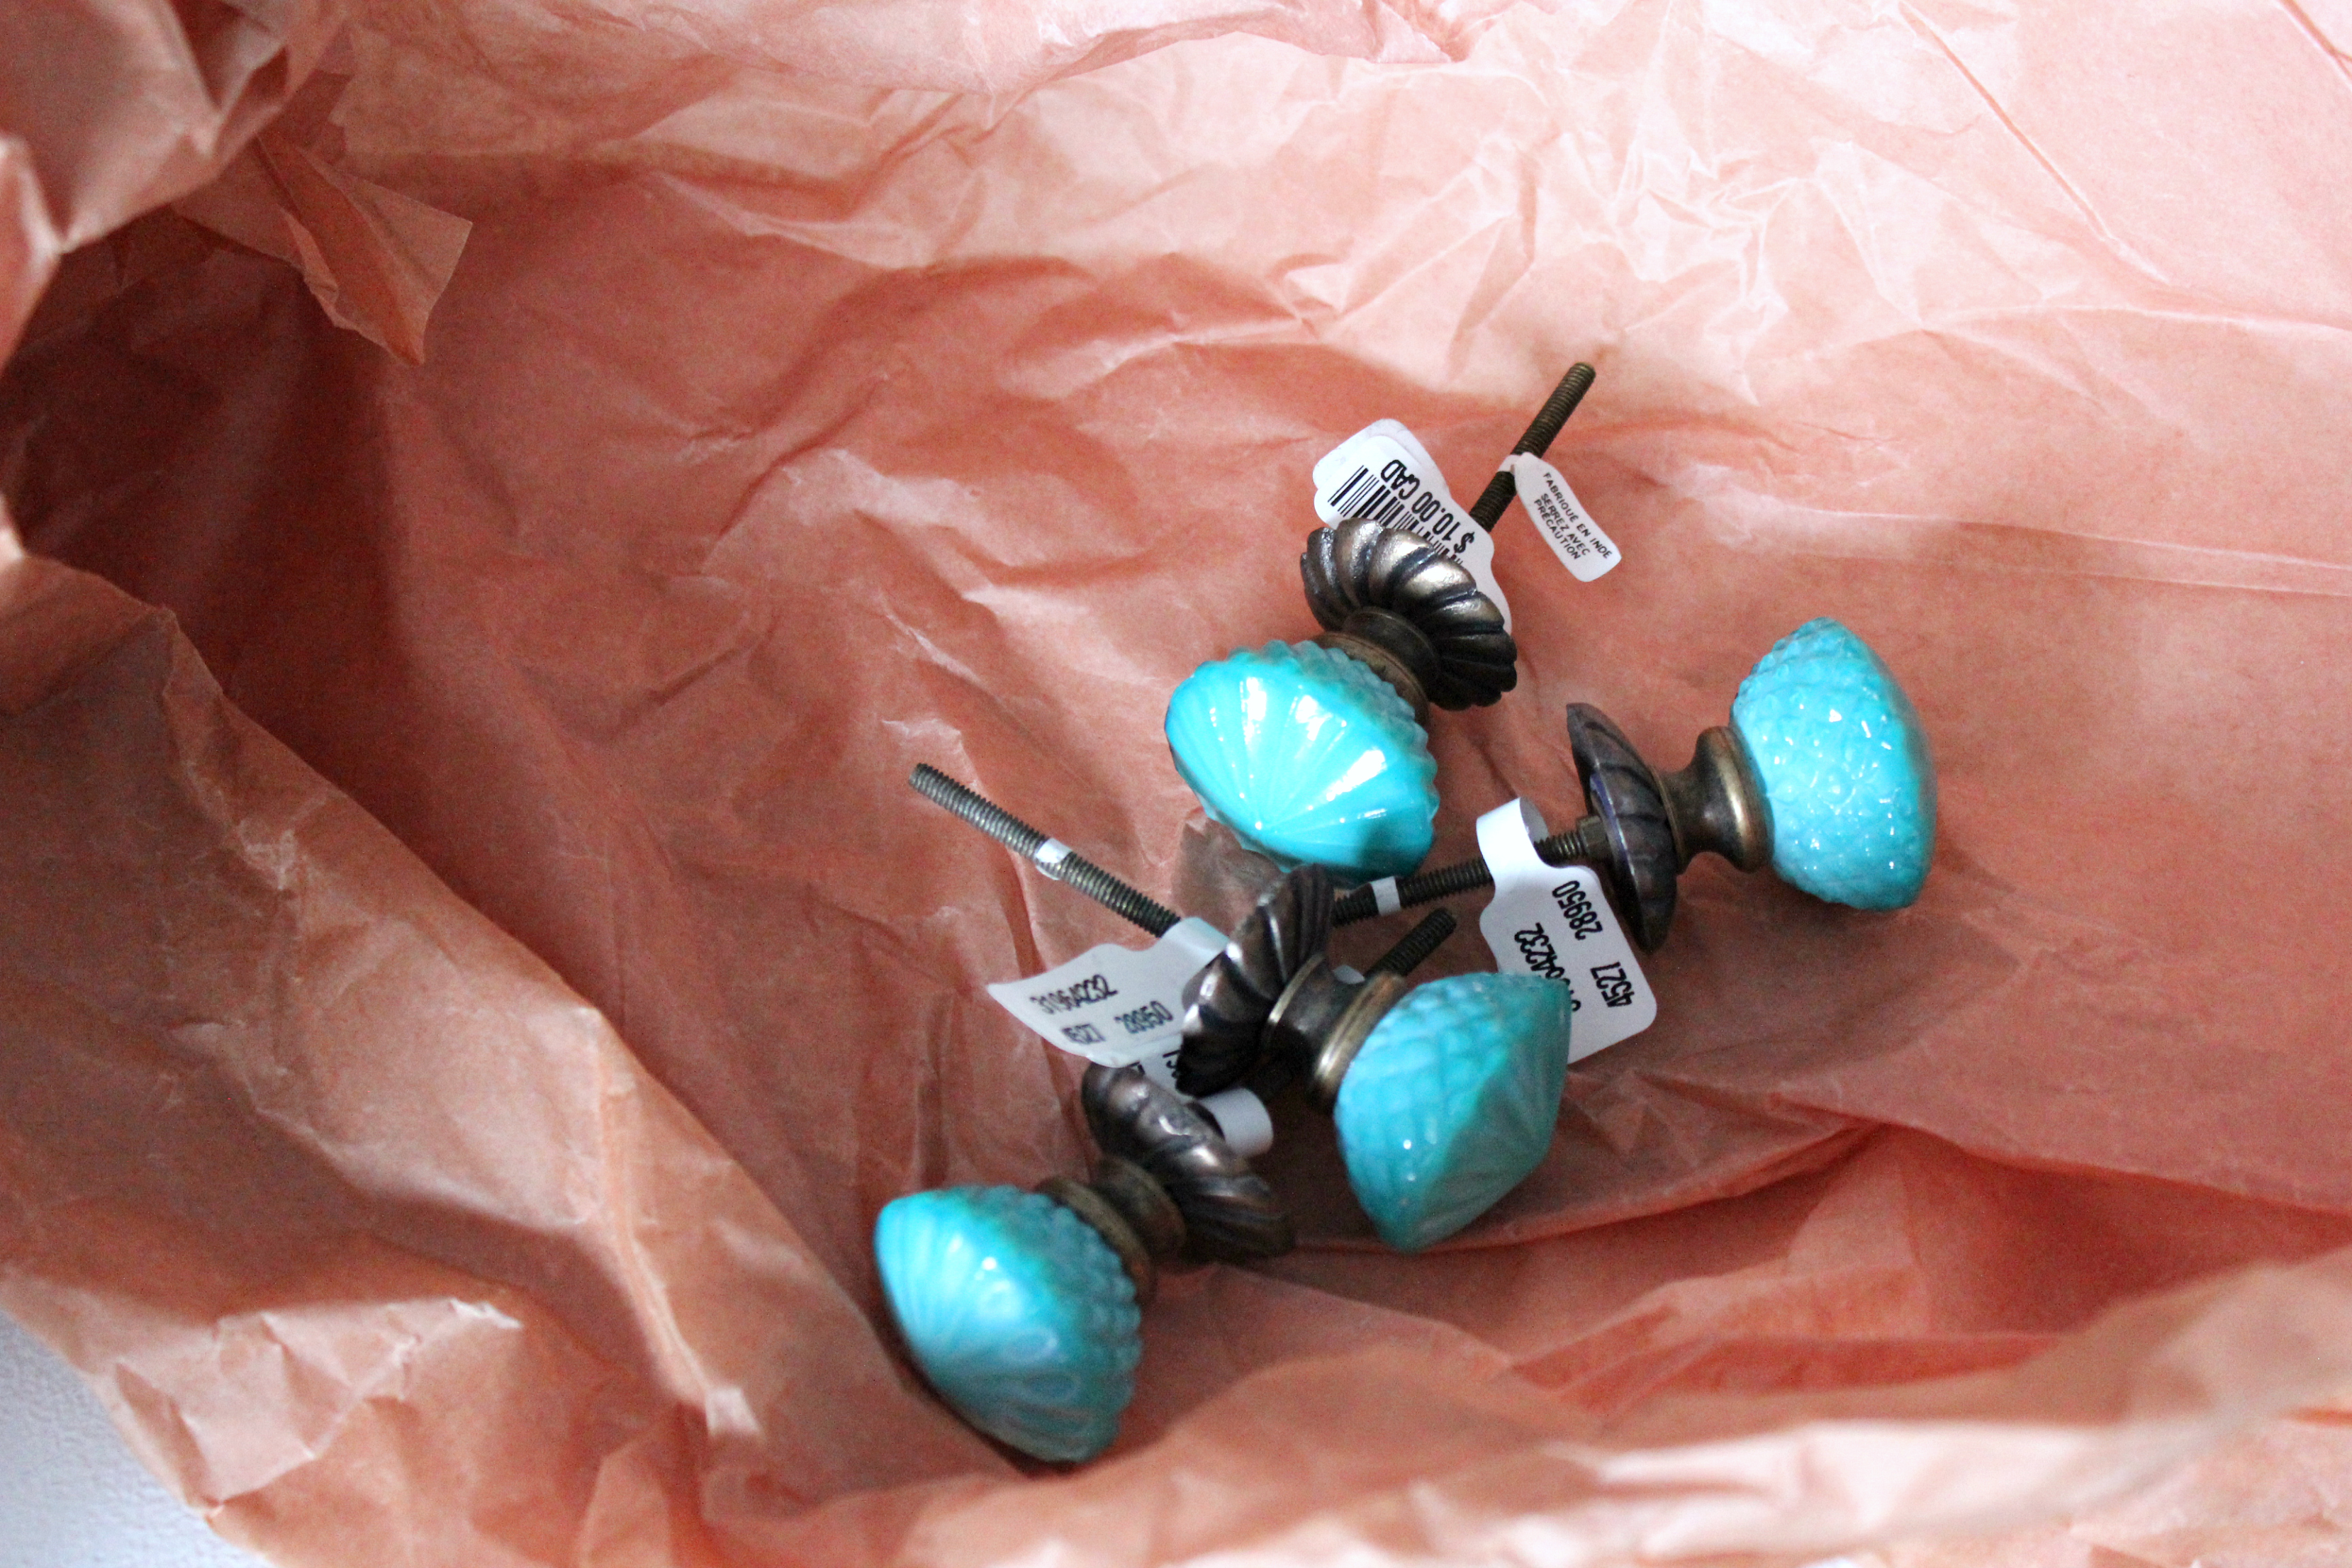
Step 10:
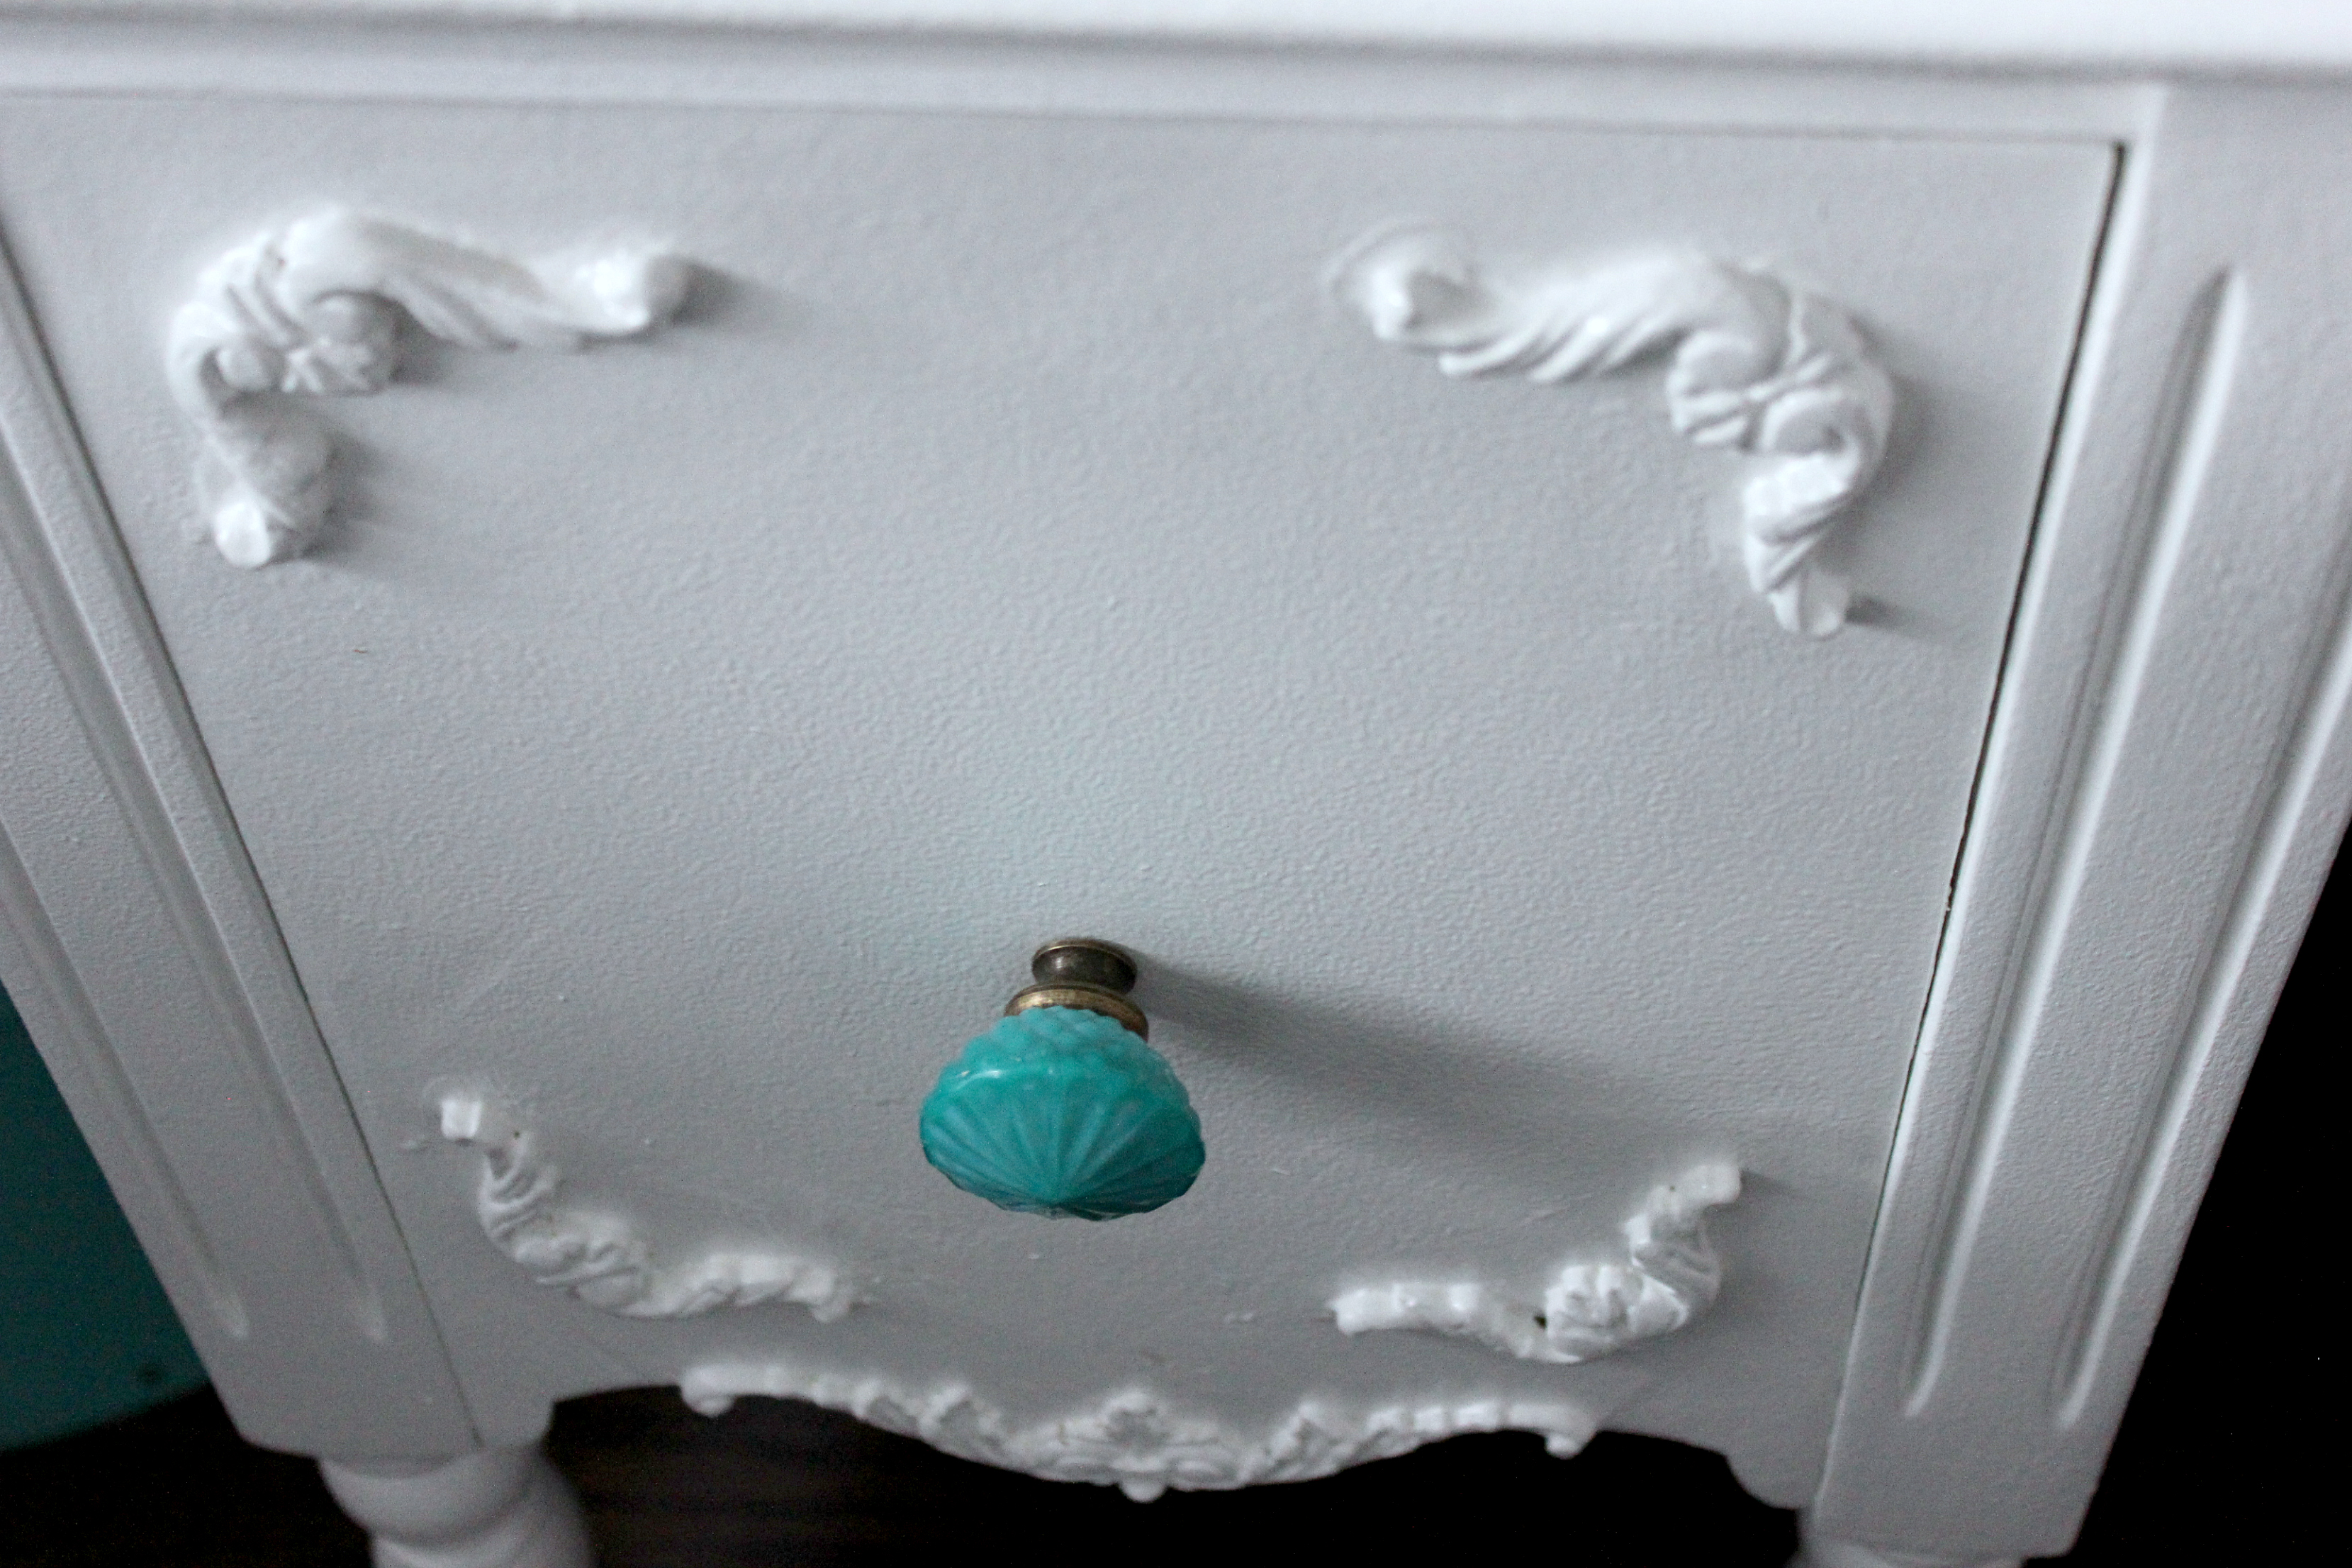
Install the new hardware. We went with a turquoise glass and oh man I am so in love. They look like jewelry!
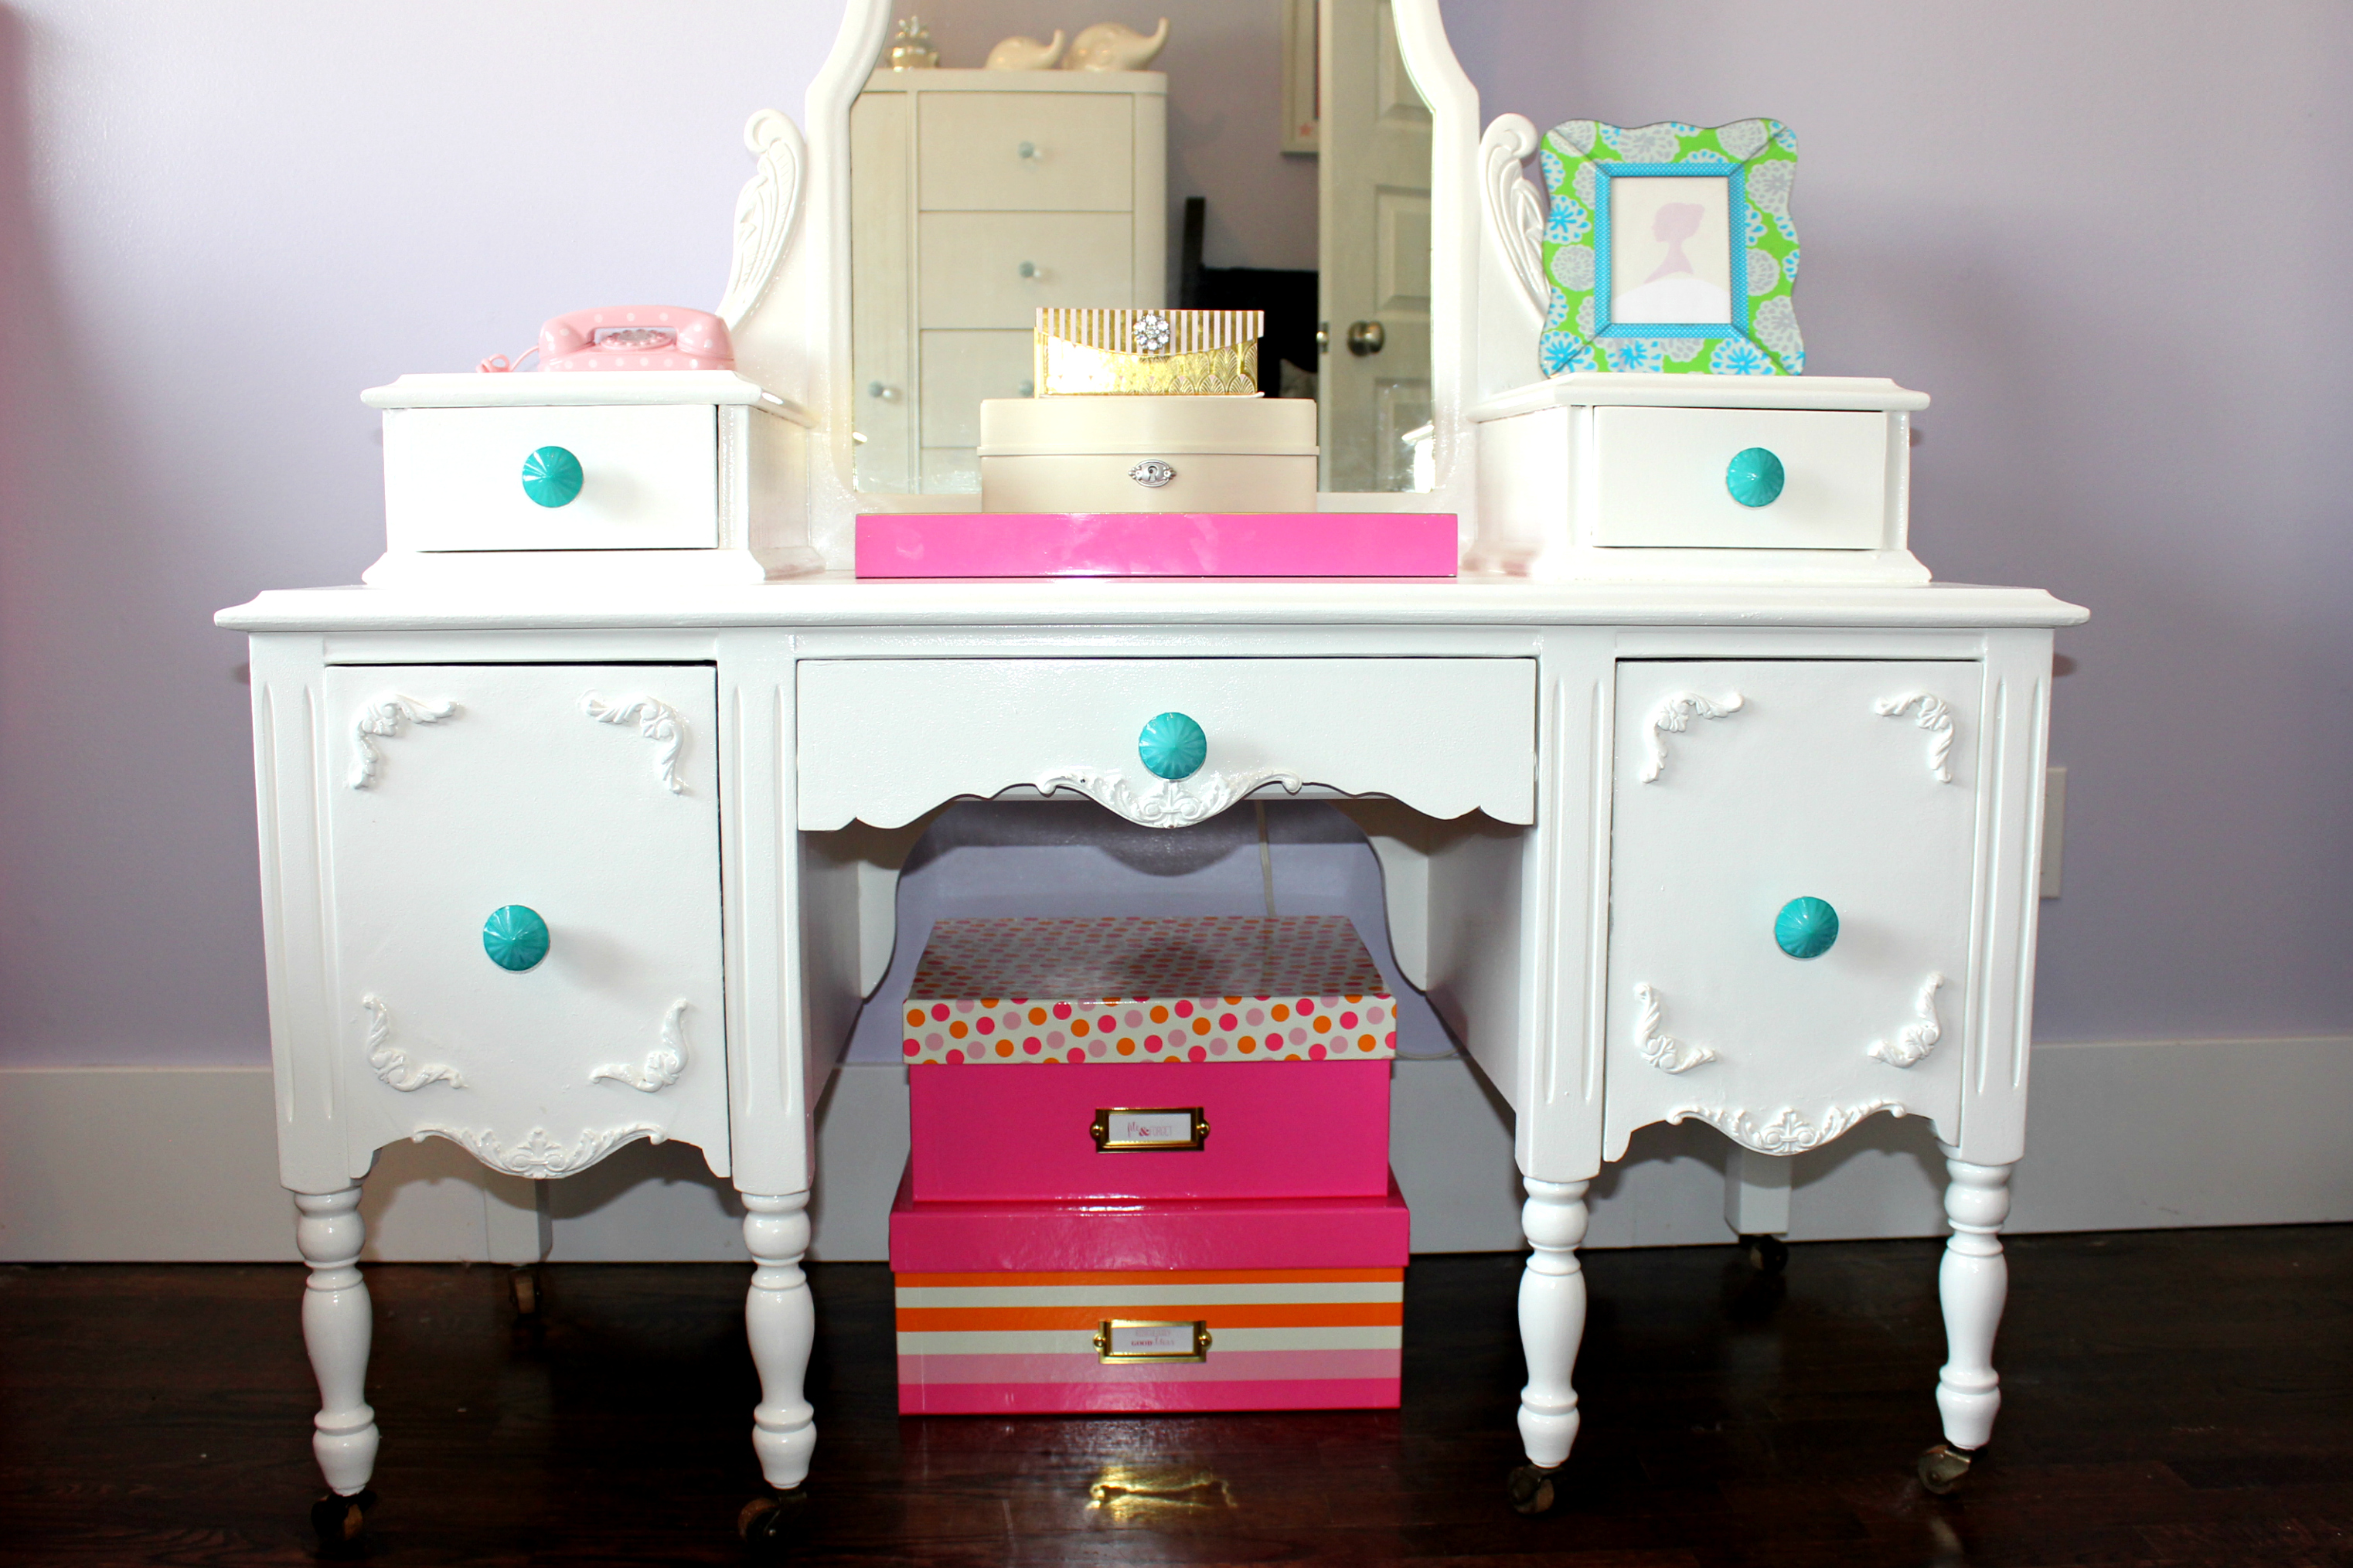
And there it is. All done!
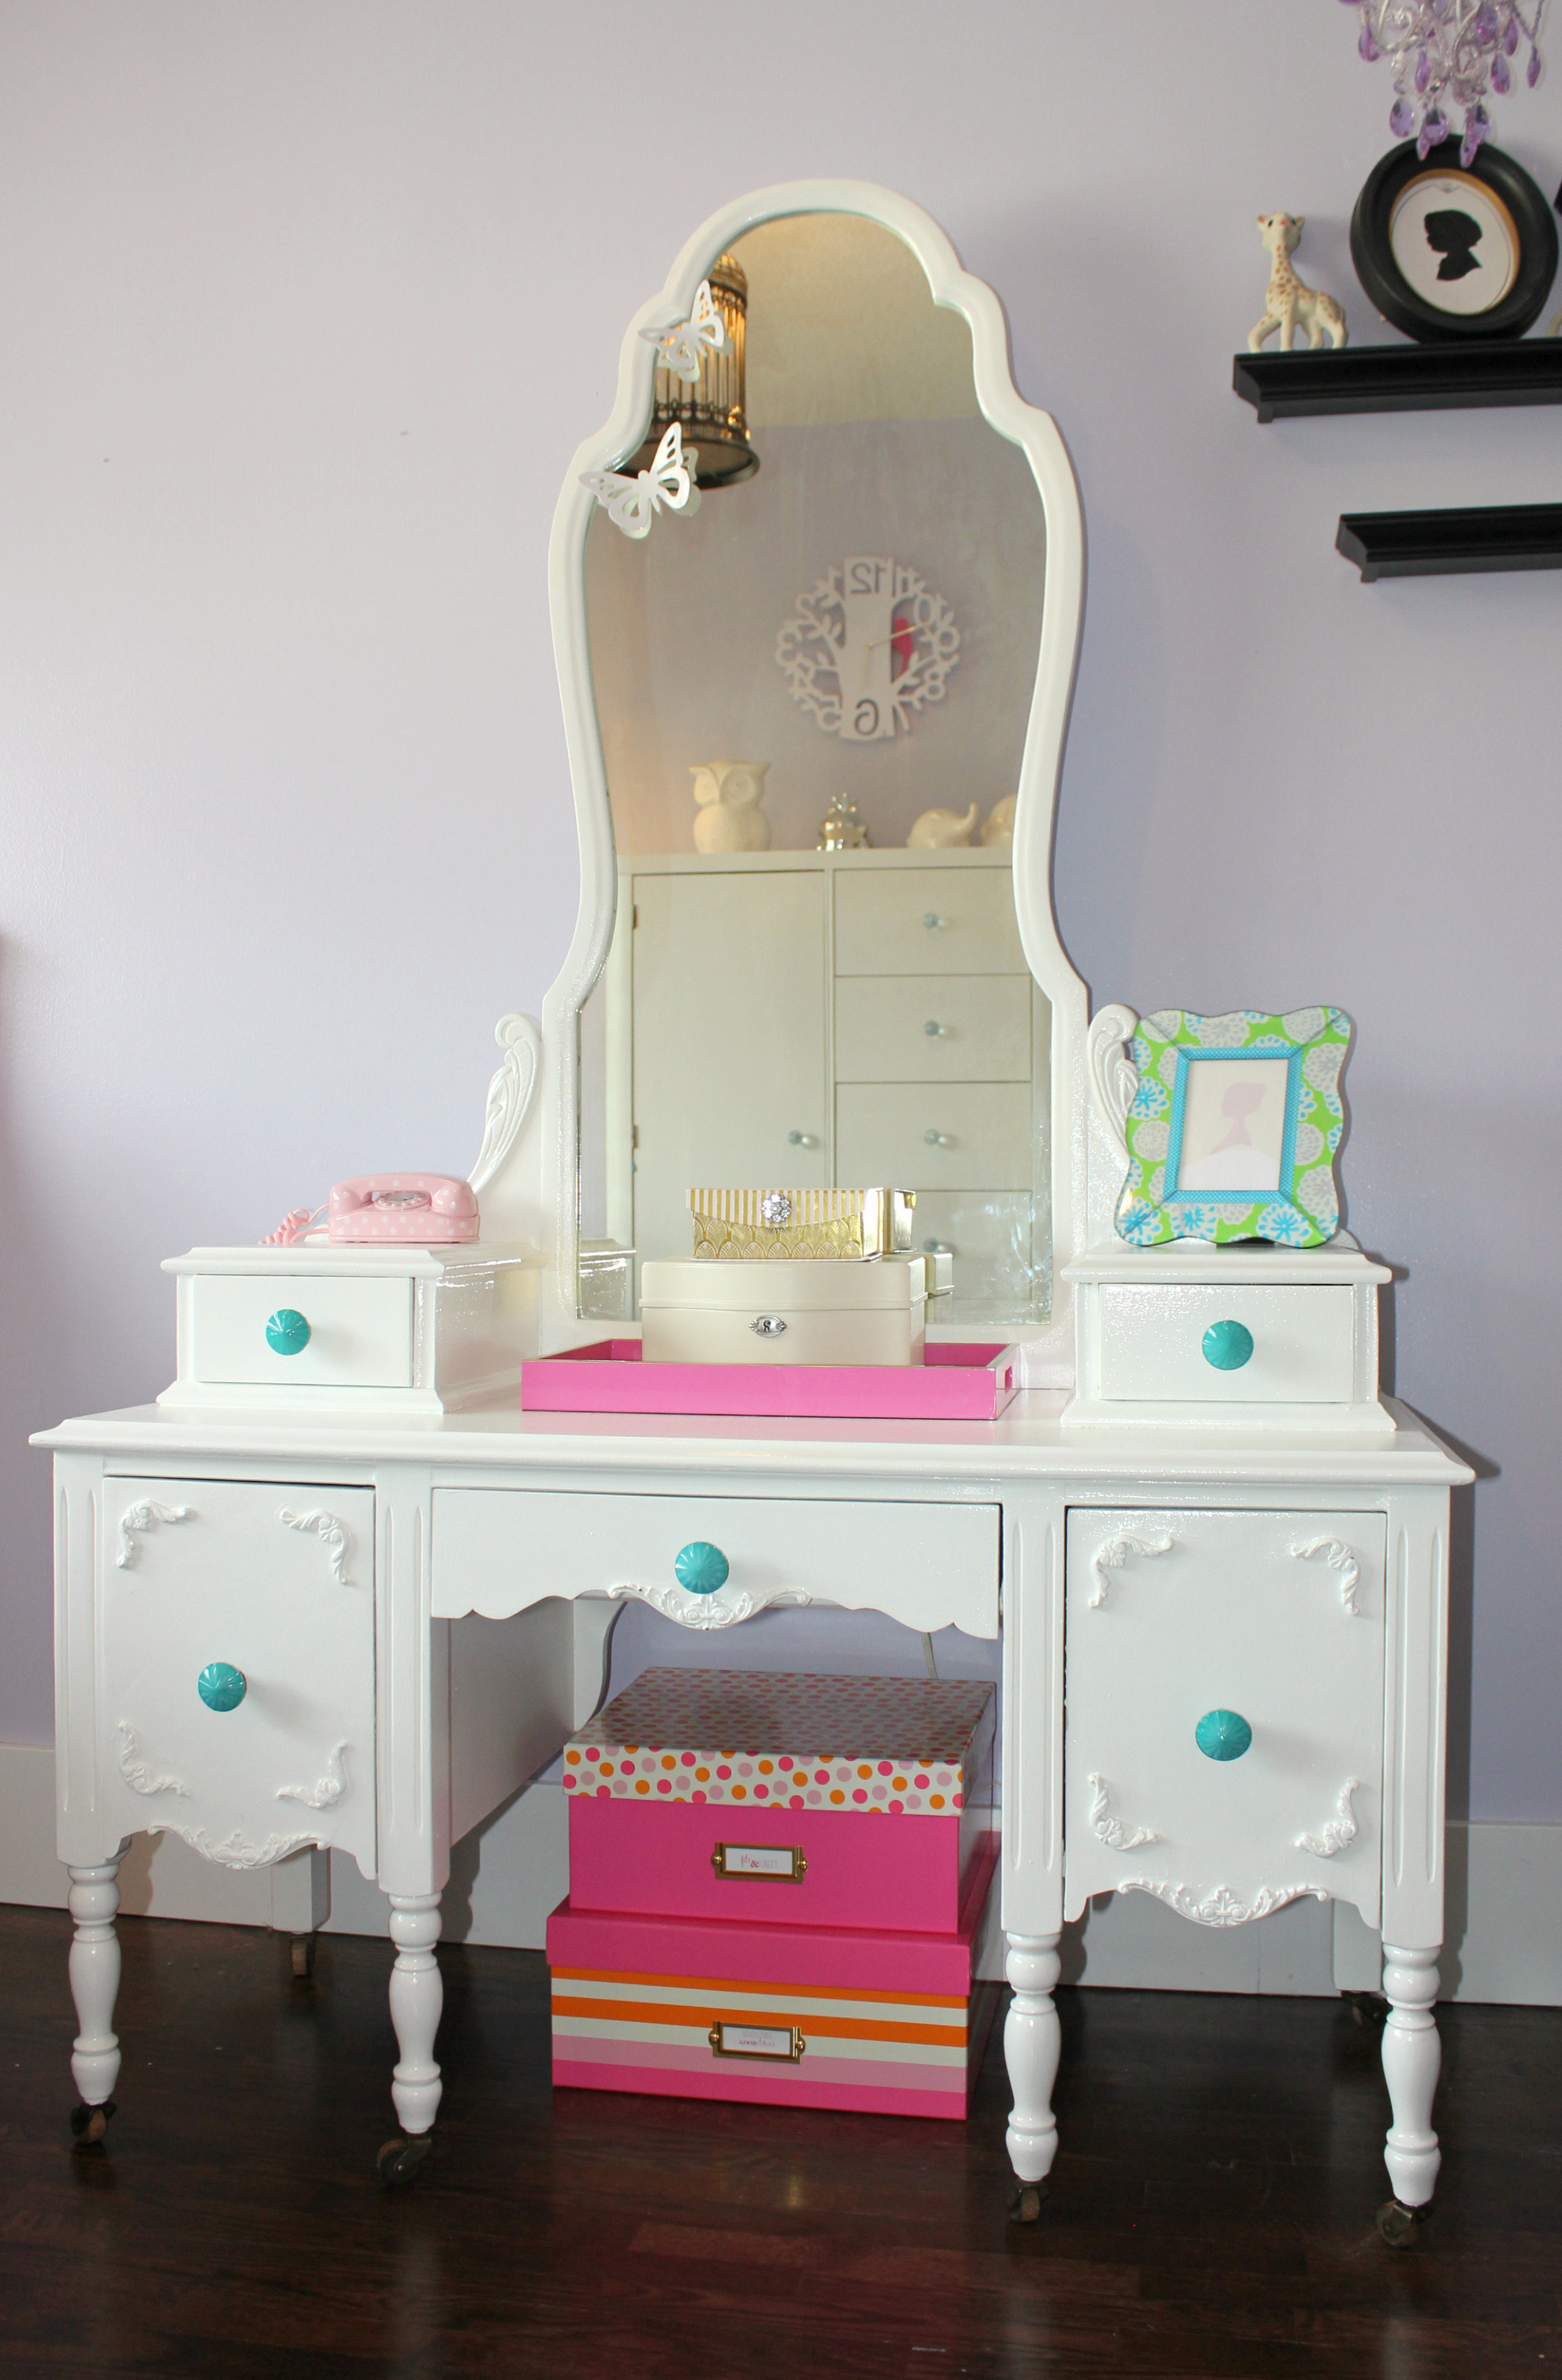
I was very pleased with this beautiful vanity, and not just because I didn’t have to do any of the sanding! Acacia especially loves that her father bought it for her. I think it also doesn’t hurt that her older sister doesn’t have one (she has her own desk instead – an antique roll top secretary, also refinished by her father). You can tell both father and daughter are proud of it and I like that! Even the following day when I walked into Acacia’s room, I found her sitting in front of her new vanity happily listening to her jewelry box play music and watching the little ballerina inside of it twirl. Appears I am not the only one pleased.
The post Refurbished Vanity DIY appeared first on Creative Sides.
]]>The post Fashion DIY: Knitted Graphic Tee appeared first on Creative Sides.
]]>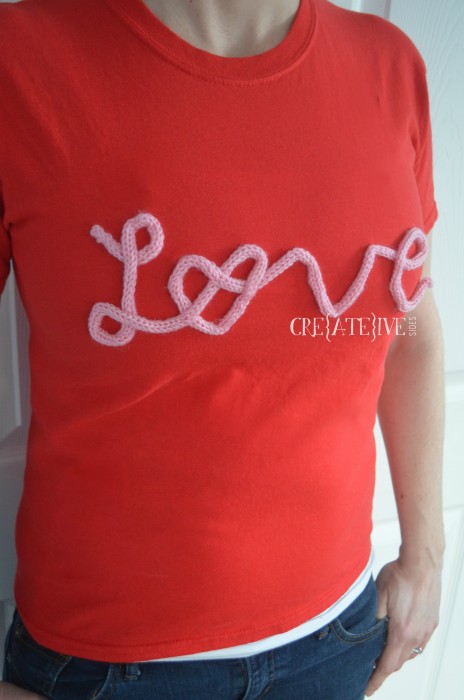
From home decor to fashion, word art is everywhere right now. This project puts a new twist on a plain t-shirt to create your own graphic tee.
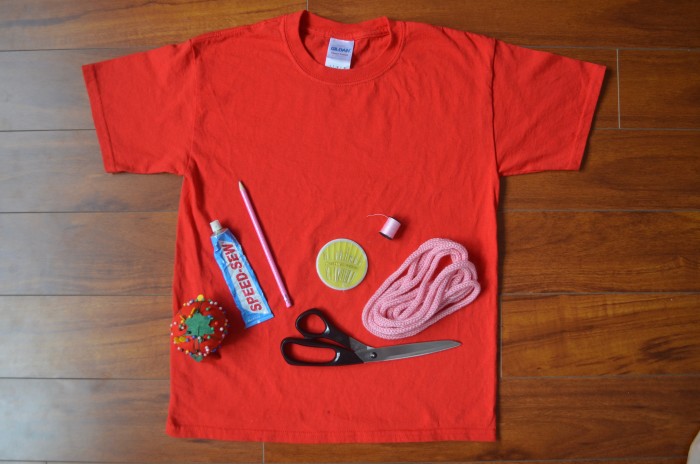
You will need:
- T-shirt
- Knitted or crocheted icord – 2 feet or more depending on the size of your design
- Scissors
- Pins
- Kwik Sew glue
- Toothpick
- Newspaper or cardboard
- Needle and thread
Knitted Graphic Tee Instructions
Step 1: Wash and dry t-shirt to prevent shrinking.
Step 2: Put a piece of cardboard or newspaper inside the t-shirt underneath the area you want your design to be. Place icord on your t-shirt in the shape you want and pin in place. Trim any excess cord.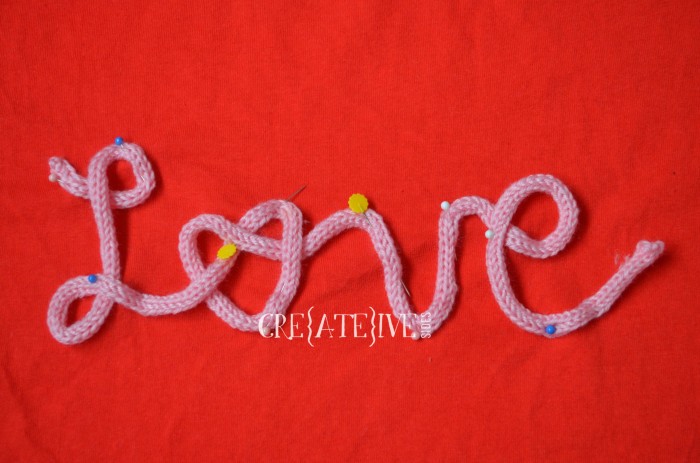
Step 3: Take a small amount of Kwik Sew glue on a toothpick and tack pieces of the icord design in place and let dry. This step will make it much easier to hold your design while sewing.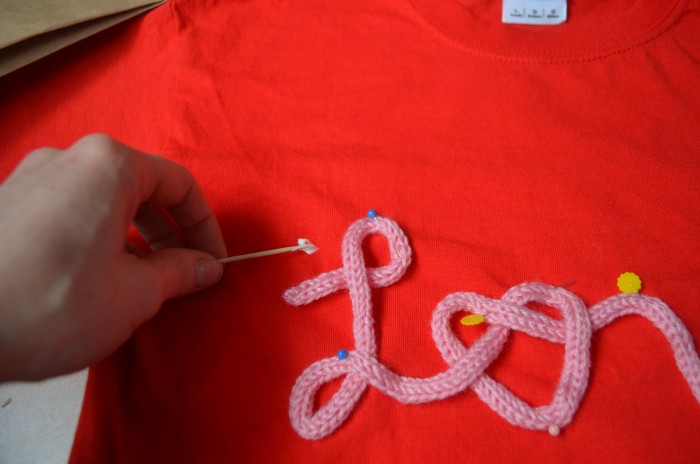
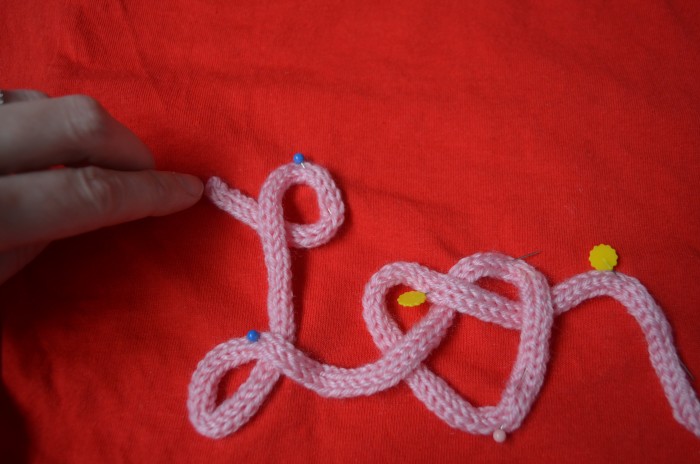
Step 4: With a needle and thread, sew your icord onto the t-shirt paying close attention to the spots that may snag with wearing or washing.
Step 5: Rock your new graphic tee!
Pro tip: Once your design is complete, wash t-shirt inside out!
Want to learn how to create your own icord for this project? Stay tuned for the full tutorial coming soon!
The post Fashion DIY: Knitted Graphic Tee appeared first on Creative Sides.
]]>The post Stack-O-Lantern Planter DIY appeared first on Creative Sides.
]]>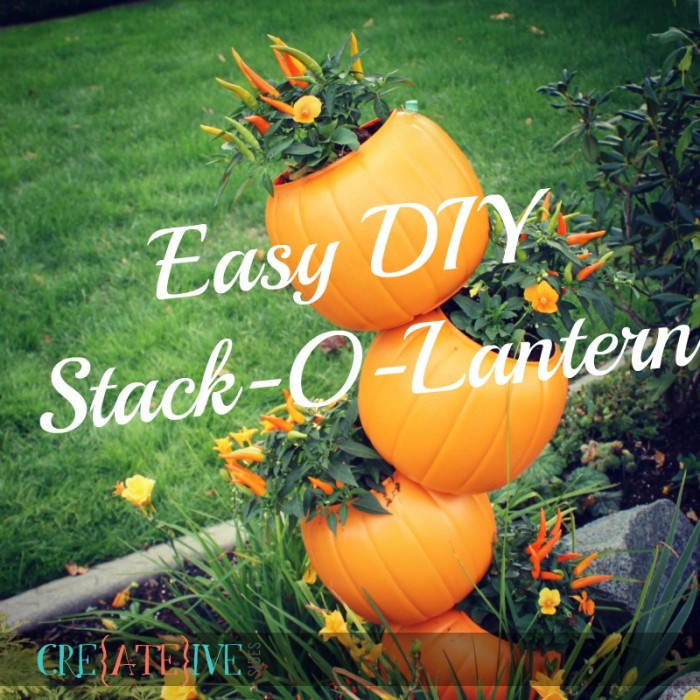
I’m not a green thumb in the slightest and don’t pretend to be. I have a reputation amongst local landscapers as a plant killer – it’s not my fault, I think I have too much love to give and the plants aren’t sure how to handle it. (If only I could exhibit a fraction of that affection in real life relationships, I might not be single!) I decided this year to attempt to work with live plants again, after a really long hiatus and a full ban on plant purchasing by my gardener.
I’m going to take you step by step through creating this fun and simple project that will give your garden a cute Halloween vibe.
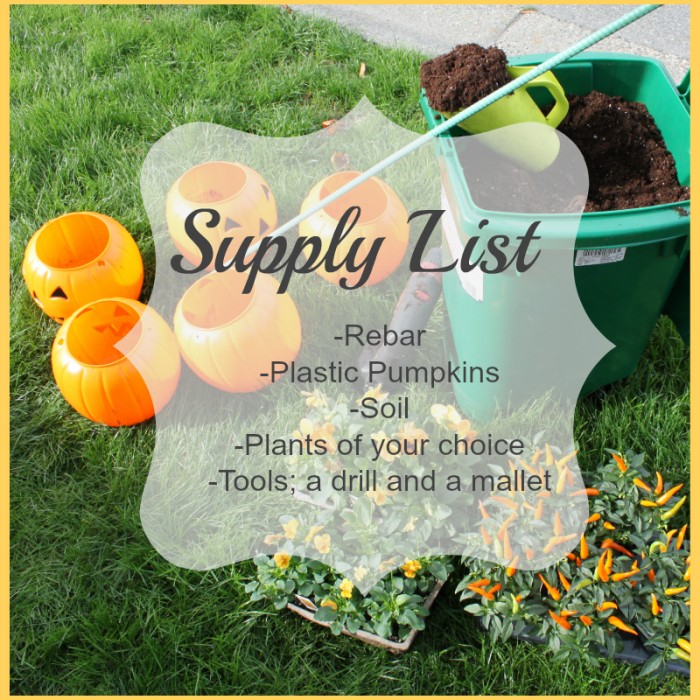
Here’s what you will need:
• A piece of rebar
• Five plastic pumpkins
• Soil
• Small Plants
• Tools- a drill and a mallet
This project can be customized to your tastes in several ways. We used a 48” piece of rebar for our stack o lantern planter but you can make it longer or shorter depending on your space and what you want it to look like in the end. The 48” length gave me enough room for 5 pumpkins and still have enough length to pound roughly 8-10” into the ground.
You can also opt to use real pumpkins if you like but my reasoning against it is, the real pumpkins are significantly heavier, you have to cut them open and scoop out their guts (not my favorite thing) and they will get soft and begin to rot over time so while I know I’ll have to replace the plants annually, my creation is re-usable year after year after a quick 10 minute build.
Sounds easy so far right? I was surprised how easy this little project was and it looks adorable in the garden! I’m not the only one who thinks so, there are constantly people out front taking photos. (I was creeped out by this.)
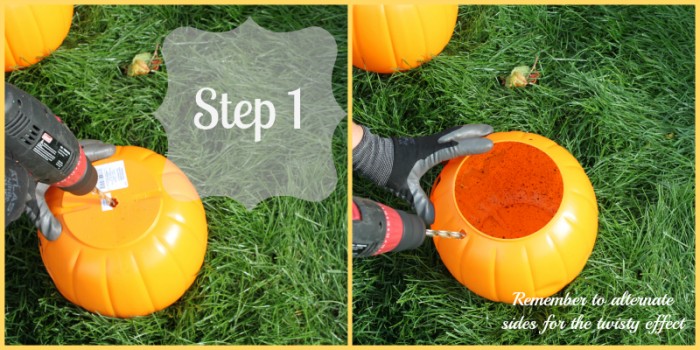
Step 1: This is the one and only time you’ll need the drill. I love the feeling of a power tool in my hands so this project will likely lead to more ‘drills required’ DIY’s. Drill a hole in the bottom of your pumpkin and then drill another hole on the top of the pumpkin. This is where you will insert your rebar so to get the curved look, be sure you alternate the sides that you drill on.
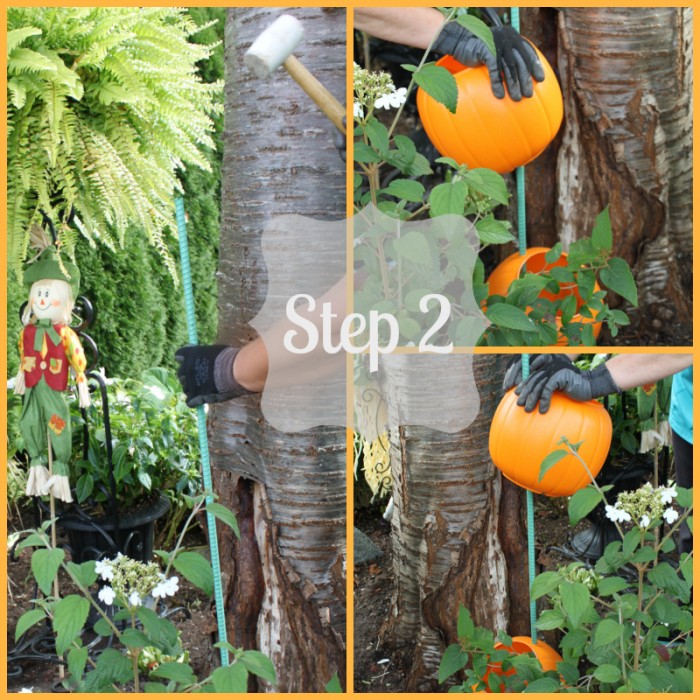
Step 2: Pound that bad boy into the ground! Another fun part for me, I tend to enjoy using a mallet. Once you have your post in place grab your first pumpkin and push the rebar through your pre-drilled holes.
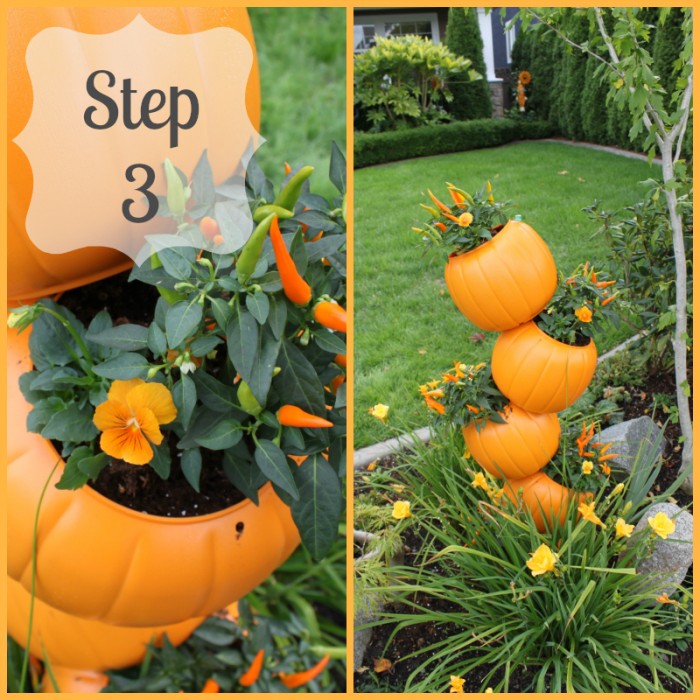
Step 3: Load up the pumpkin with dirt and place your plants in as you like. I used ornamental peppers because I’ve had less of them die on me in the past and they look cute. I paired the mini peppers with yellow pansies but you can use any plants you like. I think this would be fun with succulents or cacti as well!
Repeat steps 2 and 3 until you’ve used up all of your pumpkins.

The post Stack-O-Lantern Planter DIY appeared first on Creative Sides.
]]>The post Baby Carriage Diaper Cake appeared first on Creative Sides.
]]>
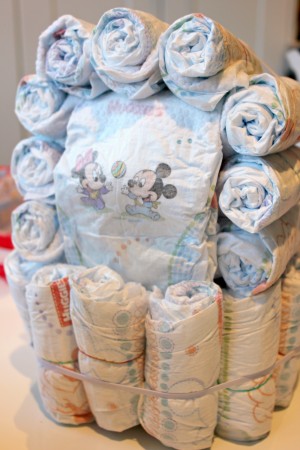
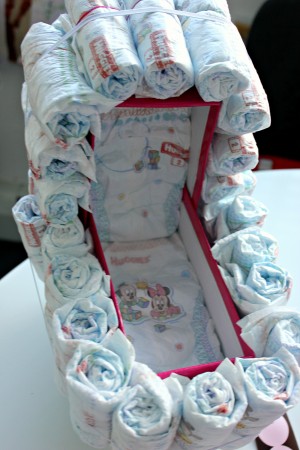
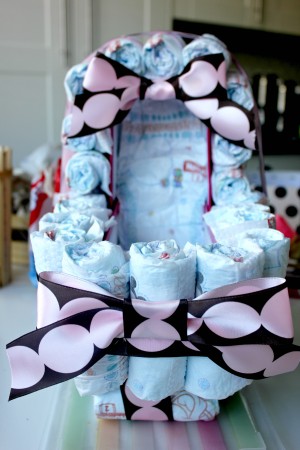
For my second attempt at turning diapers into a ‘cake’, Pinterest and I agreed on a baby carriage design. I thought it was a fun way to gift diapers to a new mom. I made sure that all the diapers were in fact usable by using elastics, ribbon and double sided tape to assemble this little carriage of diapers. So even though it looked cute at the baby shower it was actually functional in the long run as well.
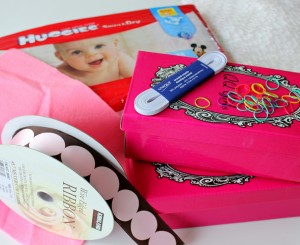 To Make A Diaper Cake Baby Carriage You Will Need:
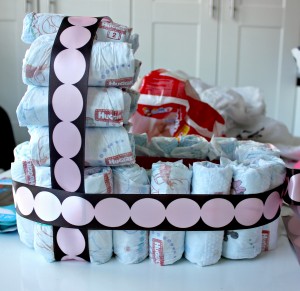
2 kids size shoe boxes (about 8″x 4″)….bigger boxes work well too, they just require more diapers and result in a larger carriage
Diapers (I used 38 Huggies size 2)
Tiny elastics (I find the rainbow loom style from the dollar store work great)
2 Large elastics or 2 lengths of elastic and two safety pins
Thick decorative ribbon
Scissors
Double-sided tape
Small doll (optional)
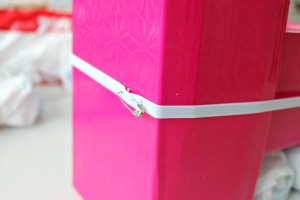
Step 1: Put one box into the other to form an ‘L’ shape. This will be the base of the carriage. Make sure the boxes are a snug fit, otherwise glue into place. Take a large, thick elastic or create your own by safety pinning two separate lengths of elastic to fit the box, one horizontally and one vertically. Attach the elastic that runs vertically first and then place the elastic that will run horizontally along the base overtop.
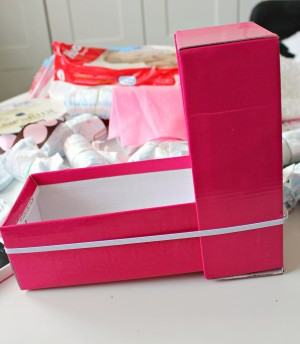
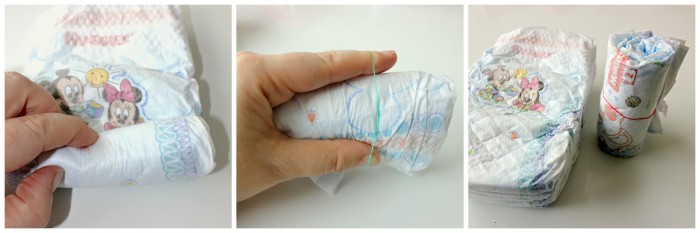
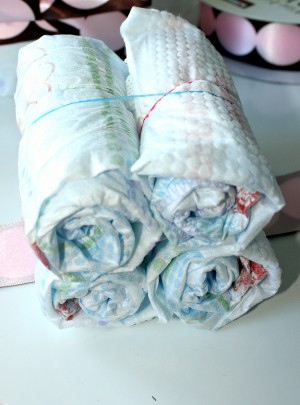
Step 2: Roll the diapers one by one and securing with the tiny elastics (white or clear work best because you don’t see them). The rainbow loom elastics work well because they are thick, if using the thinner tiny hair elastics, you may need 2 per diaper.
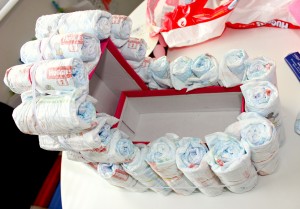
Step 3: Place the diapers around the carriage by slipping each one under the elastic around the outside of the box that forms the base of the carriage.
Step 4: Once the base of the carriage is covered, begin working your way up and over the top of the carriage in the same way, with rolled diapers slipped horizontally under the elastic.
NOTE: Make sure the elastic that runs vertically goes on first beneath the elastic that runs horizontally.
Step 5: Take a diaper (unrolled) and cover the exposed back of the box. Tuck in the top and bottom under the rolled diapers to secure.
Step 6: Line the inside of the carriage with two diapers.
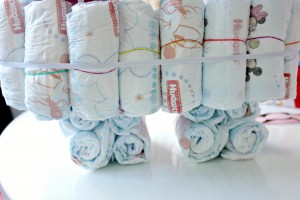
Step 7: Next, make the wheels by putting 4 rolled diapers together with an elastic for each wheel.
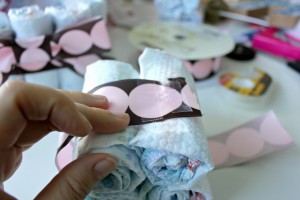
Step 8: Cut a length of ribbon long enough to wrap around the carriage and cover the elastic. Using double-sided tape attach the two ends overlapping and together, making sure to pull the ribbon tight so that it will stay in place.
Step 9: Next measure and cut a length of ribbon to cover the elastic running up and over the carriage, securing again with the double sided tape, once the ribbon has been pulled taut in place.
Step 10: Cover the elastic on the wheels with ribbon as well, and using the double-sided tape or hot glue (on the ribbon not the diapers), attach the wheels to the underside of the carriage on the exposed bottom of the box.
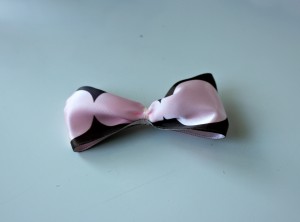
Step 11: Create a bow out of the ribbon by folding the ribbon into a bow shape and wrapping a 1.5″ piece of ribbon around the centre and using the double-sided tape or glue to secure in the back. Use the double-sided tape to attach to the front of the carriage.
Step 12: Using the same process, create a slightly smaller bow and attach it to the top of the carriage.
Step 13: Create a small bow for the back, I did this by attaching a clear elastic to the centre of the ribbon and then attaching to the back with more double-sided tape (this is the only diaper that actually had something adhered to it, because I wanted them all to be usable).
Step 13: Lastly, and this is optional (unless you are my daughters in which case this step becomes completely mandatory), add a small doll to the carriage 
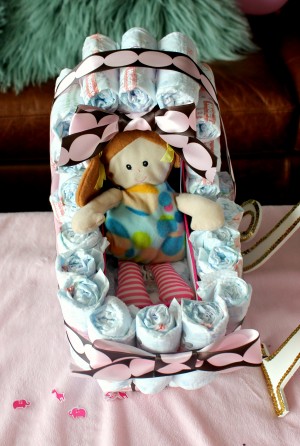
And there you have it, a mini baby carriage out of diapers!!
Inspiration for this design came from www.myloveofstyle.com
This post may contain affiliate links. See our disclosure policy for more information.
The post Baby Carriage Diaper Cake appeared first on Creative Sides.
]]>The post DIY Wooden Letter Monogram appeared first on Creative Sides.
]]>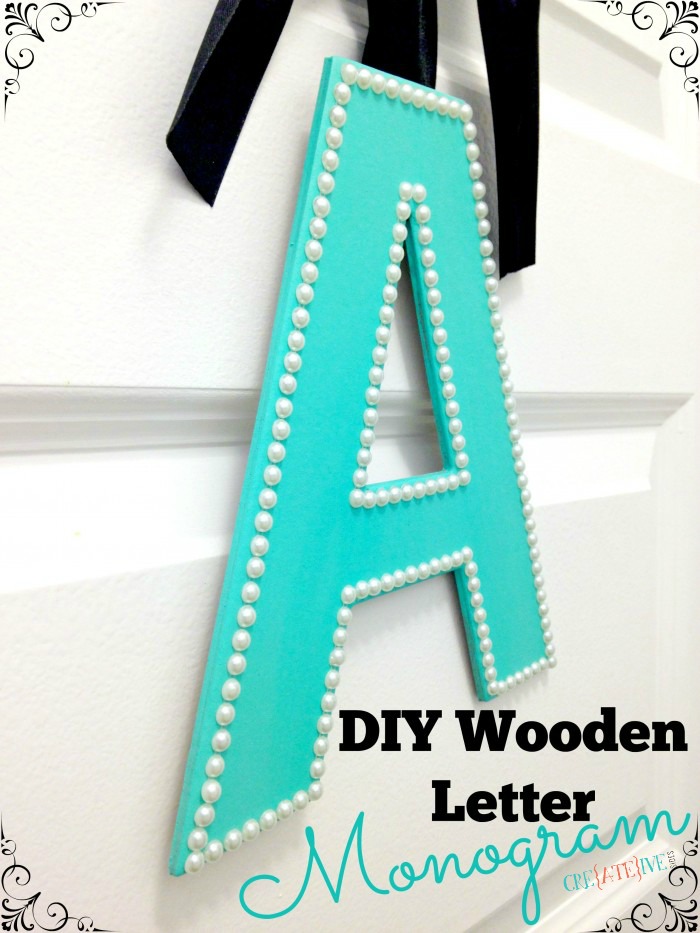
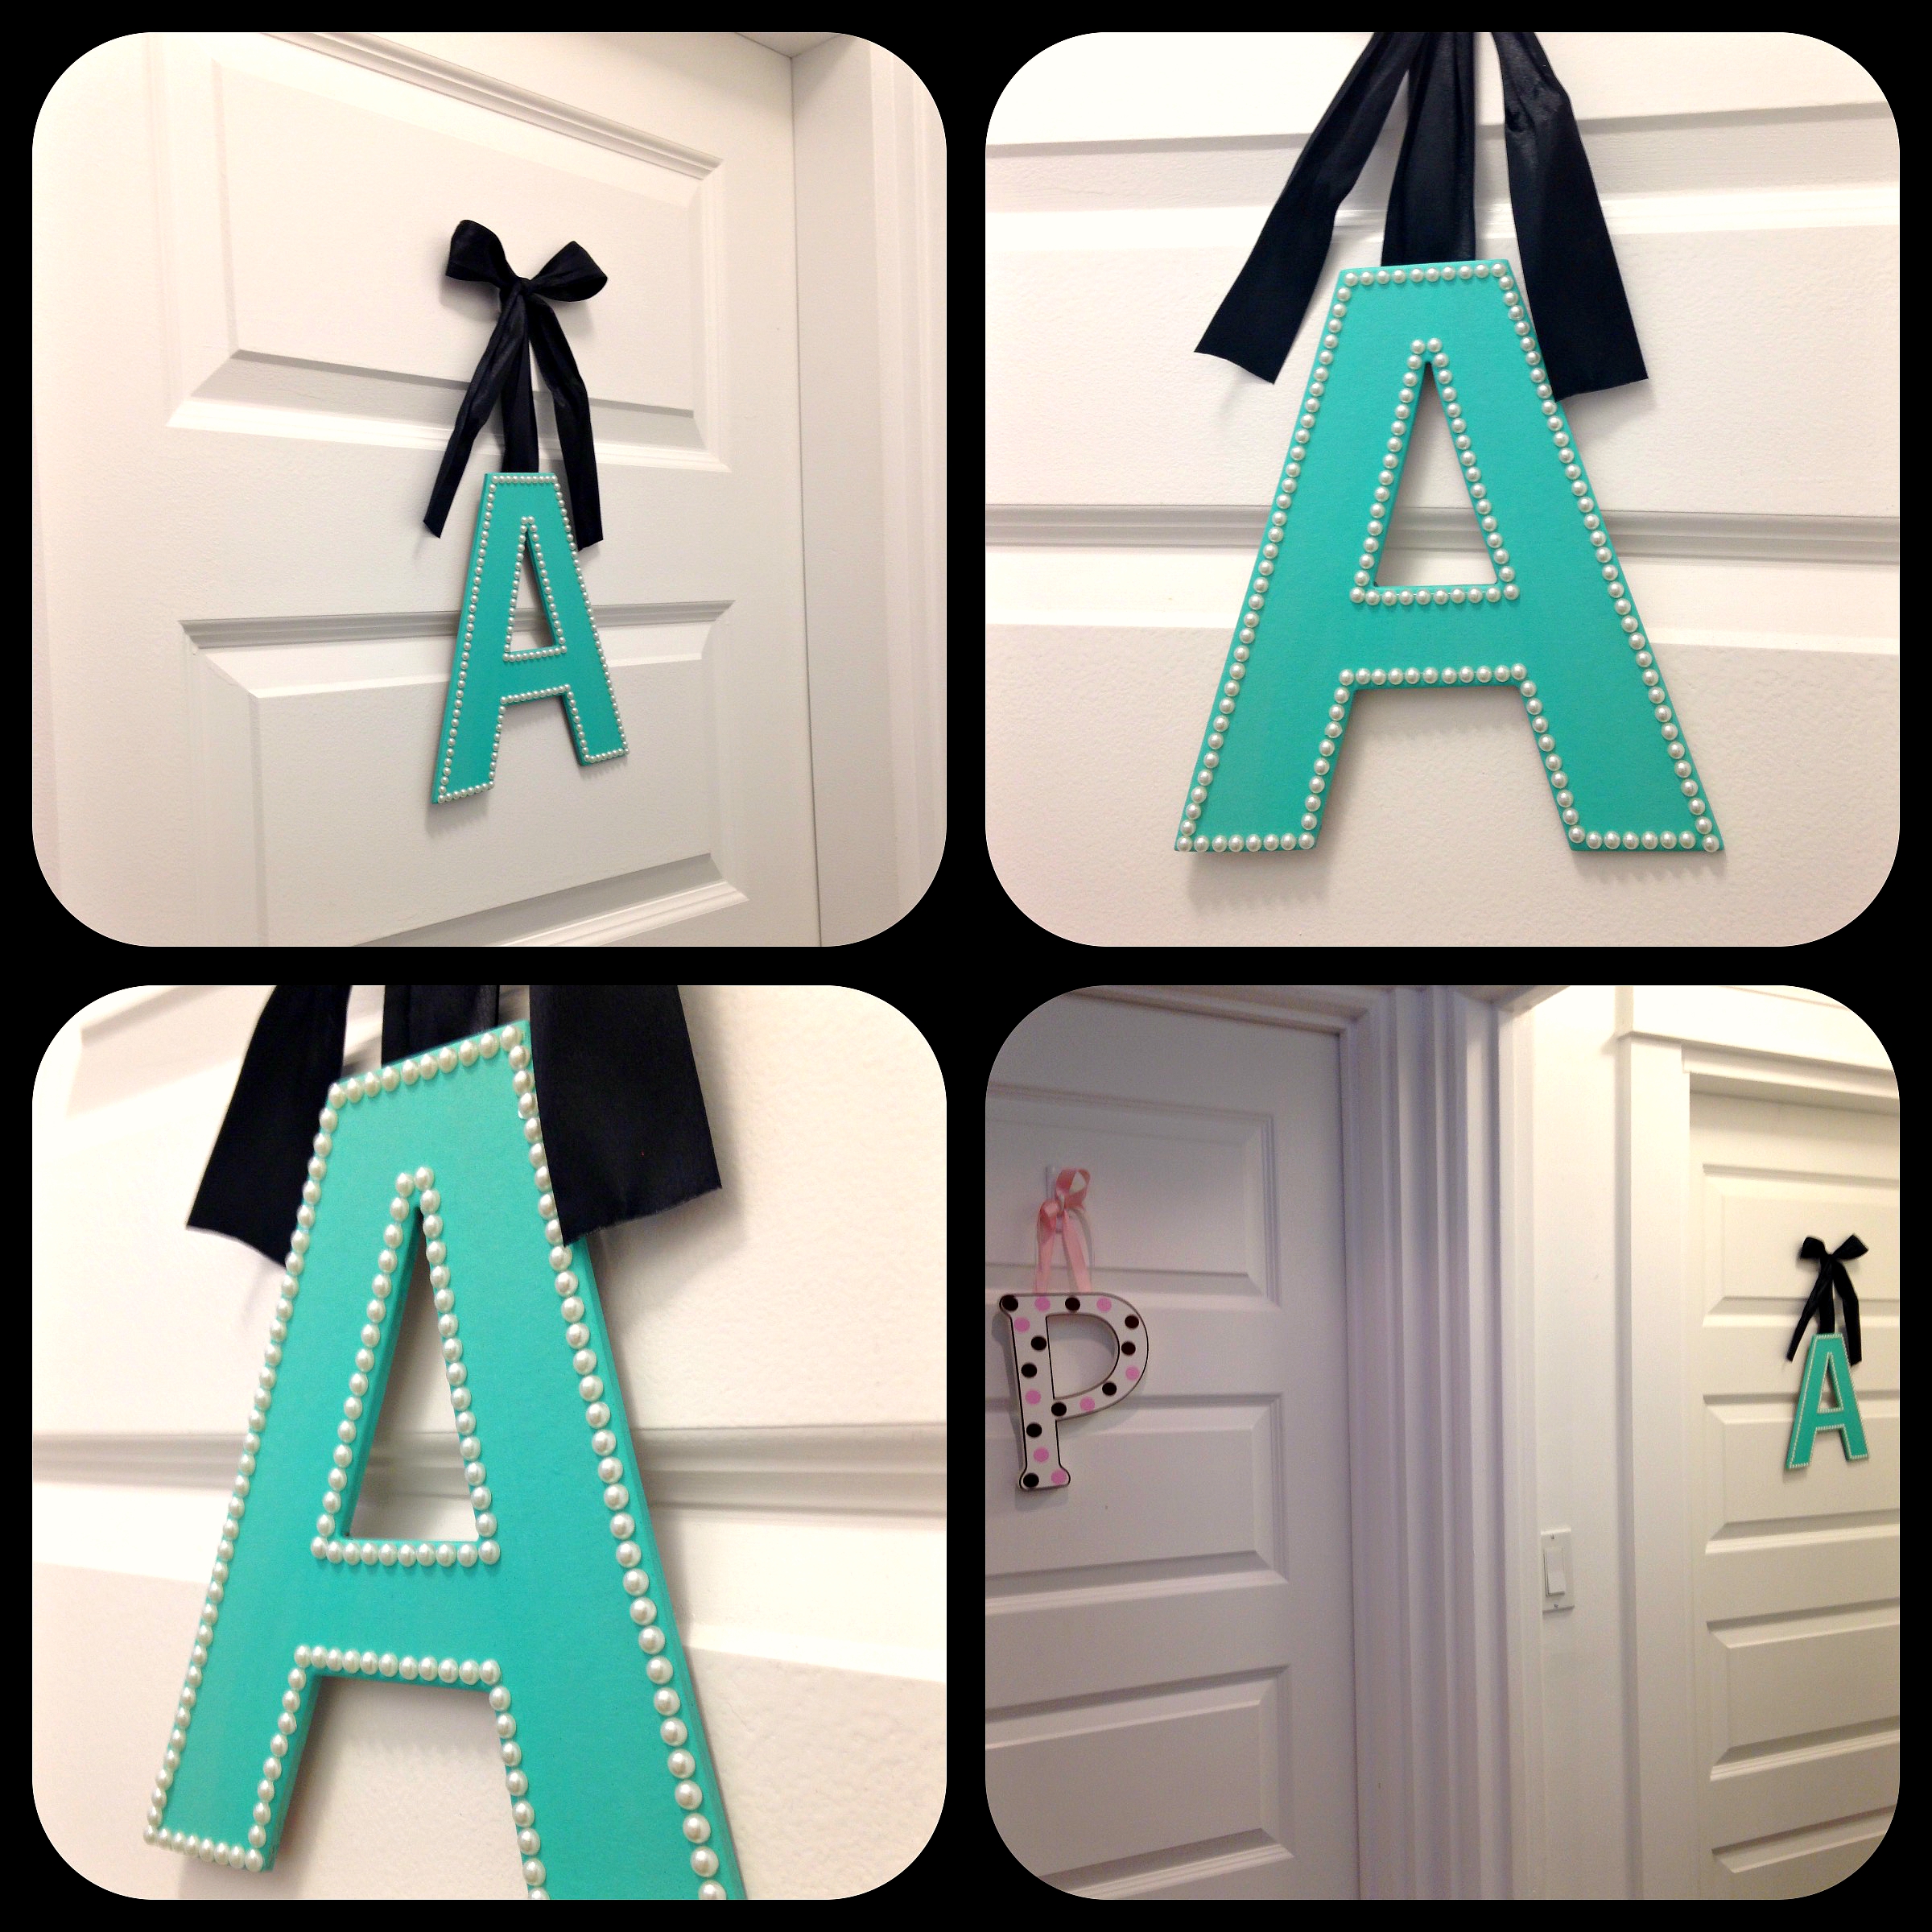
I am really rather taken with monograms and initials. I don’t really know why, it seems kind of silly really, but I have different letters and initials up all over our place. So even though it’s not a true ‘monogram’, both of my girls have the first letter of their names on their bedroom doors. Now after three years of searching for just the right ‘A’ for my younger daughter’s bedroom door, I decided to make one myself. Delightedly it only cost me about $3 in supplies. But to be perfectly honest, I could not endure the conversation regarding why the letter ‘P’ on her older sister’s bedroom door was larger than her letter ‘A’ again. Really, seriously not again. I don’t believe words could even do justice to conveying the grave importance Acacia felt this held. Of course her door had a letter ‘A’ on it (I am not a monster), but it was in fact smaller than her sister’s (and all the sparkles in the world couldn’t change that).
So a whole $3 dollars lighter and prompted with the motivation to never have to discuss this again (heaven forbid the older sister has something the little sister has not), I embarked on this incredibly simple project. I have to admit I am very pleased with the way it turned out. More importantly Acacia was over the moon happy and actually gasped out loud when I surprised her with it on her door! Thus freeing up more time for never ending conversations regarding more important things like why is the sky blue and how rainbows are made and why when we cut our own hair, it will not grow back the next day…. (and of course my personal favourite of why I won’t buy her a unicorn).

My love of all things Tiffany’s was the inspiration in both my colour and style choice. The actual ‘A’ and paint were found at Michaels (in the sale section at about .50 cents each if I remember correctly). The ribbon I already had, but can also be found at Michaels or Fabric Land. As for the pearls, they were stickers from Dollarama, making this project a breeze!
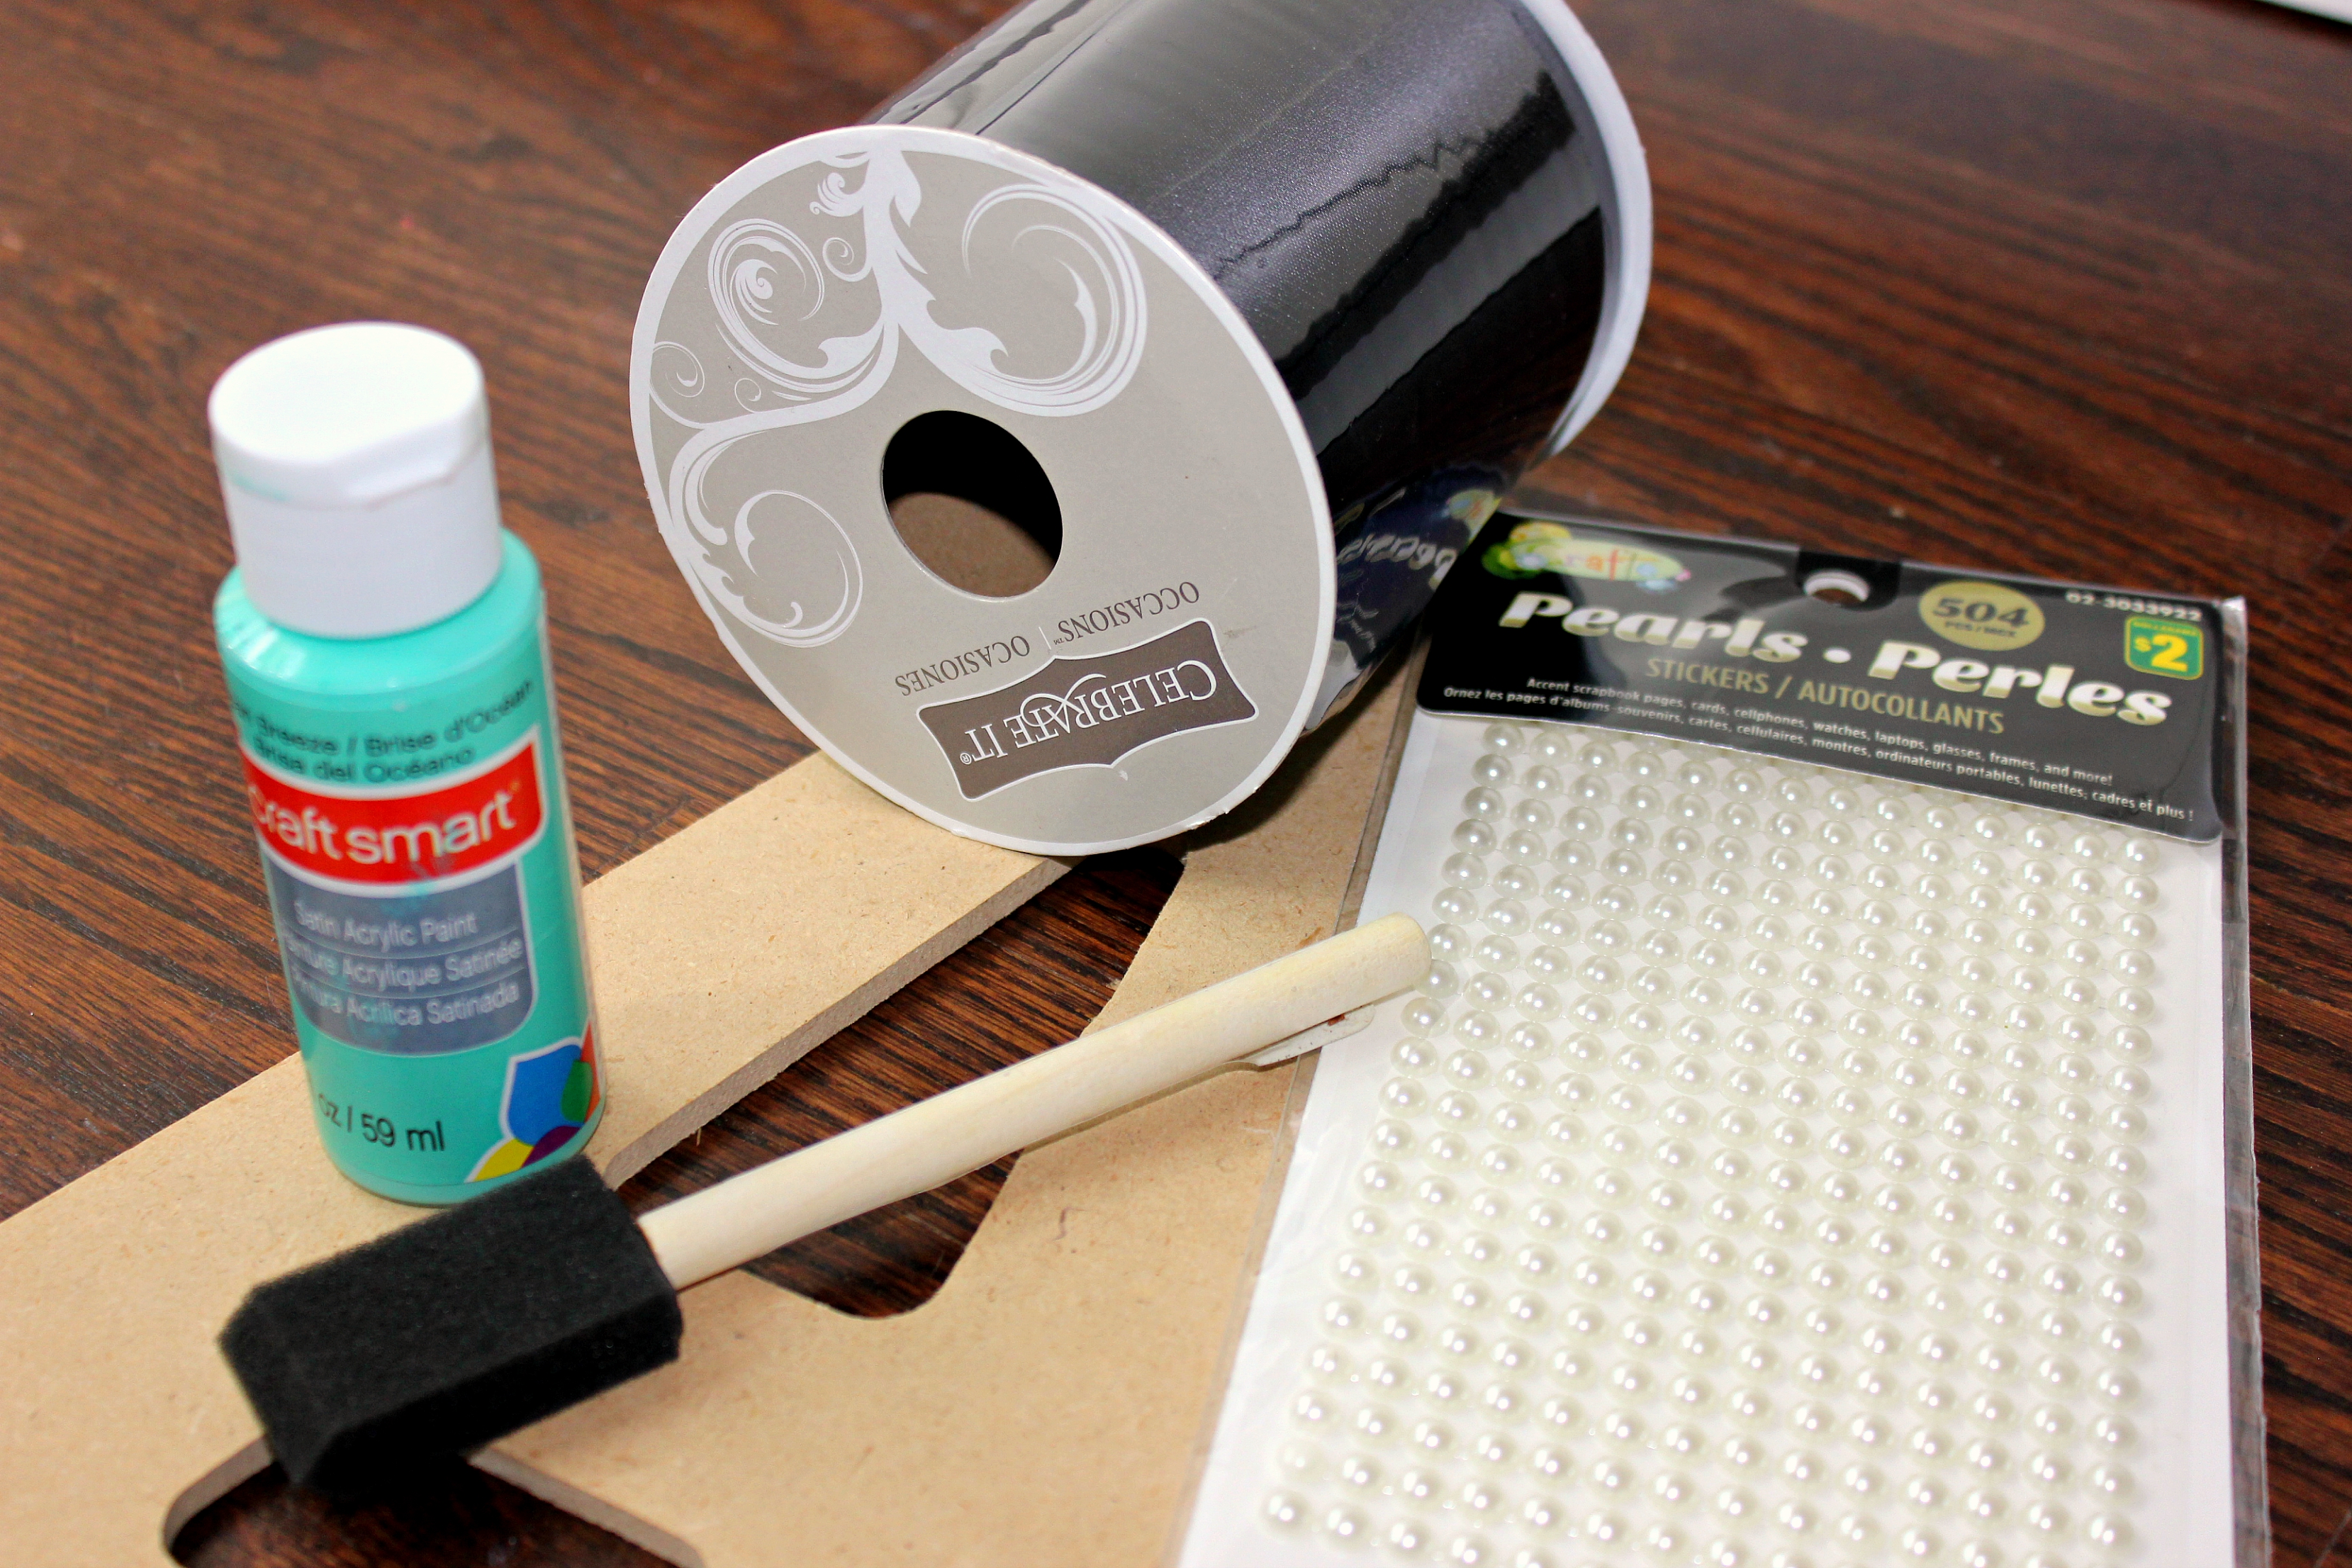
For a similar project you will need:
A wooden letter
Craft paint (I used craft smart satin acrylic paint in ocean breeze)
A foam paint brush
Embellishments (I chose pearl stickers)
Ribbon
Hot Glue Gun (or craft glue)
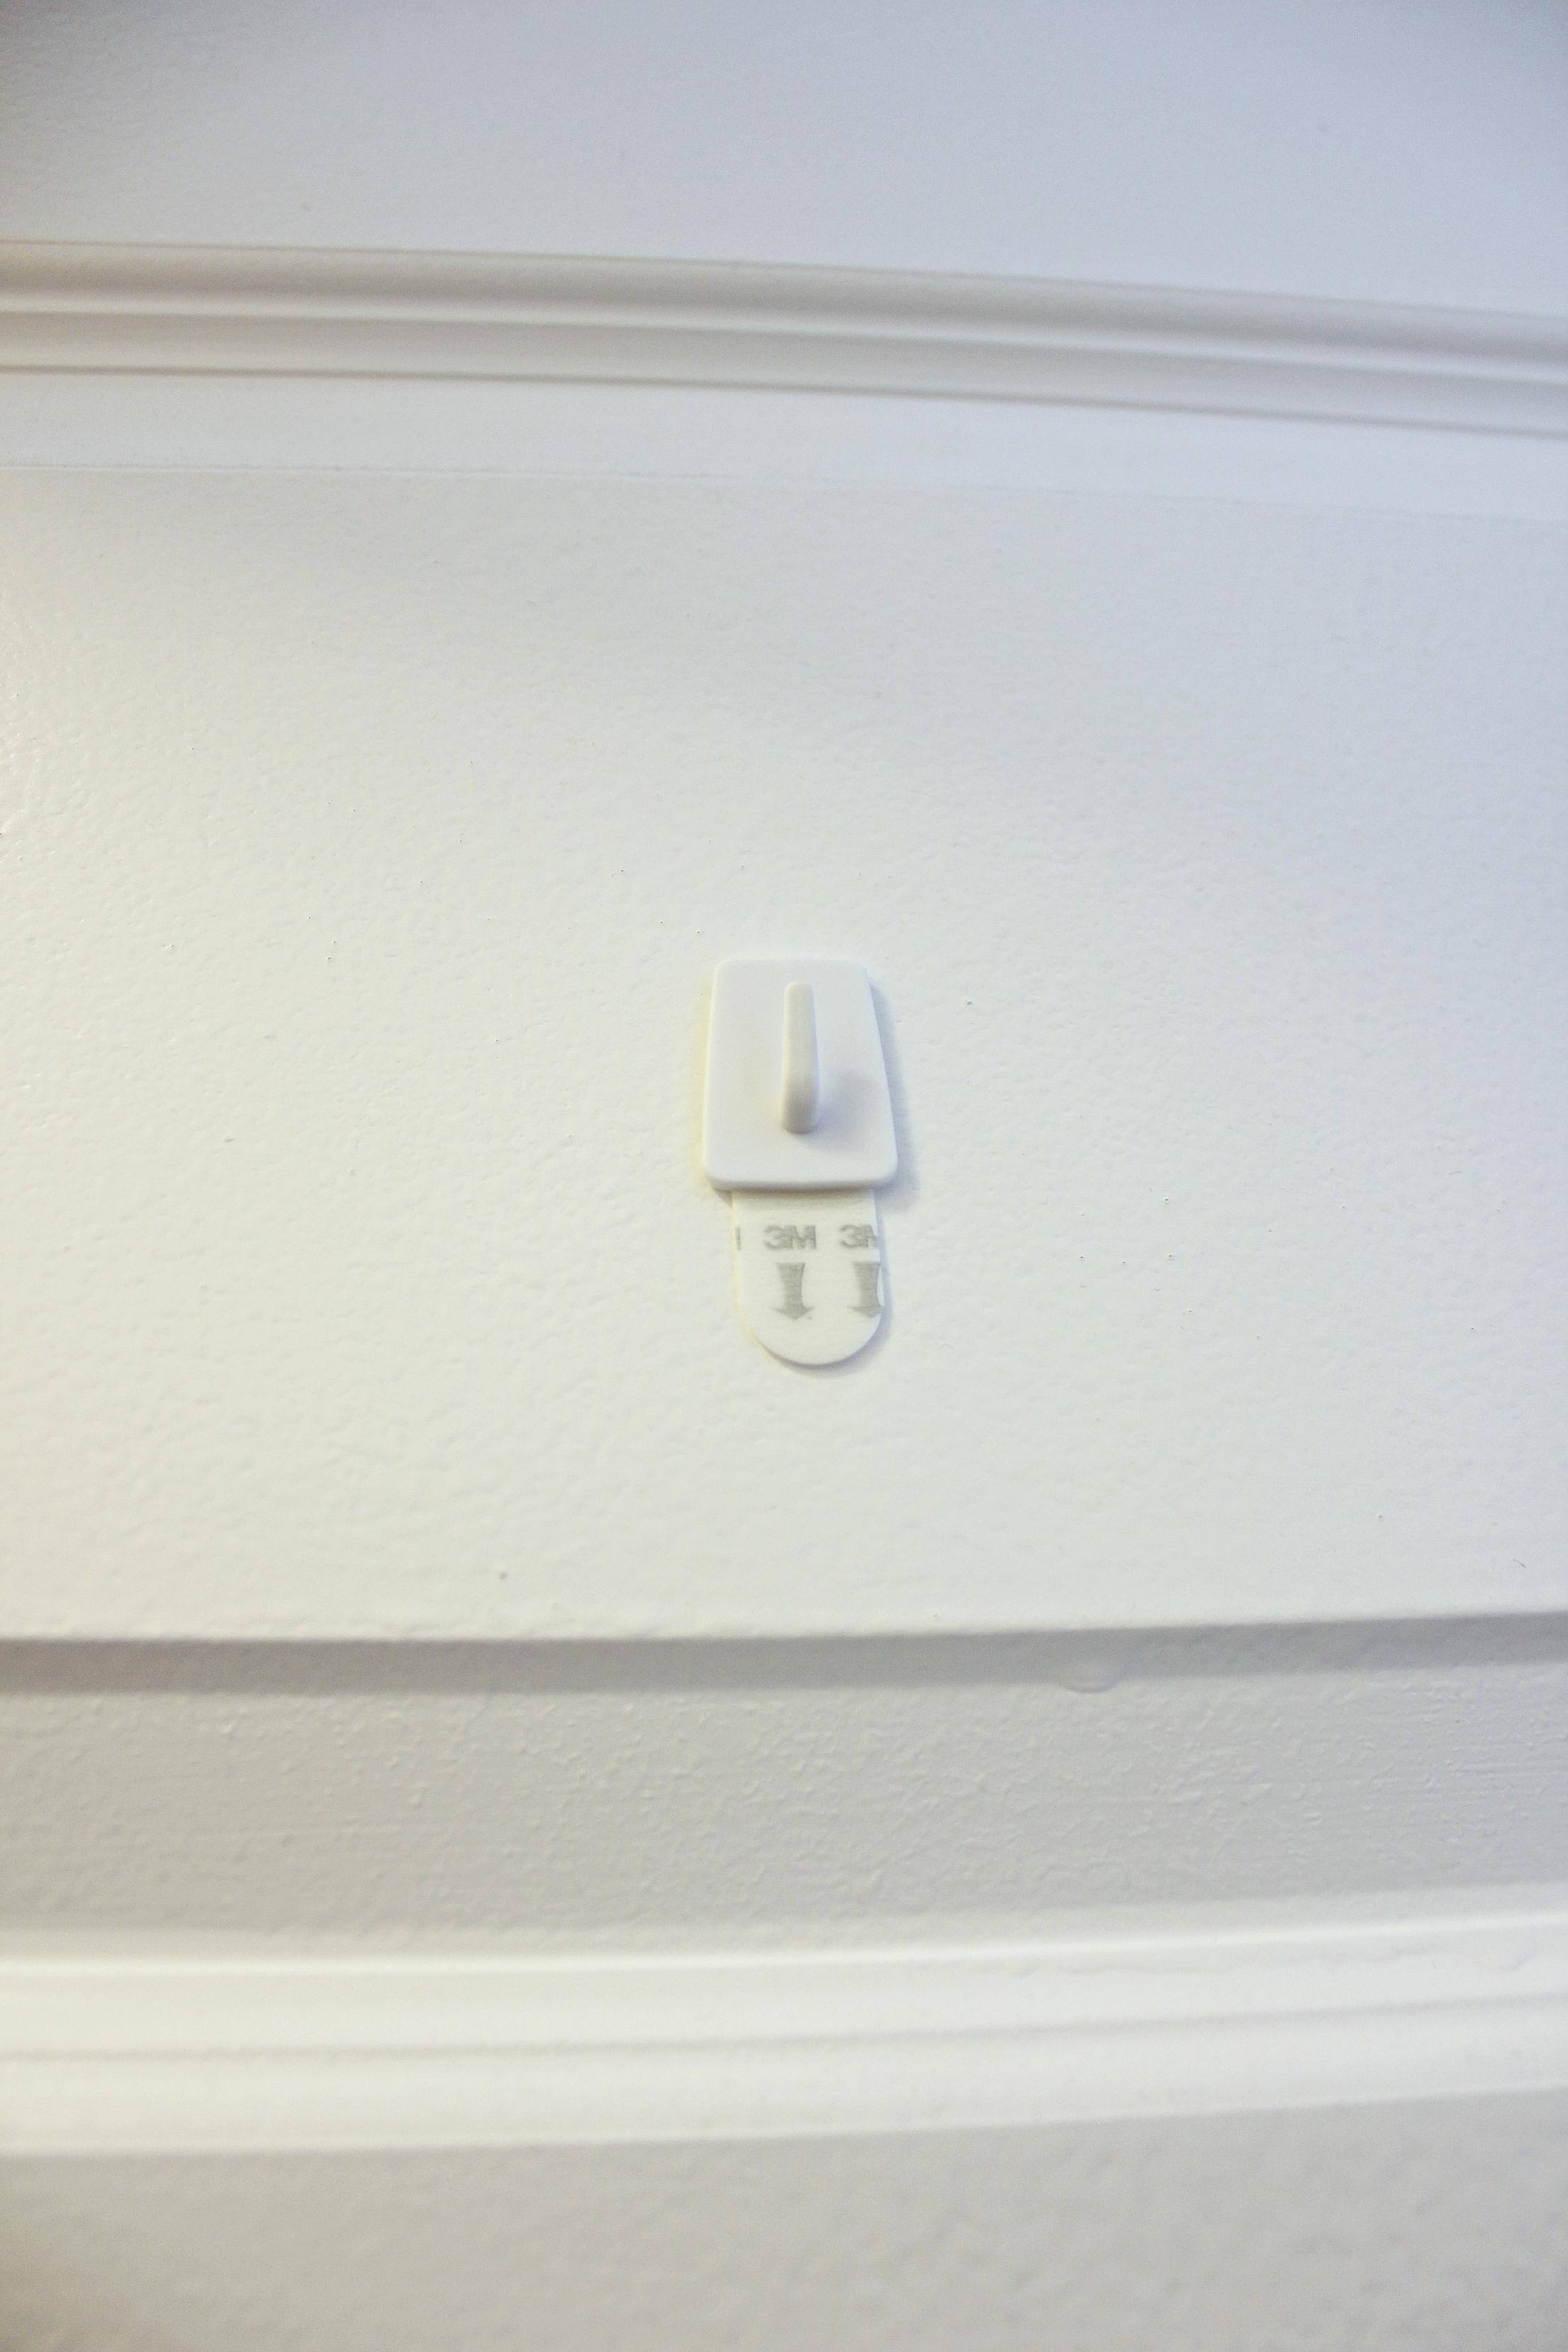
A hook (I went with a small Command Damage-Free hook so as to not leave a permanent mark on the door)
Scissors
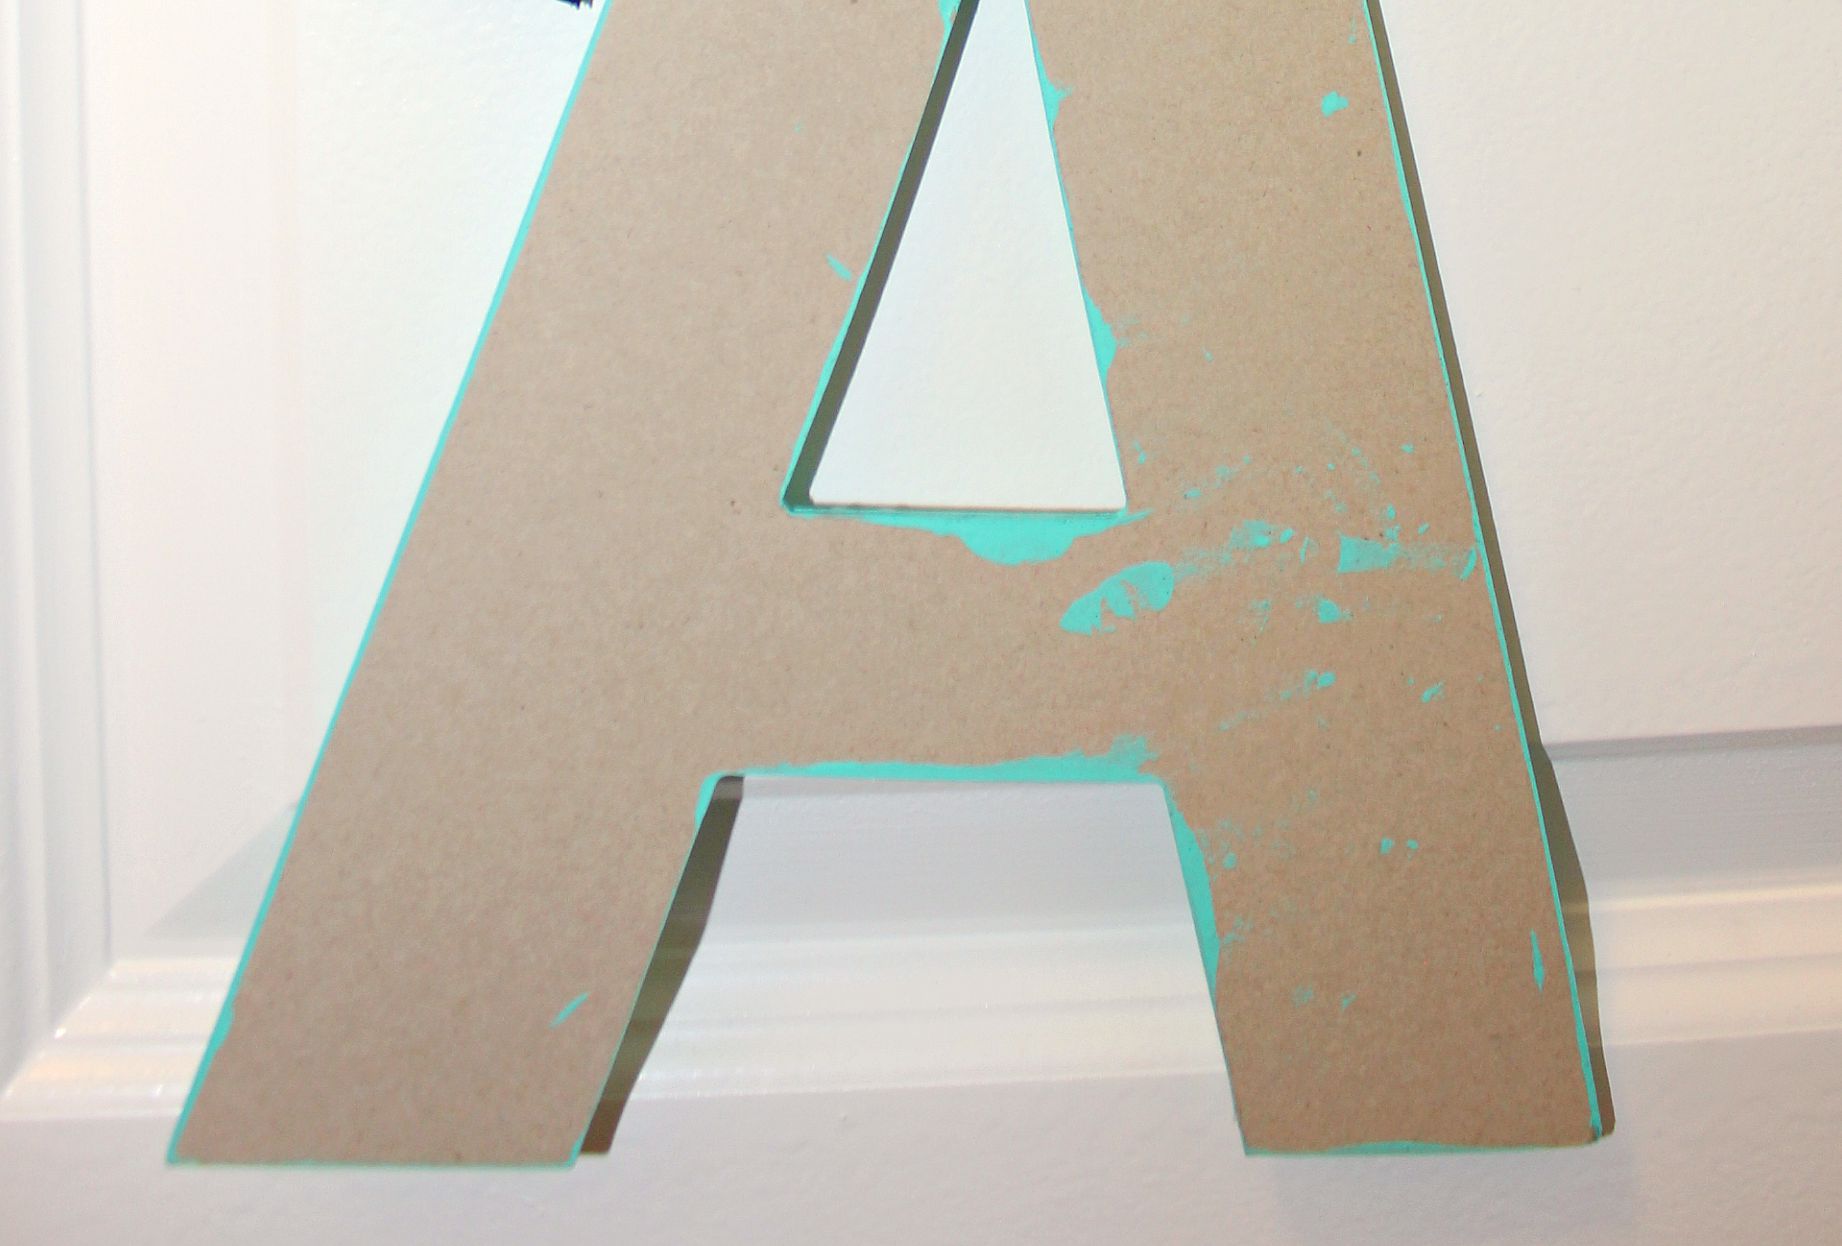
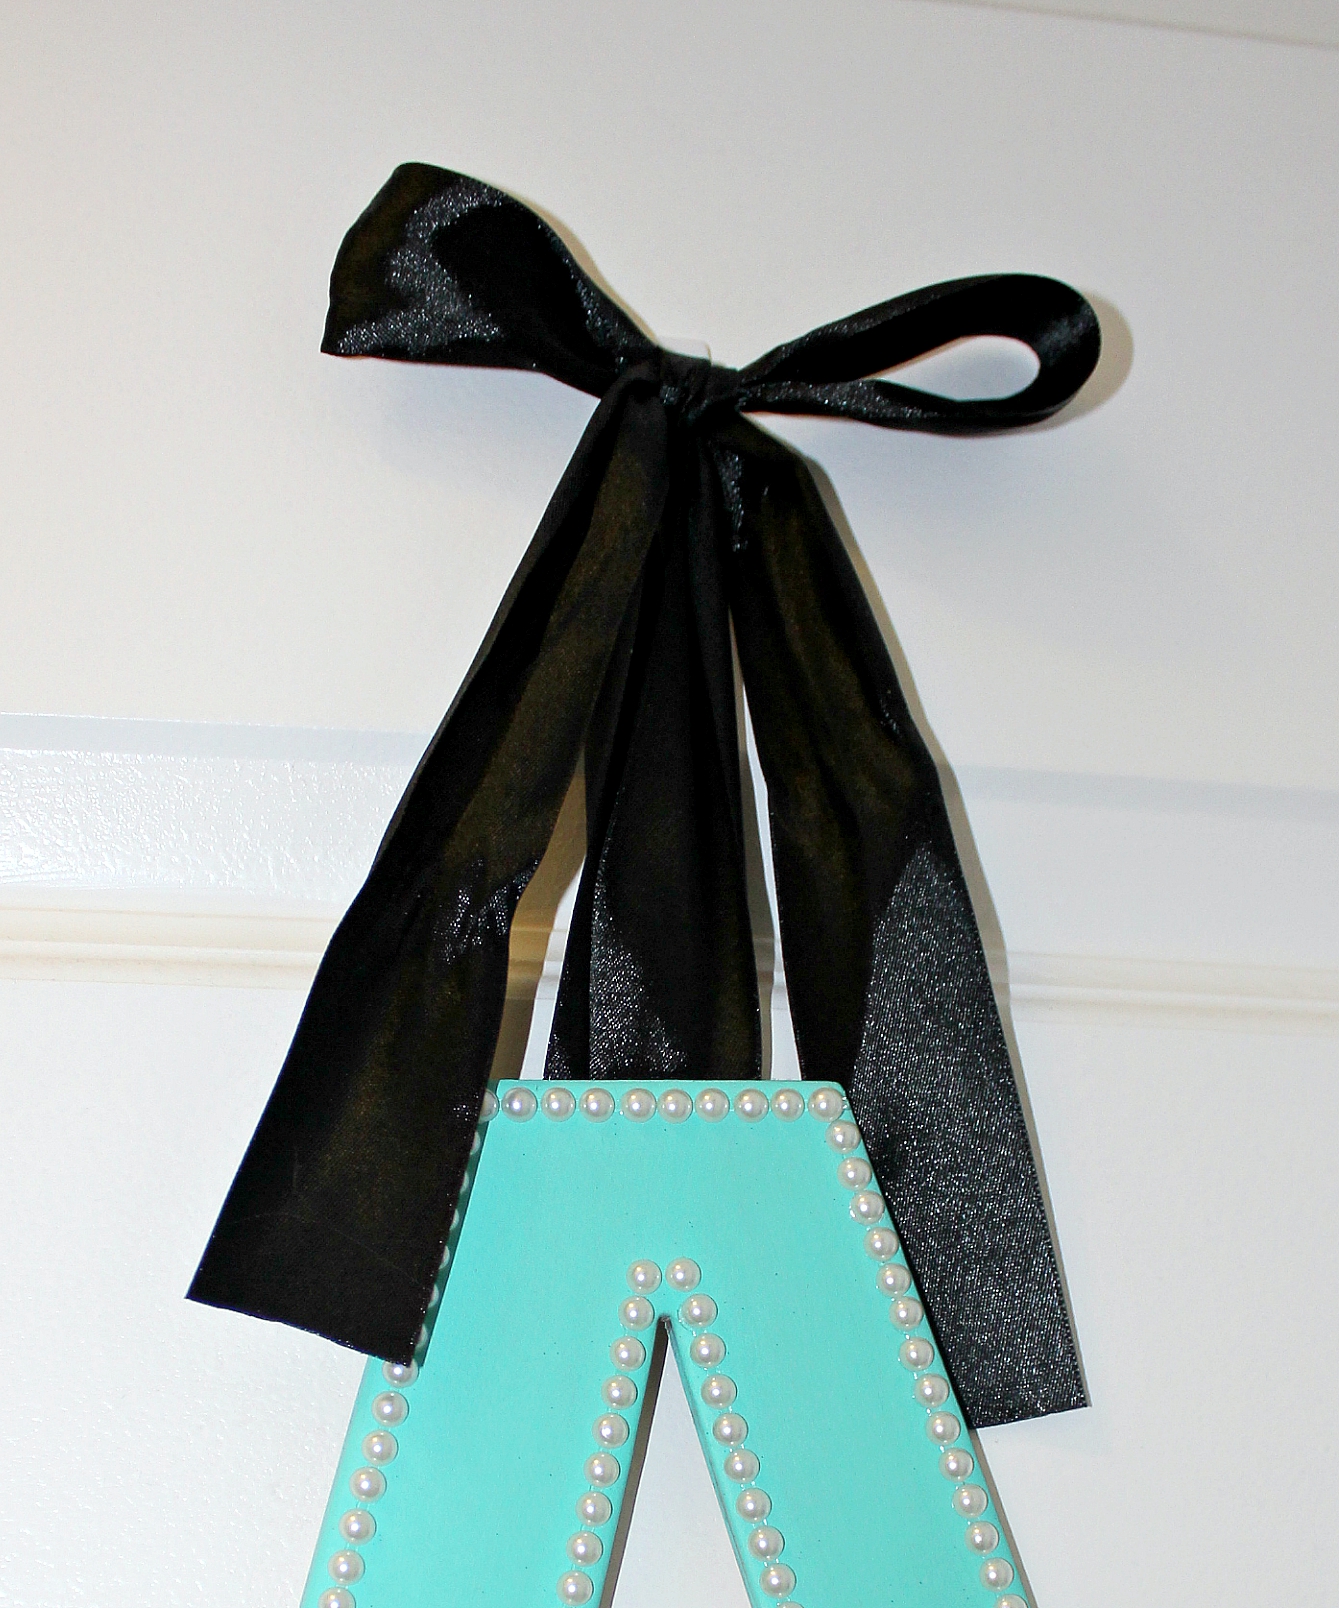
Step 1: Paint the letter, starting with the sides. I used two coats of paint, allowing the letter to become ‘dry to the touch’ in-between coats (this really only took a few minutes). Then allow to dry completely (if it is not completely dry the stickers will not adhere properly in the next step).
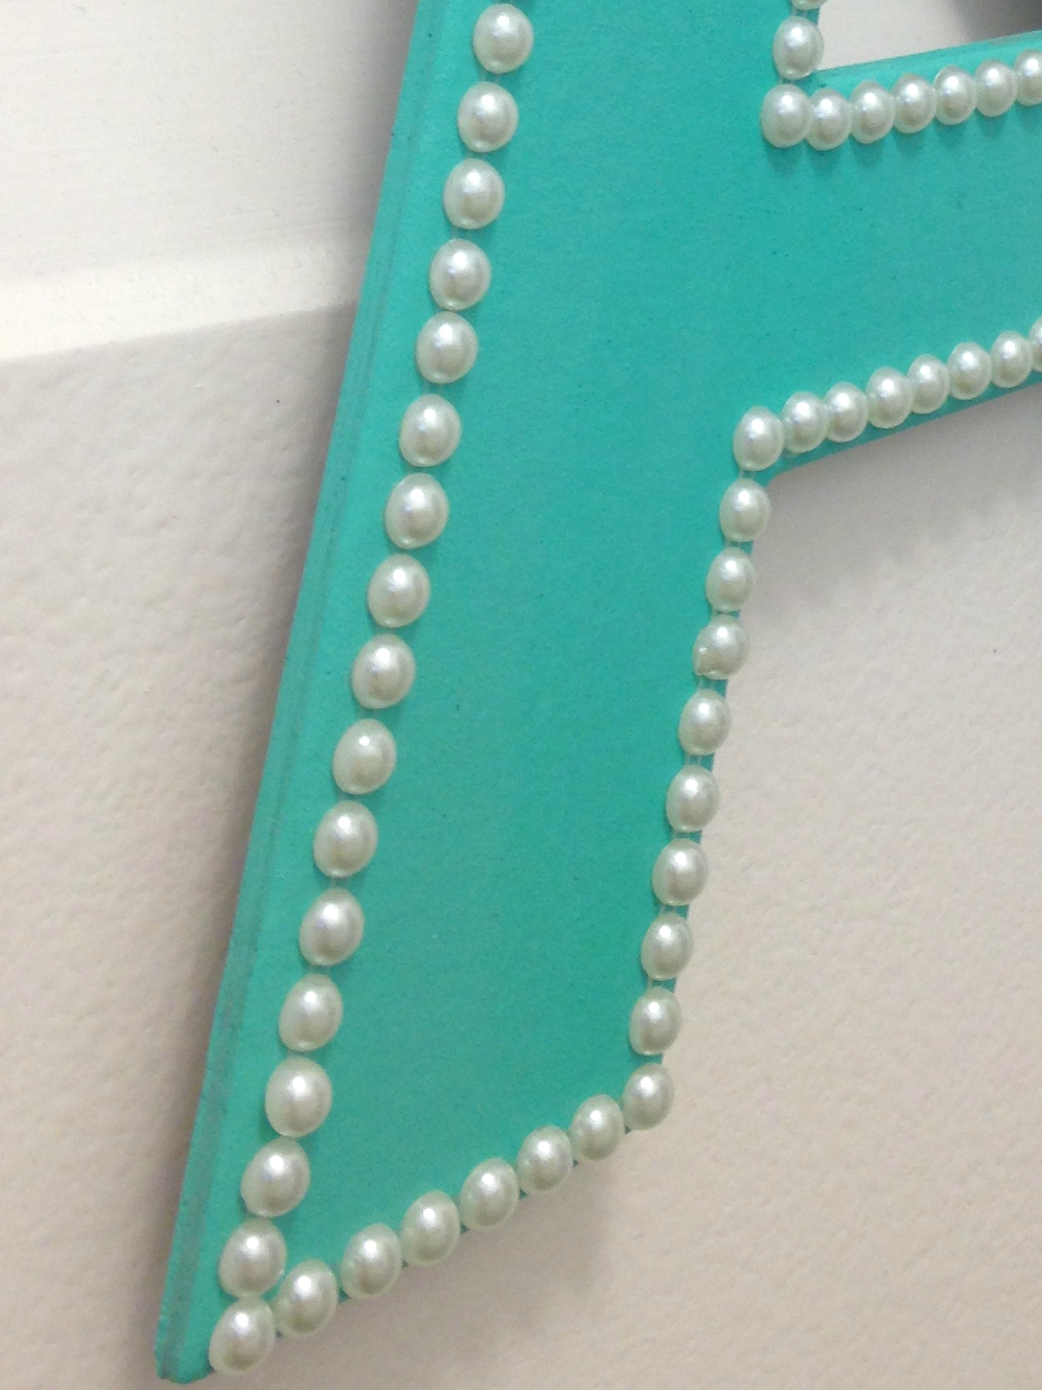
Step 2: Once completely dry, outline the letter in pearls. Following the shape of the letter, lay the pearls down just inside the edge. My ‘pearls’ came in sticker form, with 14 in a row on a clear sticker backing. I trimmed the stickers to fit with scissors (cutting the sticky plastic backing not the pearls themselves), especially on the corners, trying to get as uniform a look as possible.
Step 3: Cut a length of ribbon. I cut a length of about 36 inches. Fold in half at the centre point and glue to the back of the letter top and centre (so it will hang straight). I used my glue gun for this and it was quick and easy.
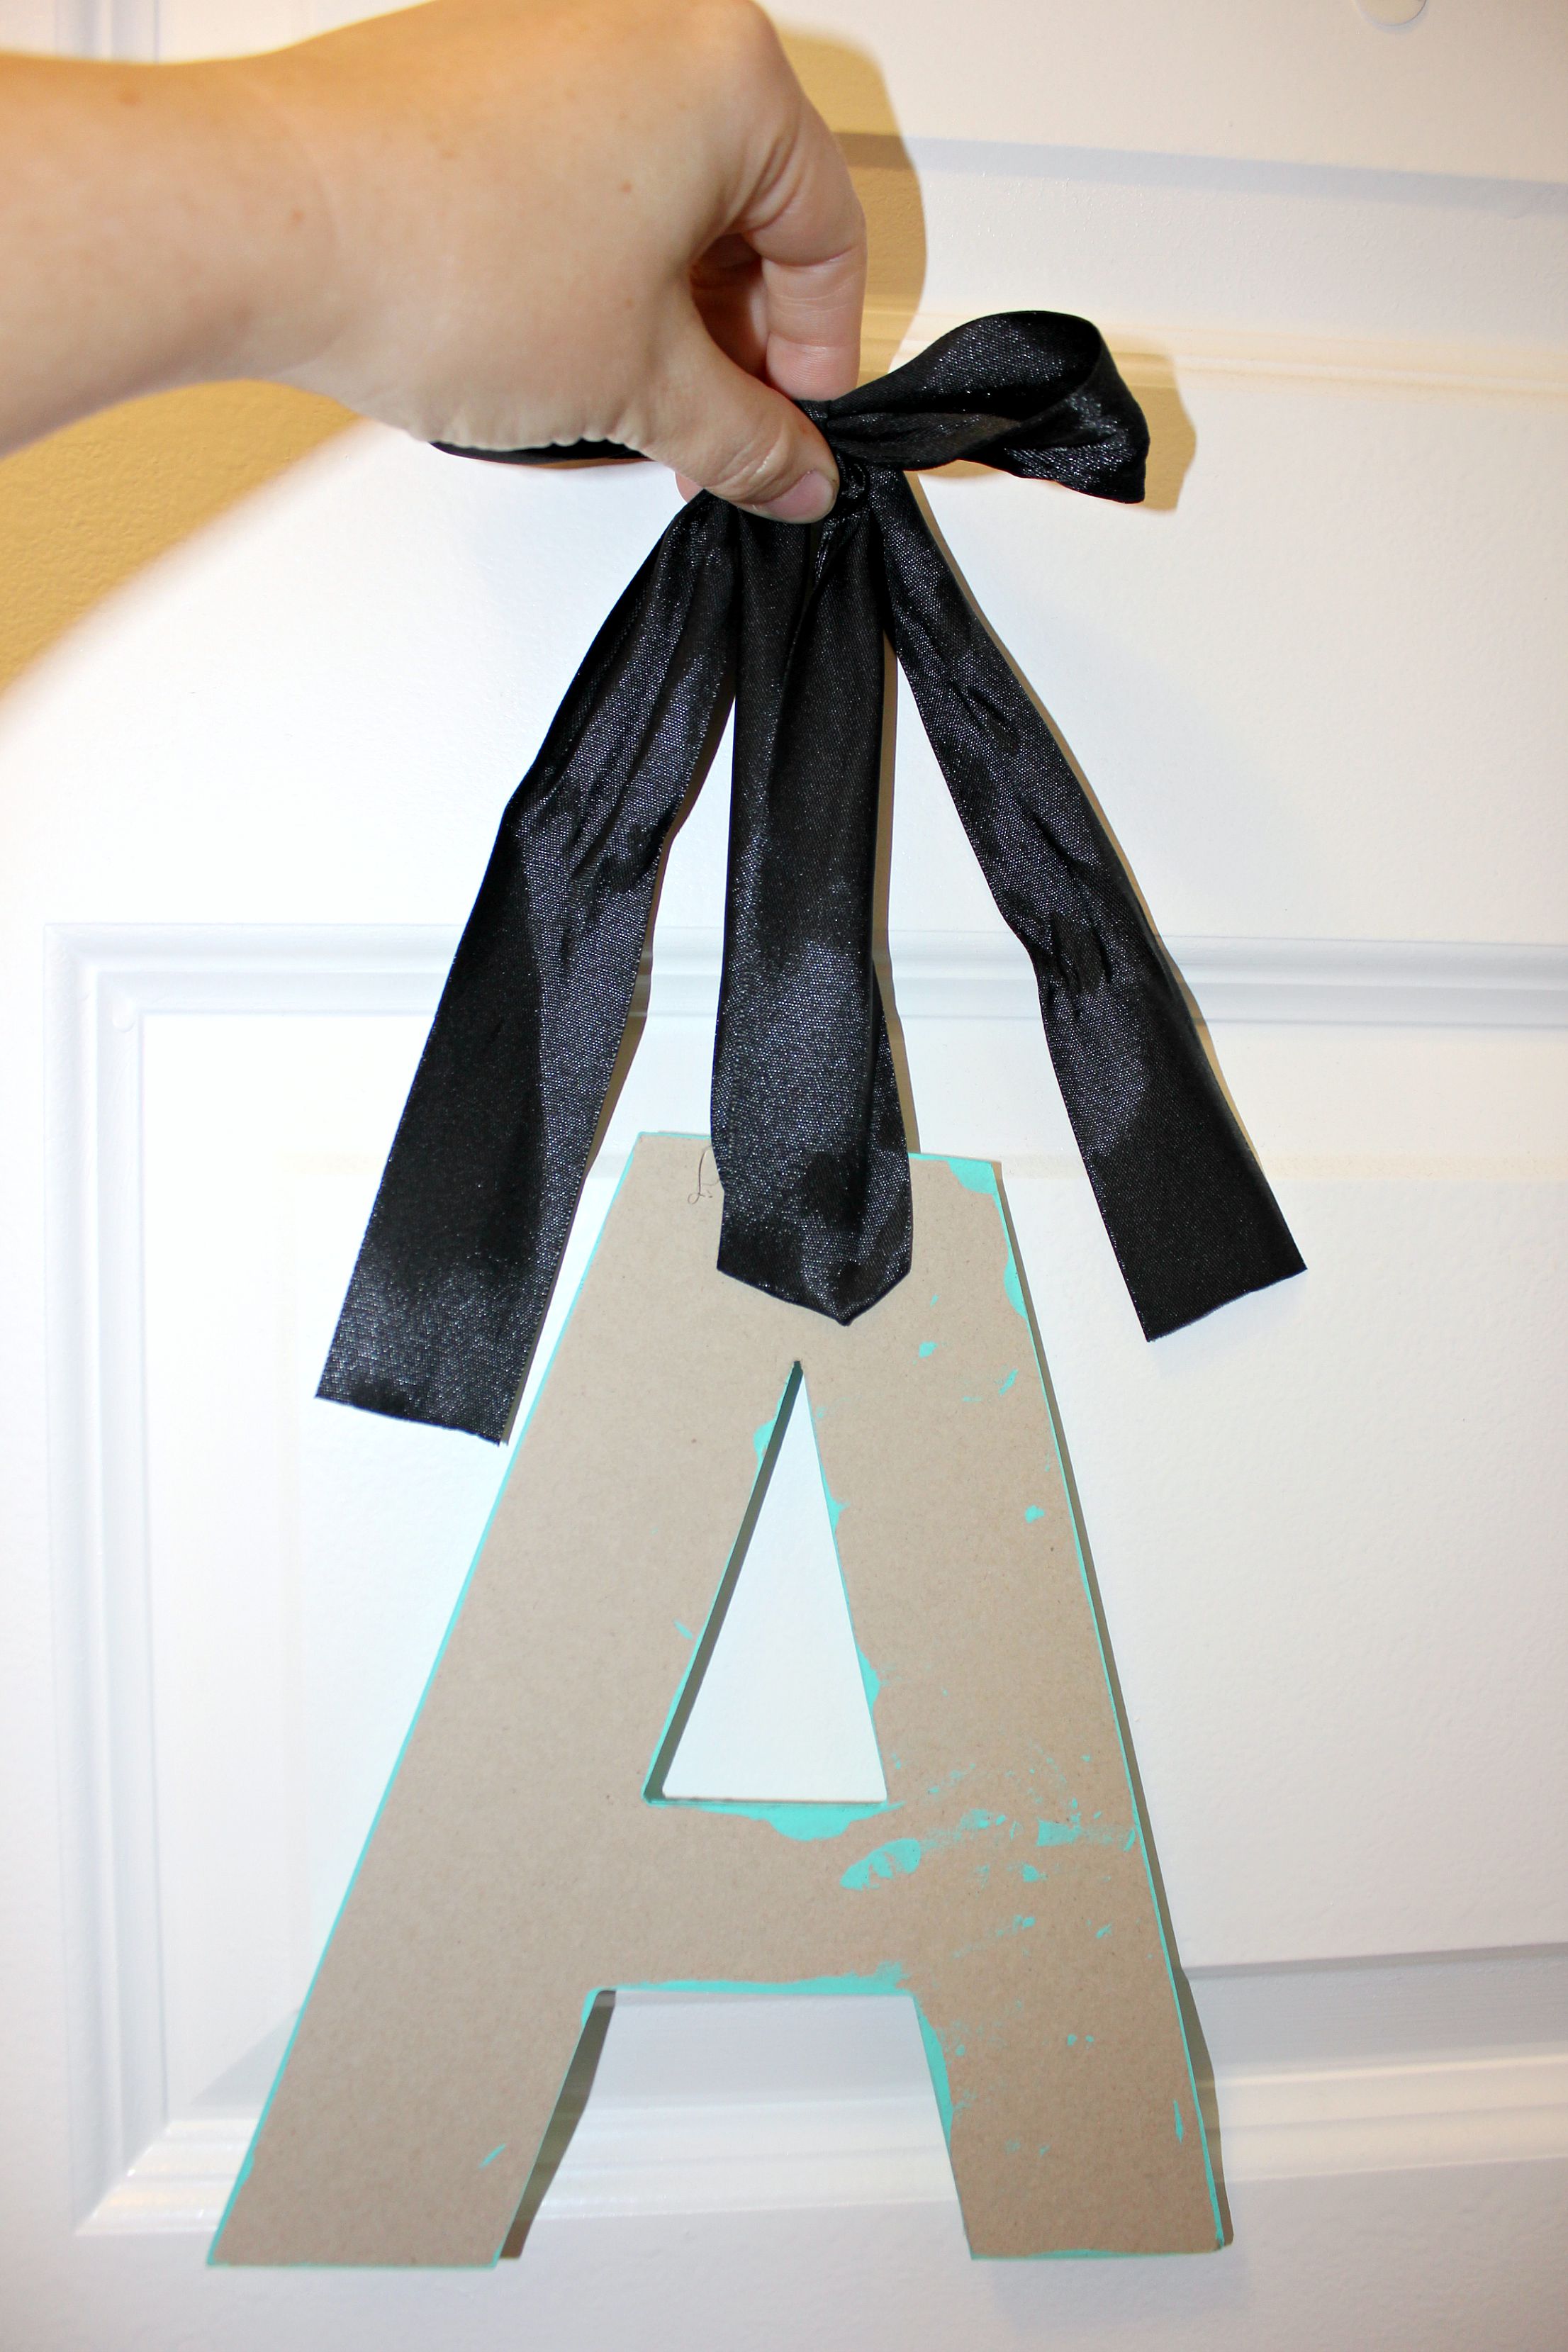
Step 4: Leaving the desired length of ribbon, tie into bow at the top. Trim the edges of the ribbon so they hang evenly and are not frayed.
Step 5: Attach the hook to the door (following the directions that come with the command hooks, if using) and hang up the letter by the bow.
Step 6: Step back and admire your handy work and allow your child to gasp in glee!
This post may contain affiliate links. See our disclosure policy for more information.
The post DIY Wooden Letter Monogram appeared first on Creative Sides.
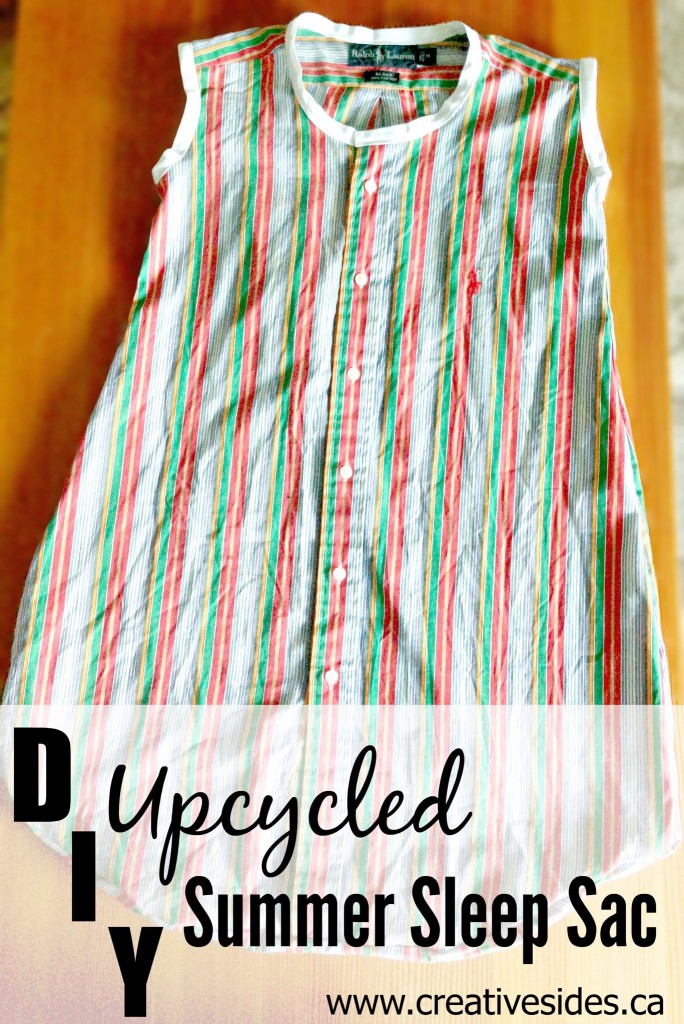
]]>The post DIY Upcycled Summer Sleep Sac appeared first on Creative Sides.
]]>- Wiggly babies still need a comfortable cocoon in the summer.
- Up-cycling is so great because a lot of the fiddly bits are done for you.
- They are so cute!
What you need:
- One man’s dress shirt. I hit the local thrift store.
- Bias Tape. You want the one that folds over more than twice
- Sewing machine. This is a great beginner one.
- Matching thread
- Pins
- Iron
- Scissors or rotary cutter and pad
How to make this :
Step 1: Wash and smooth out the shirt
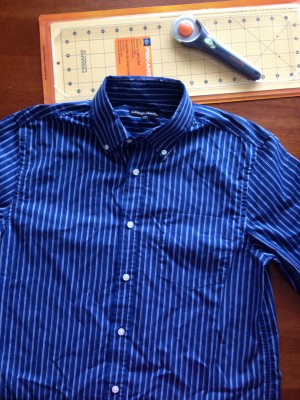
Step 2: Carefully remove/ cut off the collar and any collar buttons.
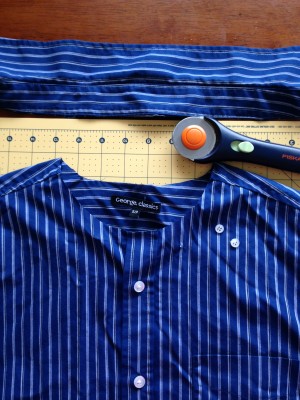
Step 3: Shape the neck by removing an arc of fabric. If you have another sleep sac that you like, use this as a template for this step and the side shaping.
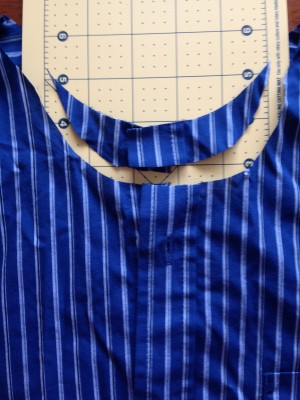
Step 4: Cut off the sleeves and extend your line down to remove the armpit. This is where you can free hand it or use another sleep sac for a template. (Do both sides)
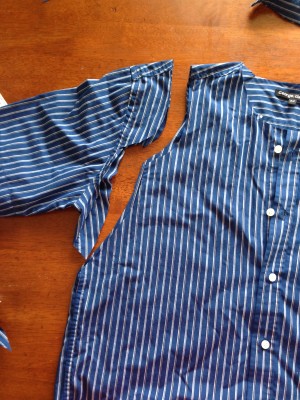
Step 5: Turn your shirt inside out, line up the side seams you just created and pin them.
Step 6: Sew a straight stitch seam on each side, remembering to secure the beginning and end.
Step 7: While you have the shirt inside out, line up, pin and sew the bottom edge to close up the bag.
Ok, easy part done. Shake out and breathe for a second.
Step 8: Now start with one armpit and pin the edge of the bias tape all the way around.
Step 9: Sew this in place.
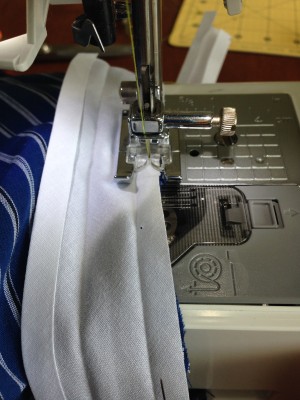
Step 10: Turn the whole shirt right side out. Now fold over the bias tape enveloping the raw edge of the sleeve.
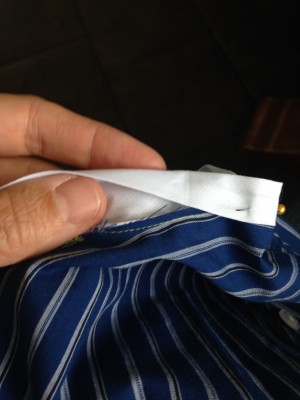
Step 11: Pin and sew in place remembering that you are on the right side of the garment and it will show. I chose to use a decorative stich on this one but usually I use a straight stitch. You can match your thread to the bias tape or choose a colour that compliments the finished piece.
Step 12: Breathe.
Step 13: Repeat on other sleeve.
Step 14: Breathe.
Step 15: Repeat on neck. Make sure you don’t accidentally close the neck up. You need to be able to unbutton the shirt to get it on the baby.
Et Voila, all ready for a summer nap!
This post may contain affiliate links. See our disclosure policy for more information.
The post DIY Upcycled Summer Sleep Sac appeared first on Creative Sides.
]]>The post How to Cover Letters with Fabric appeared first on Creative Sides.
]]>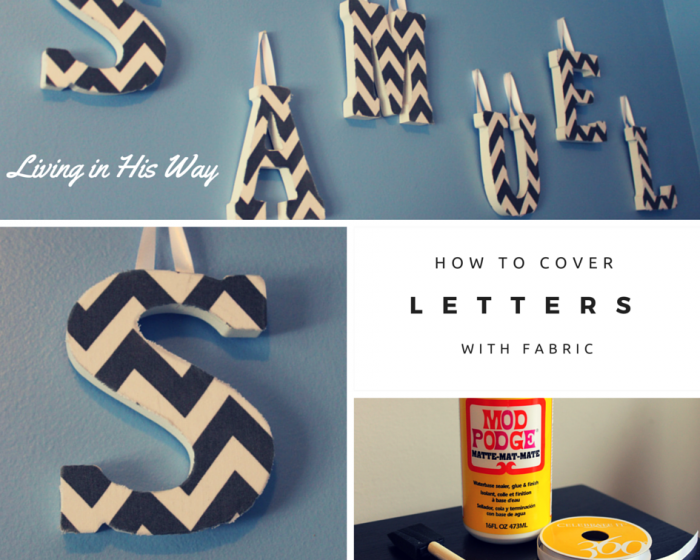
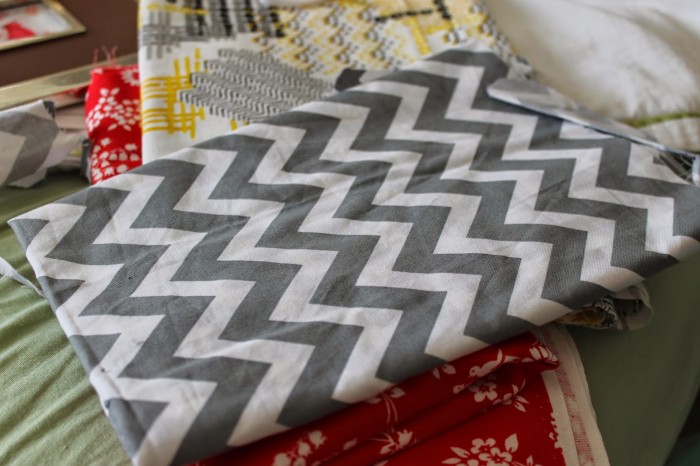
When I found grey chevron bedding for my son’s nursery and remembered I had grey chevron fabric, I knew a project was looming!
My older daughter has her name displayed in her room and I just left the letters plain white to match her furniture, but for Samuel’s room I decided to dress them up a bit to go with the rest of the decor.
I didn’t take photos as I was covering, but this really is a quick and easy craft.
How to Cover Letters with Fabric
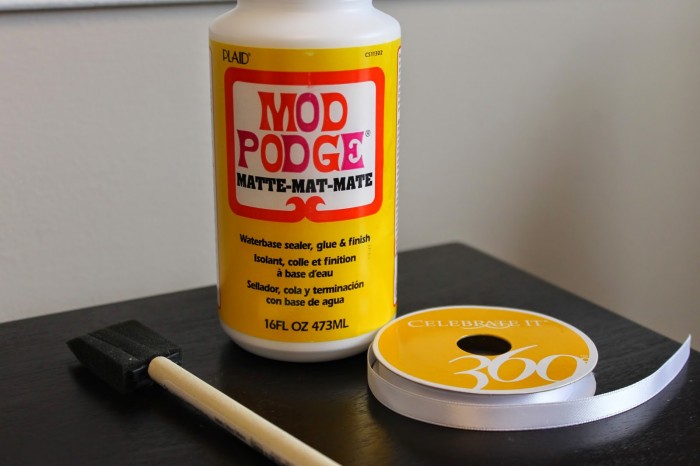
You will need:
-fabric
–wooden letters with a smooth surface
–mod podge
–a sponge brush
–ribbon
You don’t need much fabric for this, depending of course on how large your letters are and how many you’re looking to cover. I started with half of a yard and had plenty left over.
First, I traced my letters upside down onto the wrong side of my fabric. Next, I cut them out.
I covered the right side of the letters in mod podge, using the sponge brush and placed the fabric cut out on each letter, moving it to completely cover the white. Then I let it dry. Once it was dry, I added another layer of mod lodge to seal it.
The final step is to add the ribbon! This step is totally optional, but the letters I chose didn’t have a hole for hanging and I like the look of the ribbon as well.

I used mod podge to attach the ribbon too. I applied it to the top, stuck on the ribbon, and sealed it once it was dry. It worked like a charm and allows each letter to lay flat against the wall.
I measured the pieces of ribbon first to make sure they were all the same length. For letters that require two pieces of ribbon, this is especially important! Make sure they are attached the same way as well, or your letter won’t hang straight.
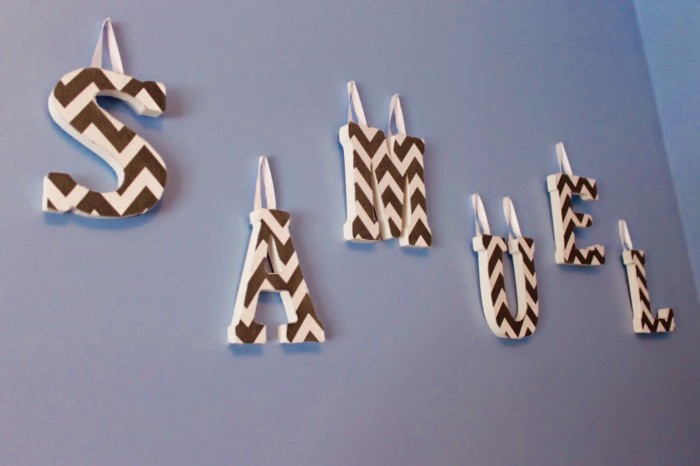
I love the final result and think it really adds to the nursery. There are so many possibilities here and letters can be decorated to match pretty much any decor!
This post originally appeared on livinginhisway.ca
This post may contain affiliate links. See our disclosure policy for more information.
The post How to Cover Letters with Fabric appeared first on Creative Sides.
]]>